| Print this page - use Landscape |
Search the WeetHet Pages |
||||||||||||||||||||||||||||||||||||||||||||||||||||||||||||||||||||||||||||||||||||||||||
| WeetHet is being updated! - Current articles will slowly move to www.tweaking4all.com For excellent webhosting that is reliable and affordable, we highly recommend: LiquidWeb |
|||||||||||||||||||||||||||||||||||||||||||||||||||||||||||||||||||||||||||||||||||||||||||
|
On this page ...
Warning: This hack has been successfully tested on firmware's GSV7AA3.261 and 235 of the ISDN and PSTN/Analog Alcatel SpeedTouch Home. If you can confirm a succesfull hack with other firmware, then please let me know by mailing me. See the "How to upgrade firmware" page for details. NEW: Available for download now, the firmware Gsv7aa3.281 (ISDN) which I tested with ISDN and it's working. Others have tested the firmware with POTS, and confirmed it to work! POTS/Analog version Gv8baa3.281 (POTS). Warning: Updating firmware is NOT without riscs and can render you modem useless! READ THIS CAREFULLY Tip: With newer firmware (for example
GV8BAA3.270 - and 281) releases this hack appears to work
aswell. At the "User" prompt you should use the username
"guest". After login type "td". You
now get the [td]-prompt - Type "prompt"'. You
will now get to the expert-mode (sometimes shown as Trace &
Debug mode) as seen with the older firmwares, so the MAC address
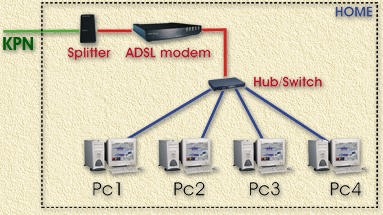
of your adsl-modem will become visible. Note: If you would like to know more about the Alcatel Shell, for example for mapping ports, you will need the command line interface manual, which you can download here. So why the hack? Well, with the standard modem (Alactel SpeedTouch Home) using KPN's MXStream, the user needs to login using a dialup-connection from the PC he or she is working from. Once a connection like that is setup, a second user (connected using a hub or something like that) would be unable to connect at all. Bummer ... Next problem is that the computer you are using should be able to setup a PPTP dialup connection. This is not only difficult to implement for the no-Windows machines, but also an additional load in general. So I figured a few solutions, which can be found here (one of them being sharing the connection using WinRoute or using a router). I found the router solution to be working just great, but had to try this hack anyway ... The hack makes your modem a Pro version. The Alcatel Pro has additional features like acting as a router, DHCP server and it can actually do the dialing work for you. Basically it does everything what WinRoute and the Vigor router do as well. This means that your setup, after the hack, can be limited to a modem, a simple hub and your PC(s) as shown below:
All PC's are automatically connected to the Internet
- no additional action required! Be prepared ... Before start this hack, we must make sure that we have everything setup properly.
Step 1: Get connected Direct Connect Make sure the PC is CLEAN! PC IP Settings
Try making contact
Step 2: Get the Expert-password In order to apply the hack, you will need the "Expert" password. Unfortunately I do not know how to "calculate" this password, but at the SDSC website you will find a tool that will do this for you. Update: The Expert password can now also be calculated with the WeetHet Alcatel Expert password calculator. Before you go there, start a TELNET session (if you want, you can use PUTTY - a tiny but easier to use program); 1. open a DOS box
(The yellow text is the text you entered) 4. Now we enter the Expert mode by entering the command "EXPERT", your modem will respond similar as shown below:
(The yellow text is the text you entered, remember the red text!) 5. Copy the line (without the quotes) saying 'SpeedTouch
(00-90-D0-00-00-00)' (the red text in the example above) and open this
webpage at SDSC:
Calculate
expert password script. 6. The SDSC script will now return with a new page stating the proper password (a 10 digit number). In this example:
Remember the 10 digit number, here "1552815226" (I wrote it on my modem). Unfortunally the calculator at the SDSC site is no longer available. Alternative 1: The Expert password can now also be calculated with the WeetHet Alcatel Expert password calculator. Alternative 2: You can use this standalone DOS password generator by "The Master of Disaster". You will need to open a DOS box and go to the directory where this program sits. Now enter in dos (yellow text): CRACK "SpeedTouch (00-90-D0-00-00-00)" (where 00-90-D0-00-00-00 whould be replaced with the numbers you modem produced!)
The red marked text is the required password. If all went fine, then you can start applying the hack - read the disclaimer FIRST! Step 3: The real hack - Changing things a byte This is actually the easiest part, but requires you
to be more precise and most of all careful! 7. Enter the 10-digit number you just wrote down and press enter. If you did everything by the book, you should now get a confirmation of the Alcatel modem that you are indeed in expert mode.
(The yellow text is the text you entered) 8. Enter the "rip" mode by typing "rip" (without the quotes);
(The yellow text is the text you entered) 9. Enter the "drv_read 2 1 b" (without the quotes and don't forget the spaces);
(The yellow text is the text you entered) 10. Now remember this number which was just returned by the drv_read command. Change the last digit to a "6" (without the quotes). This is the actual hack: enter "drv_write 2 1 b XXXX", without the quotes, where XXXX is the number relevant for your modem. NOTE: NOTE:
(The yellow text is the text you entered) 11. Finally we enter "exit" to exit rip-mode.
(The yellow text is the text you entered) 12. Enter "system" to enter system-mode, and finally enter "reboot" to have the modem reboot.
(The yellow text is the text you entered)
Step 4: Reset modem to defaults Once your modem restarted, it already has the Pro-options enabled. We just want to bring it just a bit further ... we will now full reset the modem to it's (SpeedTouch Pro) defaults, just to make sure that we don't forget anything ... This is done pretty straight forward. For convenience: shutdown your computer first.
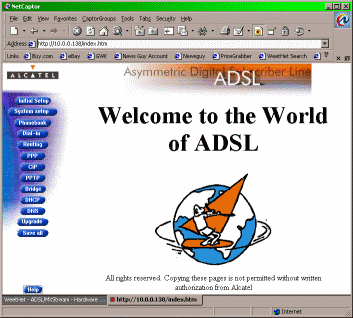
You can release the ball-point once the LED's "Line Sync" and "PWR/Alarm" are green (takes about 45 seconds). You have then completed the full-reset. Your modem will now have it's default settings. IP address will be 10.0.0.138 and the subnetmask will be 255.255.255.0. Note: Do NOT activate the ADSL dialin connection you usually would use! This is NOT needed and WILL INTERFERE with the next steps if you do use it. Note: expert mode is still active. Now you can reboot your PC again. Step 5: Configure your modem for auto dial-in The now following setup instructions are for the current (Dutch) KPN MXStream valid only. If you do now use a MXStream account in the Netherlands, then you might need slightly different settings! Bert apparently have tested this hack with the KPN's MXStream ADSL service using XS4ALL as provideraccount, but it also is known to work with Planet. I tested this hack (thanks to FFB who stood next to me sweating like hell ... just like I did) with a HCC-net account. Ludo informed me that this hack works for the Belgian SkyNet as well. Connect to the modem webinterface by using the Internet Explorer or any other browser. Enter the address "http://10.0.0.138". It is very well possible that you cannot connect. Please consider resetting your PC or using a different PC. Somehow the network settings can be mixed up. Note: Make sure you are no longer connected to the Internet! Tip: Make sure there is NO dialup adapter installed on your PC! Otherwise IE will use it to connect to the modem and block the settings. Click the blue "PPTP" menu button on
the left of the now opened window. Now click the blue "Phone Book" button and once more remove all entries. Tip by Tristan: If you are unable to delete all entries: goto BRIDGE and remove all entries there. This appears to be an issue with Belgian providers. Click the blue "Apply" button in the left-top corner and click the blue "Save All" button on the lower left. In the "Phone Book" screen, you must now add a new entry. Enter these setting for KPN:
According to Ludo these are the phonebook settings for the Belgian SkyNet, Bart did confirm that this is the case with the Belgian EasyNet as well:
Click the blue "Apply" button in the left-top corner and click the blue "Save All" button on the lower left. Now click the blue "PPP"-button and add a new entry for the newly made 'MXS' with type 'vc-mux'. Click "configure" at the 'MXS' entry with the now following settings
Click the blue "Apply" button in the left-top corner and click the blue "Save All" button on the lower left. Now - still in the "PPP" window - you should now activate the connection by setting "Status" to "On", as shown below:
It can take a while before the modem actually connects
and changes to the "Up" "State". Step 6: DHCP settings (optional) DHCP helps you to easily configure network settings of the computers connected to your network. It automatically can set IP-address, DNS, default gateway etc. etc. It definitely can make live a lot easier, but it's optional. The settings for the client are done as described below, most of the time you do not need to do any efforts, since most OS-installations go for the DHCP settings anyway ... Click the blue "DHCP" button and check the option "DHCP server" and click the blue "Apply" button in the left-top corner and click the blue "Save All" button on the lower left. Now click then blue "DHCP" button once more, and then the "ADVANCED" button (upper right corner), and a new window will open.
In the table below these field's you will see a list
of connected computers by IP-address and MAC-Address If you would like to see the actively connected
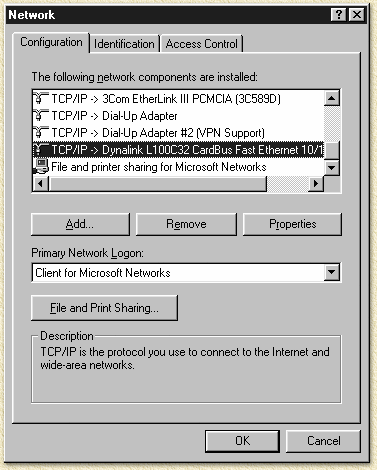
PC, then blue "DNS" button. It shows PC name and IP-Address. Step 7: Configuring Clients (optional) I'm assuming you're using Windows, click here for Windows 2000/XP or Windows 9x/ME. Linux and Macintosh have similar settings: set networking to use DHCP. Configuring the PC's is relative simple. Start the PC (Win9x/ME) and click with the right mouse button "Network Neighborhood" and choose "Properties".
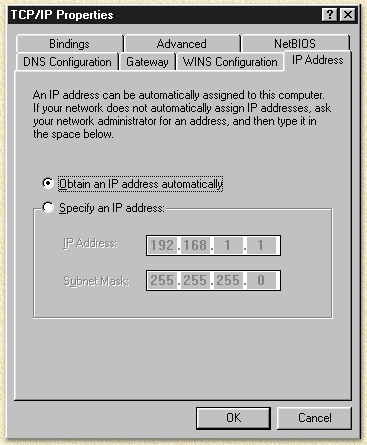
No select the "TCP/IP" protocol that goes with the network-card connected to the router and click"Properties".
Make sure "Obtain an IP address automatically" is checked. Click "OK" and click "OK" once more. The computer now would like to restart: do so. The configuration is done now. Settings can be checked by typing "winipcfg" in a DOS box or in the "Start"- "Run" box. Select "START" - "Settings"
- "Control Panel" and click "Network and Dial-up
Connections".
Choose "Internet Protocol (TCP/IP)" and click "Properties", copy these settings:
Click "OK" and click "OK" once more. The client is now configured. Windows 2000 does not require a reboot, it takes a few seconds before Windows gets a new IP-address (Use IPCONFIG in a DOS-box to verify).
|
|||||||||||||||||||||||||||||||||||||||||||||||||||||||||||||||||||||||||||||||||||||||||||


