|

| Print this page - use Landscape |
Search the WeetHet Pages |
||||||||||||||||||||||||||||||||||||||||||||||||||||||||||||||||||||||||||||||||
| WeetHet is being updated! - Current articles will slowly move to www.tweaking4all.com For excellent webhosting that is reliable and affordable, we highly recommend: LiquidWeb |
|||||||||||||||||||||||||||||||||||||||||||||||||||||||||||||||||||||||||||||||||
|
On this page ...
Overview The Yamakawa doesn't seem to like the Xing MP3 encoder. Other encoders, like Frauenhof (thus supporting the Radium codec aswell) and Blade are accepted without any problems. Older firmware versions however, do not seem to like so called variable bitrates. Step 1; What software should I use to encode MP3's ? Take a look at the MP3
Introduction page for information about compression and tools. Step 2; How do I store the MP3's on CD ? There are several setups supported by the Yamakawa player, each of them are explained on a seperate page;
The easiest and most sloppy method, but also the most compatible method. Copy all MP3-files to the root of the CD. This will then be accessable by most MP3 players. Downside is the enormous list of files. Ofcourse you can name all MP3's with a sensible name but there we migth bump into a limitation of the filesystem supported by the Yamakawa players (and maybe others too).
The basic filesystem for data CD's is ISO9660, unfortunally this is limited to an 8.3 filename structure (ABCDEFGH.123). This mode is refered to as LEVEL 0 ISO9660. Let's assume we have this list of songs, which in the 8.3 format these files will look like so:
This is what the Yamakawa will make out of this ... 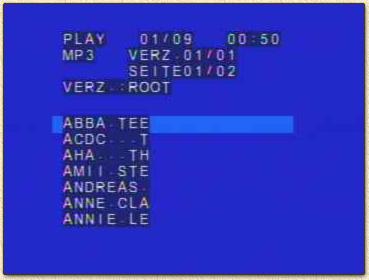
In the songlist you should use "SKIP-LEFT" and "SKIP-RIGHT" to walk through the song list. Confirm by pressing the "OK" button. There is also a so called "Romeo" mode, a.k.a. ISO 9660 level 1. This mode supports more characters in a filename, ie. 31 characters instead of the limited 8 and 3 characters as seen in mode 0. Unfortunally the Yamakawa player are capable of only showing the first 18 characters of the filename. When doing playback on the Yamakawa, you will notice that "more" tekst is visible now. Compare the Yamakawa screenump with the level 0 screendump above to notice the differences.
It's still not pretty, but better ... 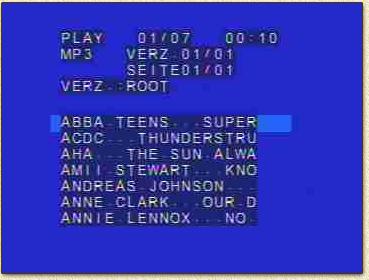
Not perfect yet, is it ?
So let's fix problem numer 1, the lack of organization on the disc. This is a rather simple approach: we sort the files
and store them in seperate directories.
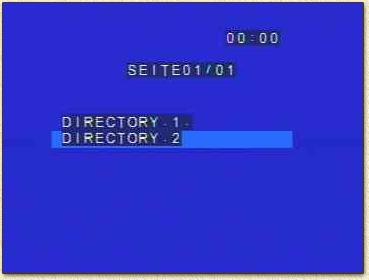
Yamakawa supports multiple directories so this should work just fine. So let's expermiment here, we copy these files to 2 seperate directories and call them "DIRECTORY_1" and "DIRECTORY_2" (just a random name). I copied Abba Teens, ACDC and Aha to "DIRECTORY_1", the other 4 songs are copied to "DIRECTORY_2". Once more, I used ISO9660, level 1 as CD filesystem. The CD automatically starts with the first file of the first directory, in our example the Abba Teens. You can use the "TITLE/DIGEST" button to select directory, use "SKIP-LEFT" and "SKIP-RIGHT" to select the directory. Press "OK" to confirm your selection;
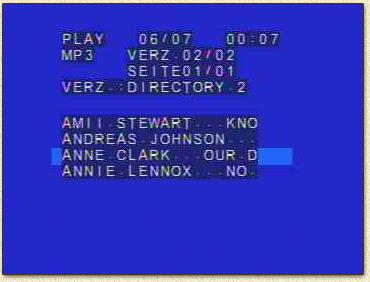
So now finding a song will be easier, specially when
you are using directory names that make sense, for example "ANNIE_LENOX"
indicating all songs of Annie Lenox. We are still not happy, we need more information visible here ... so now it's time to seek for the special features of the Yamakawa.
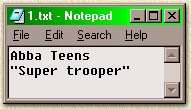
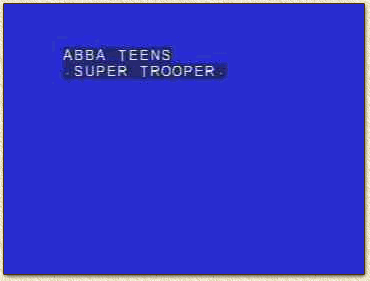
3. Using the advanced Yamakawa features - TEXTFILES The Yamakawa is one of the best machines I have seen so far. Specially now, since we are looking for additional features to make MP3 CD's more attractive and easier to use. Note: that this trick might not work with firmwares using the new Smart Navi. One of these great features is the support of so called "TEXTFILES". Textfiles are usually made using NOTEPAD of Windows or any other simple text editor. So how does it work ? Well, say we have 3 files (to keep things simple); Abba Teens - Super trooper.mp3 Now rename each file to a filename with no more than 4 characters, for example "ABCD.MP3" or "1234.MP3". You DO NOT NEED to RENAME the files, it's just easier on me for the purpose of an example. Create for EACH file a textfile with the same name except for the extension which should be "TXT". In the sample above these files would be "ABCD.TXT" and "1234.TXT". In the text file you write a title for the song. So let's go to a real life example to clarify it a bit more:
Just a sample of the content of one of those textfiles, "1.TXT":
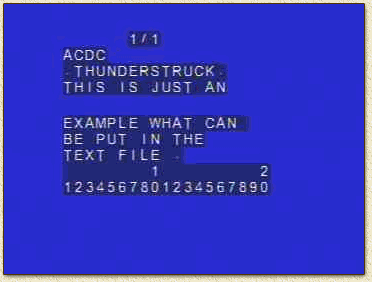
As you can see, multiple lines are allowed. Even multiple pages. Basically this feature is intended for the Karaoke part of some Yamakawa models. The page your are viewing is called "MP3 Lyrics" refering to that feature. The "MP3 Lyrics" page can be reached by stopping playback (press "STOP") and switch display mode by pressing "DISPLAY" until the "MP3 Lyrics" page appears. You will also see a page called "MP3 BMP", this feature will be explained in the bitmap section.
As sample 2 shows, there can be a lot of text in a file,... even multiple pages are supported. Notice the "1/1" in the upper part of the screen, indicating page 1 of 1 pages. Scrolling through multiple pages is done using the "SUB-TITLE" button. Stil not exactly what I was looking for though. The text only appears for each individual song,....
4. Using the advanced Yamakawa features - BITMAPS We are getting even deeper into the additional features of the Yamakawa. Not only are textfiles supported, but also bitmaps! This should not be a suprise for those that visited the TEXTFILE page since you have seen the display mode "MP3 BMP"... Note: this trick might not work with firmwares that use Smart Navi. Bitmaps can be basically anything from handdraw pictures
to photogrpahs or cover scans (!). Two additional programs are needed for conversion to a proper fileformat:
Both file are zipped into one zip-file which you can download here. Download the file and unzip it using something like WinZip. So how does it work ? The approach matches the textfile technique. Well, say we have 3 files (to keep things simple again); Abba Teens - Super trooper.mp3 Now rename each file to a filename with no more than 4 characters, for example ABCD.MP3 or 1234.MP3. Once more: you DO NOT NEED TO RENAME the files, I only use short filenames for the purpose of an example. Create for EACH file a bitmap file with the same name except for the extension which should be "BMP". In the sample above these files would be "ABCD.BMP" and "1234.BMP".
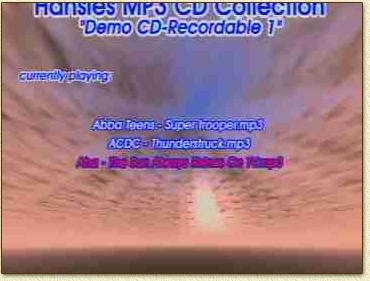
Just a sample of the content of one of those bitmapfiles, "1.BMP" (strongly reduced in size though):
As you can see, it's a matter of creativity what you do with images. Basically they work the same as the text files. I added a little trick by using the same image for all song. For each song bitmap I did highlite the song name. The page your are going to view is called "MP3 BMP". The "MP3 BMP" page can be reached by
stopping playback (press "STOP") and switch display mode
by pressing "DISPLAY" until the "MP3 BMP"
page appears. Before we can use a bitmap file we must use the tools mentioned before. For this purpose need to go to a MS-DOS-box (refered to in Windows as "MS-Dos prompt"). Now go to the directory where the bitmaps are located. Copy the "MKLOGO.EXE" and "CBIN.EXE" to that same directory. At the DOS prompt type (for converting "1.BMP"): MKLOGO 1.BMP I will show you an example how this could look like in the DOS box:
This commandline action generated a file called "e2logo.c" which must be converted to a BIN file. We will use the "C2BIN.EXE" file for that. Note: for you programmers out there, the "e2logo.c" file is actually a C-source-code file for storing a binary. Once more in DOS, type: C2BIN E2LOGO.C 1.BIN
The final result "1.BIN" is actually an MPEG2 picture. It is about 60 Kbytes in size. Repeat these steps for converting the other bitmap files to a BIN-formatted file. Now you can put all the files on a CD, either in the root or in subdirectories (be creative!). It can even be combined with the textfile solution. The way I created my images, each songtitle gets highlited when playing the song.
This is more like it,... you can for example, use a seperate image for each directory with a cover of the CD on it, or a pciture of the artist. Finally you use all the long names etc. you want to use.
The issues addressed in the last few pages
can (and should be) combined to get a really cool MP3 CD.
Additional tools help us to create these easily, check out the Additional tools section. Here we also find tools that simulate the Yamakawa for playback on your PC. The features mentioned on the previous pages are very work intensive when you're making CD's with up to 180 MP3's... here I present you some tools that make life a little bit easier.
|
|||||||||||||||||||||||||||||||||||||||||||||||||||||||||||||||||||||||||||||||||