|

| Print this page - use Landscape |
Search the WeetHet Pages |
|||||||||||||||||||||||||||||||||||||
| WeetHet is being updated! - Current articles will slowly move to www.tweaking4all.com For excellent webhosting that is reliable and affordable, we highly recommend: LiquidWeb |
||||||||||||||||||||||||||||||||||||||
|
On this page ...
Overview Note: a CD can be made or copied in an
image file format. Nero has it's onw format "NRG" (see
the menu "File" - "Burn Image"). Other
formats are also supported:
Starting - Wizard or no Wizard ? I will walk through Nero using version 5 dialogs in order to create a data CD. While reading this you can already try it, simply click the Nero Burnin Rom icon. You can find the icon, if you installed Nero, on your desktop and/or programs-menu. This might appear, if not then take a look at the next picture. If you would like to use the wizard and you didn't get the dialog below, then click "Wizard" to return to the wizard-mode:
You can decide to use the wizard from now on (the easiest way), or close the wizard by clicking "Close Wizard". If you decide to continue with the wizard, then click "Compile a new CD" and click "Next". You will have no need for the following page(s). If you don't want to use the wizard, then keep reading.
What type of CDROM - Without the Wizard
In the left icon-bar, you can choose what type of CDRom
you would like to create. Since we are about to make a regular DATA CD,
we select CD-ROM (ISO). Other options are We choose "CD-ROM (ISO)". CD-ROM (ISO) - Multi-session ?
This dialog now appears:
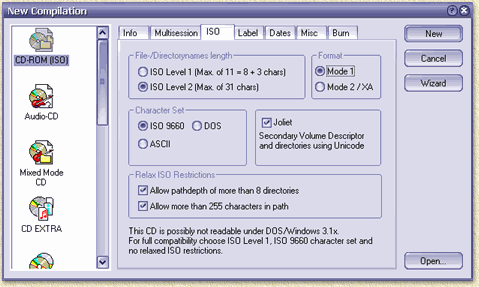
Here we can choose of we would like to make or continue a multisession CDRom or not. What is Multisession ? This is a feature in which you can add files to this CDRom later on (so after you bruned this one, you still can add files). If you would like to continue Multisession, then choose "Continue Multisession disk". If you want to start one choose "Start Multisession disk", otherwise choose "No Mulitsession". If you want to continue a multisession CD, several options are available: remove all previous files (remove all checkmarks), add new files ("Add new files to compilation") and/or update of previous files ("replace files in compilation" and "Remove deleted files from compilation"). I usually use "No Multisession" since this can be handled by all (even ancient) CD-players. File options - type filesystem The next tabsheet "ISO" (in older Nero versions this tab is called "File Options") looks like this:
First we choose "File-/Directorynames length". There are 2 options ISO level 1 and 2. To remain compatible with DOS
I always choose Level 1 - more about filenames later on. To remain compatible I always choose Mode 1 here. "Character Set" offers of the choice between characterset ISO 9660 (recommended), DOS or standard ASCII. Next to the field "Character Set" we see an additional option called "Joliet". This option generates a secundairy filesystem. This means that on your CD, 2 directory-trees can be found. One standard "ISO9660" directory, with the short 8.3 names, and a second one in the so called "Joliet" format. Joliet is something Microsoft thought of when they introduced Windows 95 for the purpose of using long filenames. We check this option !. Systems that cannot read Joliet will only see the ISO9660 directory, thus being the most compatible mode. To remain compatible, I always choose "ISO 9660" and check "Joliet". Next option is the so called "Relax ISO restrictions". Both options are checked, leave it that way. ISO9660 is rather limited in it's path lenght (255 characters maximum) and directory depth (8).
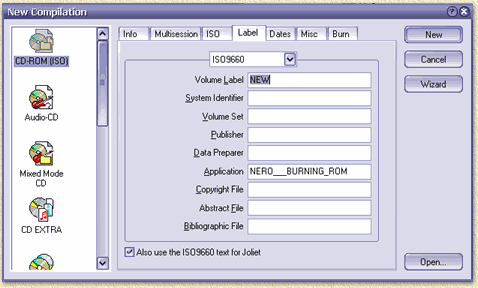
The next tabsheet "Label" (older Nero versions call this tab "Volume Descriptor") offers you space to enter some info about the CD.
Unfortunally I have not seen ANYONE using this information yet except for the volumen label. Volume label, or: what name should the CD have
? When entering a label here, you will notice that you cannot enter spaces
or lowcaps characters, this is thanks to ISO9660.
If we select "Joliet", the field "Volume Label" can now have an alternative name.
The tabsheet "Dates" offers us some slack in fiddling with time and datestamps of files and directories. I usually do not change dates here since the dates are a good indication which version/how old a file is.
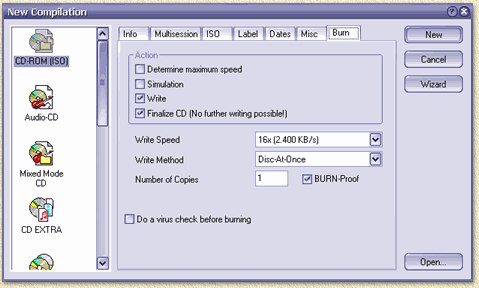
The tabsheet "Burn" will not be used yet, click "New" to start your compilation. After clicking "New" this dialog appears:
Some important indicators before we proceed, first of all we see a progressbar in the lowerpart of the Nero window.
This bar indicates how much space is used so far expressed
in MB (MegaBytes).
By default these lines are set pretty good, only change them if you find it really necessary. The positions can be changed using "File" - "Preferences". In the upcoming dialog, in the tab "General" the values can be adapted. Here the tabsheet "Expert Features" offers you "overburn" settings as well. On a 74 min. CD, I usually do not exceed 76 minutes and 20 seconds. Below the progressbar you will also see what the "active" CD-recorder is, in my situation, a "Plextor PX-W1610A".
The actual "placing of files" is done using "drag and drop". Files and directories from the "File Browser" window can be dragged and dropped to the "ISO1" window. Files and directories (including the content of the directories) are placed on the CD. As an alternative, you can use Windows Explorer as well, just drag and drop the files from the Windows Explorer to the "ISO1" window. None of the original files will be moved or harmed in any way. Changing names ... As you soon will notice, the drag and drop principle is an excellent technique to create chaos. Renaming files or directories might be something you would want (the original will not be changed). Select the file or directory in the "ISO1"
window which you would like to rename (one at a time!) using the left
mouse button. Alternatively you can select the file or directory name using the right mouse button. Select "rename" from the popup menu. Tip: you can also change the CD-label using F2 or using the right mouse button. New directories You can also create new directories in the "ISO1"
window. Now you have compiled a complete CD and are ready to start the big "Burn", please before you start pay attention to these pointers first:
OK, now whe have read that, we can start writing, click
the "flame" icon (
Tip: Use the button "Medium Info" (older Nero versions call this button "CD Info") to see information of the CDR or CDRW.
Click "Write" to start the burning process and don't touch your computer for a while now. Average waiting times for a full 74 minute CD (ie. 700 Mb) depends on the writing speed of your CD-writer:
|
||||||||||||||||||||||||||||||||||||||