|

| Print this page - use Landscape |
Search the WeetHet Pages |
|||
| WeetHet is being updated! - Current articles will slowly move to www.tweaking4all.com For excellent webhosting that is reliable and affordable, we highly recommend: LiquidWeb |
||||
|
On this page ...
Rip the VOB's to your Harddisk Before we start the proces of converting, we first rip all VOB-files to the harddisk. The entire process is described on the SmartRipper page. Once the copying process is complete, we can nog
go to the next step; the conversion process of video. Start the conversion of video Before you start: Make sure the DVDRom drive's
region matches the required regioncode for the DVDRom and make sure the
DivX codec is installed. Use some
tool like ZoneSelector (4.1 support win2000!) to set the proper region. If the VOB file produces a distorded image, then please see the SmartRipper page to fix this problem (use another "key' option, for example "new key per cell")! 2. Start FlasKMPEG version 0.593 or better (download version 0.593 here).
3. Open the files with FlaskMPEG. Select "File", "Open DVD" if you copied ALL files from the DVD or "Open File" if you copied the VOB files only.
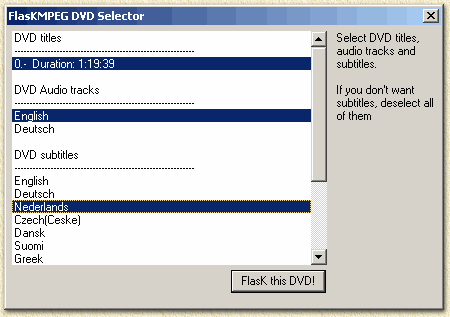
In the file dialog, open the directory where SmartRipper copied the DVD files. Select the IFO if you copied all files or the first VOB in case you only copied the VOB-files. Usually "VTS_01_0.IFO" when copied all files, or "VTS_01_1.VOB" (the first VOB 1Gb/1024Mb large VOB file) when you copied VOBs only. Now click "Open". 4. Select Video, Audio and subtitle track. Now FlasKMPEG opens a dialog so you can select the disered
MPEG stream, Audio stream and subtitles. You can click on the subtitle
you want or click again on the selected subtitle to disable it...
When done select "FlasK this DVD!" - FlasKMPEG will now briefly analyze the IFO file. 5. Setting the output file format. Select the menu "Options" and make sure that
"AVI" is checked at the "Select Output Format" menu.
Select the menu "Options" again and select "Global Project Options (Export Movie Settings)".
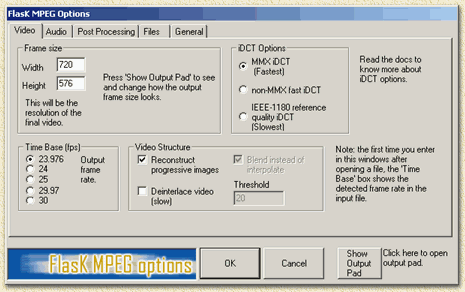
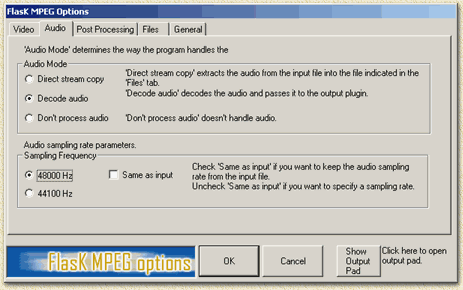
Note: now write down the "Time Base (fps)" value - you will need it if you want to use subtitles later on. Now we have to do some settings here which can be pretty tricky. This is the way I do it, but you can always try to figure out what works best for your purposes. If the current tab is not "Video" then select it now. Click "Show Output Pad". If the image looks garbled: please rip the DVD once more with SmartRipper - something went wrong here! Click "Reset settings". (The preview will now appear in it's normal size) Play a bit with the crop option if you want to, when done click "Hide". Note you can drag the window a bit up so you'll see the full image. I usually remove the black bars on the top and bottom of a movie. Tip: On the "DivX rip intro" page, you can find more info on the commonly used screen resolutions for DivX. Select the tab "Audio". I usually uncheck the "Same as input" option at the "Sampling Frequency" section and then check the 48000Hz option (which is the usual frequency used for AC3). Also make sure the "decode Audio" option is selected in the "Audio Mode" section. Next check the "Same as input" if you like.
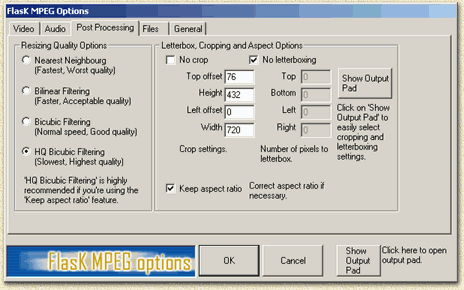
At the "Post Processing" tab you don't need to change anything. The crop settings are done at the "Video" tab, so don't change it. You might want to check if "HQ Bicubis Filtering"and "Keep aspect ratio" are checked since this renders best quality.
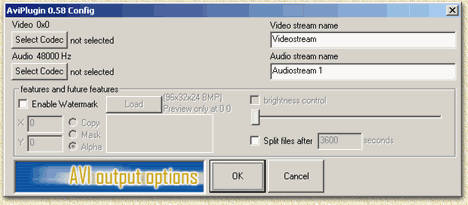
Select the "Files" tab to set the location of the ripped result. Here you can enter a different location if you don't want to use the default location (C:\VideoOut.AVI). At the "General"-tab you don't need to change anything unless you want your computer to auto-shutdown when done. Select "OK". Select the menu "Options" - "Output Format Options".
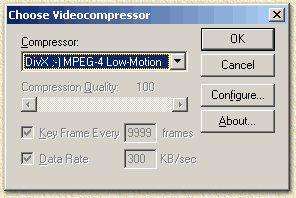
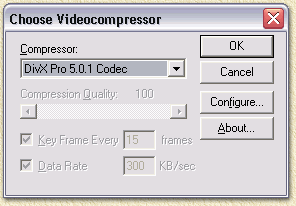
Here we can select the codec we wish to use. At "Video" click "Select Codec". Note: You can select any codec you want, just make sure the codec is VIDEO-ONLY (DVMPEG for example requires this). For best results choose a DivX MPEG4 codec.
There are a lot of possible settings here. I always try the LOW-MOTION codec first which is only available with the original ;-) DivX codec. The new DivX.com codec does not have this option. The "Configure..." button unleashes the additional compression settings window. Leave "Keyframe every 10 seconds" the
way it is. Don't change "Smoothness" either (usually
set to 100 - crispness). Select "OK" to return to the codec
mainwindow. At "Audio" click "Select Codec". Again, you can select any codec you want. For this purpose, select "PCM" using "48000Hz" - MP3 and WMA compression will be handled by VirtualDub later. Select "OK".
To finish these settings click "OK". 6. Start the conversion. Select the Menu "Run ..." - "Start Conversion". Uncheck the "Display Output" option to gain a
little bit of speed. I'm not sure if it will gain speed, I noticed something
weird here: display output tends to improve performance slightly.... You
can also set task priority. I found the latter to be not that very meaningfull...
There is no use setting it to highest when using DivX,... Depending on your computer's CPU power and memory, conversion can take quite a while. To show you some examples see these conversion times measured on my own computers, for one and the same movie (about 85 minutes movie time); 300 Mhz Pentium II - >11 hours + 26 minutes copying Copying speed depends not only on CPU speed ... Now we are ready for the final step. Conversion of Audio using VirtualDub. Start the conversion of audio Finally, the last step, conversion of the audio track of the AVI you generated. Note: if you haven't done so, you migth want to install a MP3 codec first. Download Radium's here. Start VirtualDub and select "File" - "Open video file ..." and select the AVI file generated with FlaKMPEG. Next select "Video" - "Direct stream copy" since we do not want to recompress the video track. Next step will be the Audio settings. Select "Audio" - "Conversion". In the appearing popup window you can set the samplingrate to 41000 Hz (if you want to - 48000 Hz works fine too, although the final AVI get's slightly bigger), don't forget to check "High Quality". Leave the other settings for what they are and select "OK". Select "Audio" - "Compression" for setting the desired audio compression. I usually choose "MPEG Layer-3", set to "96 KBit/s, 44,100 Hz, Stereo" but you're free to choose an other setting. If you like to use WMA, then choose "DivX;) Audio". I found that the quality of MP3 is bette. On the other hand WMA has a better compression. Select "OK". Finally select "Audio" - "Full
processing mode" so the audio will be processed by VirtualDub. A file requester will ask you to give a filename - do NOT use the same filename as the source file !!! Select "OK" when you have entered the right directory and filename. A window will now appear monitoring the progress of the conversion. If the "Show input video" and "Show output video" boxes are checked, you can uncheck them to gain a little speed. Don't worry to much about the "Projected file size" since this will change over and over again. Usually this takes about an hour or more. Once this is done, the final DivX movie is ready for use. Check out the subtitle ripping page as well if you want to use the subtitles. |
||||