Welcome to WeetHet!


Managed Web Hosting by Liquid Web

Your IP address:
3.236.18.23
     
 
Print this page
- use Landscape
Search the
WeetHet Pages
WeetHet is being updated! - Current articles will slowly move to www.tweaking4all.com
For excellent webhosting that is reliable and affordable, we highly recommend: LiquidWeb

On this page ...

So the TiVo has a serial connector at the back (SERIAL a 3.5mm stereo jack). Besides controlling other equipment with this (ie. a Satellite reciever) we can also use this port for accessing the "Backdoor" or a shell (shell as in a dos-look-a-like thingy).

Before we can access the Backdoor or a shell (bash) we must have a nullmodem and a gender changer.
I don't like the idea of plugging cable to cable to gender changer so this is what I did.
The cable can stil be used for it's original purpose after this modifcation!

Many thanks to TiVolure for his help!

Read the Disclaimer!

TiVo - Personal Video Recorder

Overview

What do we need?

For those who don't want to use gender changer and nulmodem cable!

What do we need?

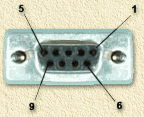
Pinout TiVO serial and how to connect it

3.5mm
pin
color*
signal
new sub-D
original Tivo Sub-D
The TiVo 3.5mm plug used for serial data
A
blank
(no insulation)
Signal Ground
(SG/GND)
5
5
B
brown
Receive Data (Rx)
3
2
C
black
Transmit Data (Tx)
2
3
         
*Color of the individual cables might differ!

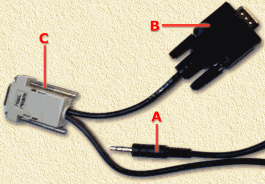
Cut the original cable approximately 15 centimeters from the black, original, sub-D connector.

Strip both cables and reconnect the inner cables:

The pinout of the new subD

- brown to brown and to pin 3 of the new sub-D
- black to black and to pin 2 of the new sub-D
- blank to blank and to pin 5 of the new sub-D

Notice the swap here: the old pin 2 is now connected to pin of the new sub-D, the same goes for the old pin 3 which is now connected to the new sub-D's pin 2.

Check the cable for shortcuts and close the new sub-D. You now have a universal cable for both normal and nul-modem RS232 looking as such:

The cable after the adaption
A

the 3.5 mm stereo jack that goes to the TiVo

B

the orginal sub-D connector (normal RS232)

C

the new sub-D connector (null-modem RS232)


First Contact

Well, this part is mostly thanks to the great help of TiVoLure ...

Notes and info:
- I'm using a 30 hrs TiVo (a Philips PTV300 - HDR312/04) with just one harddisk (30 Gb) in it.
- I did not use ANY patches yet.
- I'm not sure (yet) if this trick works with other TiVo releases, but I do know it works with the one I'm using (v1.3 - bought it in Juli 2001 at www.tivo.com - USA model).

OK,... first make sure the TiVo is OFF (ie. remove the powercord!).

Next, start your favorite terminal program (Windows users: Windows comes with Hyperterminal which works just fine for this purpose). Select the proper COM-port and make the appropriate settings:

9600 baud
8 data bits
No stopbits
1 parity bit
Xon/Xoff handshake

Now connect the newly made cable to the TiVo serial connection (Control out - SERIAL) and connect the new seb-D connector (the null-modem) to the proper COM-port of your PC.

Hold one hand near your keyboard, because you will need to press the ENTER key once as soon as the TiVo shows it's first glimps of life.

Now (with the other hand) insert the powercord so the TiVo boots and press the ENTER key ONCE (!!!!).

Your terminal program should show:

Verify password:

Now enter the secret password "factory" (without the quotes).

Please: E-Mail me if you find other passwords for different TiVo version.

Your terminal program wil respond something similar to this:

Verify password: *******
Console switched to DSS port

------- System Info --------
Processor speed = 50 MHz
Bus speed = 25 MHz
Amount of DRAM = 16 MBytes
Video configuration 3, Serial number 0
Enet MAC address= 0:4:ac:e3:0:54
Hostname = debug-13
Auto disk locking enabled
----------------------------
IDE drive 0 is locked. chal=0xabcdef1f, resp=0xc49b864b
IDE drive 0 should be unlocked now
IDE drive 1 is locked. chal=0x0, resp=0x6f566954
IDE drive 1 should be unlocked now

--- Device Configuration ---
Power-On Test Devices:
000 Enabled System Memory [RAM]
----------------------------
Boot Sources:
002 Enabled EIDE disk Controller [EIDE]
gateway: 192.168.40.20
----------------------------
Autolock disk(s) on power-up
----------------------------
B - Boot from disk
N - Network (tftp) boot
X - print extended menu
->

* Yellow text indicates your input

Here you see the "hidden" info of your TiVo, in this particular situation:

The PowerPC CPU (PPC403GCX) runs at 50 Mhz. The peripihal bus is running at 25 Mhz. This TiVo carries 16Mb of memory. It uses video-mode 3 (7114), has no serial number (???), has a Mac-address etc etc ...

Basically you can now start snoopin' in the debug session of this TiVo.

If you are reading this in order to disable the initial TiVo dial-in setup, then please continue reading here ... When you are looking for a way to get access to a Bash shell, the keep on reading here ...


Klik hier om te wisselen naar nederlandstalige pagina's You are currently on the English pages.