|
On this page ...
WARNING:
This hack
not without riscs!
I recommend using the more current hack: the OS6.x hack!
Well, some of you might have noticed the TiVo pages
covering some of the very very basics of playing with the older
SA (Stand Alone) TiVo's.
These TiVo's rely
on your cable/antenna television.
DirecTV offers similar TiVo's,
however these TiVo's are
used for receiving Digital Satellite (ie. DirecTV).
The advantages;
- The proprietary MPEG2 stream (coming from
the satellite - full digital) is recorded directly to harddisk
- The receiver actually has 2 receivers build in, so you can watch and
record, or even record 2 shows at once
On this page I show you how to modify the DiercTiVo's
so they have those cool OS 4.x features like HMO (sharing movies,
pictures, music etc). I based this info on my experiences
with my own Hughes SD-DVR40 (RID model, but
it's supposed to work with non-RID models and even SA TiVo's
as well). Most other series 2 DirecTiVo's have a similar interior,
the hack should work similar on those.
A real good place to look for more in depth
information is the absolute best TiVo forum: DealDatabase.
For buyers: visit
the TiVo website.
This can be seen as a replacement for the Sleeper
Hack I published earlier.
Based on this hack you can copy movies from
your TiVo to your PC and burn them on DVD or SVCD, view pictures,
share movies between TiVo's, etc; read the tyTools
article about all the details on how to copy movies to your
PC.
Don't forget to read the Disclaimer!
Read these Credits!!!!
many thanks
to David
Dellanave for
paving the way (it made my life a lot easier reading his guide)
and to the good folks at Dealdatabase (specifically, but not
limited to: Riley, Stevel, inet22, RC3105, AlphaWolf, NutKase, AllDeadHomiez, AhoyMatey,
MuscleNerd, and Robert)
and PTVUpgrade.
Without their information, patches, hacks, tricks, and services
this hack would NOT have been possible!
Note: Not all authors are "happy" with a guide
like this. However I do believe that it can be of benefit to
the less experienced TiVo users amongst us. Keeping up a large
forum with a wonderful large amount of information is great for
experts and people that want to do more with their TiVo, but
for newbies it's a bitch to find out what they should be doing
or not. So to the authors of the scripts/patches/mods: this article
is not written with a disregard of your wishes, or any form of
disrespect to your work. The TiVo-community is very grateful
for the work you have done, and I personally think it deserves
a great deal of thanks and respect.
Note: Before you start posting questions on
the dealdatabase forum keep in mind that you must first SEARCH
for an answer as most likely you're not the first one to encounter
this problem! Also remember to check the newbie threads!
WARNING: LinkSys has modified the hardware of the USB200M ethernet adapters. Only hardware version 1 will work! Version 2 hardware is NOT supported by the TiVo. |
 |
Overview
Note: this
is NOT a hack to freely use either the DirecTV service, or the TiVo-service!
Specially TiVo should
be credited for it's effort to create an open system, so we can modify
the TiVo to our needs!
I'm not so sure about DirecTV -
since they still do not listen to their customers, they can be pretty
arrogant and stubborn, not to mention plain insulting when talking to
their customer service on questions why HMO is
not available on DirecTV TiVo's. According to their "technical
people" this hack
is not even possible. So here ya go: load a crap!
The aim of this hack is:
- Upgrade your TiVo and give it some
more recording space (optional).
- Make your DirecTV TiVo run OS 4.x (including those
nice features like folders, HMO, look at pictures, share recordings,
etc)
- This will enable the TiVo's USB
ports which we can use the ports for Ethernet connection.
- Enable FTP/Telnet/TiVoWeb etc,
so we can remote control our TiVo.
- Enable TyTools so we can copy a
movie from the TiVo harddisk to our PC, so we can burn our recordings
to VCD, SVCD, DVD or DivX.
I HIGHLY recommend upgrading to a
bigger harddrive.
By default the Hughes SD-DVR40 has a 40Gb disk, good for about 35 hours of
movies. Get a 120Gb disk (You can get one for less than $100!), this will give
you 110 hours ...
Another reason to use another harddrive is that this
way the original drive remains in tact and can be put back in the TiVo
if things do not work out the way they should.
STEP 1 - Read these Assumptions
Before you begin, it's a good idea to read the now
following assumptions!
- We will use a LBA48 kernel. Basically this
is only needed for disks >137Gb,
but it works just fine with smaller disks.
- We'll asume some knowledge
of Linux. It's not 100% required, but it will help you understand
what you're doing.
- We asume the new TiVo disk (yes we
asume a upgrade of disk size - do NOT
use the original disk!) to be connected secondary
IDE controllor (HDC), MASTER.
- We also asume you hook up your CDRom
drive as secondary SLAVE (HDD).
The picture below illustrates this. It's OK if another disk or CDRom
is connected to the primary IDE controller as a Slave.
Details can be found in this guide.
- Be carefull with the cable
going from the mainboard of your TiVo to the front buttons! There have been reports of TiVo
been damaged by a loose cable!
- For full use off all features; a
USB ethernet adapter is required!
- A serial cable is not needed, but in case of
trouble handy to fix things.
- I applied this hack to a Hughes
SD-DVR40 RID model,
using a 120Gb harddisk (replacing the original).
- The hack is supposed
to work with RID and non-RID models!
- Have the DirecTiVo make a
call "home" before
applying the hack (enable card, etc).
Step 2 - Getting a TiVo 4.x image and a Boot
CD
Goto www.ptvupgrade.com,
select from the "Products & Services" menu,
the submenu "Software Tools".
There you will find the "InstantCake" and "LBA48
BootCD".
Both need to be purchased (InstantCake: $19.99, BootCD:
$5). A little price knowing that:
a) the image a a real and correctly
working image of a TiVo 4.x (known GOOD image)
b) the image is optained legally.
The INSTANTCAKE image you will need is either
the "TIVO/TCD240040" (40Gb disks)
or the "TIVO/TCD240080" (according
to the explanation this last one is good for ALL disksizes, so >40Gb).
DirecTiVo user: YES YOU NEED THE STANDALONE VERSION! NOT THE DIRECTIVO VERSION!!!!
The tools CD is what they refer to as the "PTVupgrade
LBA48 CD with MFStools and Enhancements" CD (code: LBA48-401DD).
I would say for almost $25 it's worth while to do the
right thing ...
STEP 3 - Downloading Additional Tools
From the DealDatabase we
need to get some more tools. The InstantCake and
the Boot CD are just a part of the puzzle
here.
We need:
init_framework.tgz (some
handy tools)
dssapp (correct use of the RID chipset)
lba48_2.4.18.px (large disk support) |
You can download them from this
thread.
Thanks to RC3105 for his work on this! |
| tivotools.tar.rar (some
tools, utils, etc.) |
You can download it here.
The file has been included in the image; but keep in mind - the most recent version
can only be found on the dealdatase!
Much thanks to AlphaWolf for allowing me to use the file! |
| superpatch-4all-NutKase-0.7.1.zip (HMO
features) |
You can download it from this thread.
Much thanks to NutKase for the wonderful job! |
| bootpage-20040921.zip (enhanced
bootpage) |
The file can be found in this DealDatabase
thread.
Many thanks to AllDeadHomiez for posting the file! |
| guide_patch_v401b.tcl (removes Guide
error) |
You can get in this thread.
Many kudo's to AhoyMatey and MuscleNerd for
posting it! |
Now you might wonder why I'm not offering this on the WeetHet download
page.
That has 2 reasons:
- Most of the creators do
not want to see there files elsewhere popping up.
- The threads explain a lot about these tools, and
also give you links to support threads.
So unless they approve that
I make an archive available with their scripts/patches,
I will not have it in my downloadspage out of respect for their work.
STEP 4 - BURNing two CD's
Before we can do anything we
will need to create ourselves TWO cd'S.
One which will be the LBA Boot CD from PTVUpgrade, and another one
holding all these fancy tools and the TiVo 4.x image.
This is what the directory/file structure should look like of the "Tools
CD". The easiest way is to make a folder somewhere on your
harddisk and call it something meaningful. Then copy the individual
files in there according to this structure.
To achief this, we need
to extract some of these files:
- bootpage-20040921.zip ... bootpage directory
- tivotools.tar.rar ... tivotools.tar file
- superpatch-4all-NutKase-0.7.1.zip ... superpatch-4all-NutKase-0.7.1.tcl
and set_mrv_name_ADH.tcl
We also need to extract the TiVo 4 image from the ISO
file. There are some tools out there that can help you with that.
I used WinRar to extract
the full ISO image. Once extracted in the folder "_IMAGE" you
will find a file called "000001".
Rename that file to "tivo.mfs",
and copy it into the "image" folder.
The sturcture should look tlike this (as suggested
by David
Dellanave):
bootpage (DIR)
| bootpage (FILE)
| bootpage.c
| bootpage.h
| bootpage.tgz
| Makefile
dssapp (DIR)
| dssapp
image (DIR)
| tivo.mfs
guide_patch_v401b.tcl
init_framework.tgz
lba48_2.4.18.px
set_mrv_name_ADH.tcl
superpatch-4all-NutKase-0.7.1.tcl
tivotools.tar
(download the files - except for the 4.x image - from
the indicated threads at DealDatabase!)
Once you have assembled this structure you can copy it all into the
root of a CD (use Nero for example to build a CD like that).
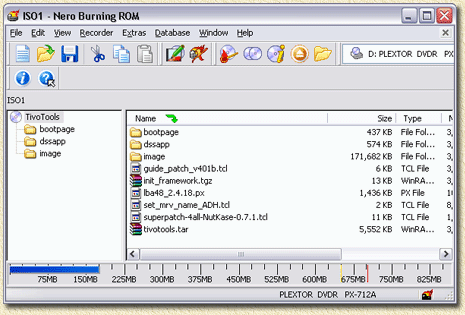
Nero is an ideal tool for creating the "Tools
CD"
Note: I requested permission form the authors/posters
of the relevant article to give me permission to package this all. For
several (good) reasons some of them declined.
The second CD we need to burn is the "ptvlba48-4.01DD.ISO"
Boot CD from PTVUpgrade. Again Nero can be of assitance here as it allows
you to burn ISO files (choose from the menu "Recorder"
- "Burn
Image"
and select the ISO file).
Mark both CD's properly, so you will be able to identify
them later (I marked them as "Boot CD" and "Tools
CD").
STEP 5 -What Else do
we need?
- Screwdrivers
Basically we need a Torx T10 and a Torx T11 screwdriver.
Some models might need a Philips screwdriver.
- An open PC
We need a PC, any PC, with at least one harddisk and a CD
Rom player installed in it, and being able to boot from
CD Rom
There are no speed limitations etc on the type of PC, as long as it can do
this:
• The harddisk must at
least have one partition (usually the C-drive) formatted
with FAT or FAT32, with at least 2
Gb free space. This free space will hold the backup image of the
original TiVo harddisk.
The harddisk must be installed as MASTER on the PRIMARY
IDE (IDE-0).
• The CD Rom player must
be installed as the SLAVE on the PRIMARY IDE (IDE-0).
We need this so we can boot the system from CD Rom
• The PC must be able and set to boot
from CD Rom (in the PC BIOS, set FIRST BOOT DEVICE to CDROM).
- IDE Flat cable
So we can connect our original TiVo harddisk to the PC we will utilize for
hacking the drive.
Some PC's have this second IDE cable already installed - so check first!
- Replacement harddisk
(strongly recommended)
Since prices are so low, I would recommend getting a 120Gb disk or larger.
5400 RPM (if you can get one) will work just fine (low noise level).
A 7200 RPM or even 10000 RPM drive will give you a better performance but
they also produce a bit more noise and heat.
STEP 6 - Removing the
harddisk from your TiVo
OK, so we're ready to open the TiVo
and removing the harddisk.
!! WARNING !!
1. although the
power cord might be disconnected,
THE POWERSUPPLY OF THE TiVo can still
hold quite a nice voltage to zap you!
2. Either
use an anti static (ESD) wrist thingy
or grab something that is grounded,
to discharge static electricity your body might CARY.
Static electricity might damage the sensitive parts OF the TiVo!
3. OPENING
THE TIVO VOIDS WARANTY!
|
Remove ALL the cables from your TiVo (satellite
antenna, video, audio, power, etc)!
Now put the TiVo on a table so you can easily
access all connectors, screws etc.
Get the Torx T10 and remove the 4 screws
on the back, indicated by the red arrows below:
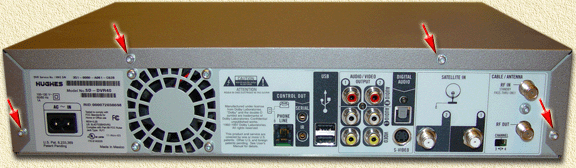
Hughes DirecTV TiVo - Remove the 4 screws on the back
Once you removed the 4 screws, slide the hood
of the TiVo to the backside of the TiVo. It might require some force
to get it going.
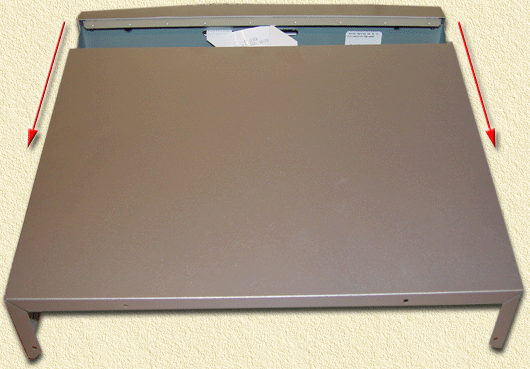
Hughes DirecTV TiVo - Remove the hood by sliding it to the
back
Once you opened, you will see the main components
of your TiVo:
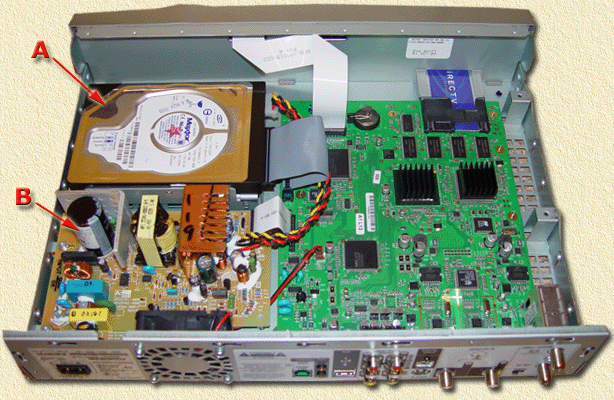
Hughes DirecTV TiVo - A: Harddrive, B: Power supply
Be very careful, avoid touching the power
supply (B:
the brown colored PCB).
Now we have access to the harddrive (A).
You will see that an IDE flat cable and a power cable (familiar to
those who have opened a computer before) that connect the harddrive
to the TiVo mainboard (the green PCB).
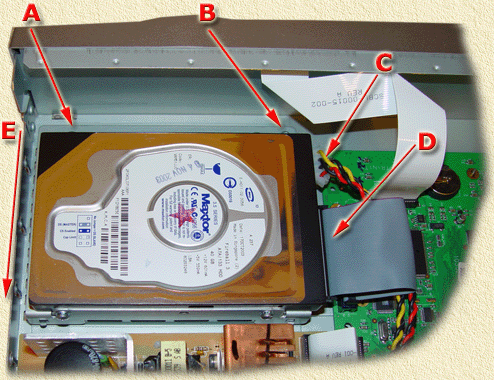
Hughes DirecTV TiVo - Harddisk located
In the image above you see the harddrive. Notice
the arrows:
| A |
Screw 1 of the harddrive bracket |
| B |
Screw 2 of the harddrive bracket |
| C |
Harddrive power connector |
| D |
Harddrive IDE cable |
| E |
After removing A, B, C,
and D,
slide the bracket in this direction |
I think the table above explains most of it;
Remove the screws (A and B), the
power cable (C)(watch
out for the white flat cable!) and the IDE cable (D).
Now move the harddisk in the direction as indicated
by the arrow (E) until you
can lift it and take it out.
The 4 screws of the harddrive can be removed with a
Torx T11.
Once removed, we can continue with the next steps,...
STEP 7 - Installing
the TiVo harddrive in your PC
Note: Unlike the sleeper hack (since this hack
does not make a backup!), there are not requirements for the C-disk
(primary master).
This PC should also have a
CD Rom player. Make sure the following requirements are met:
- The computer should be able to BOOT from
CDROM.
- The CDROM player should be connected as SLAVE on
the PRIMARY (IDE-0) IDE.
- The new harddrive should be connected as MASTER on the SECONDARY (IDE-1) IDE.
Tip: Verify in the BIOS of
your PC that the first boot device is set to CDROM.
Usually you can get
into the PC's BIOS by pressing the "Del", "Ins", "F1" or "F10" button
(at boot time it will usually show a brief message indicating which key
to use). Commonly in the "Advanced settings" section
of the BIOS you can change the boot device to "CDROM" or "IDE
CDROM".
If your computer meets these requirements, then it's
time to continue to the next step: Connect (if not already there) the
FLAT CABLE to the SECONDARY IDE (IDE-1).
Connect the other end of the flat cable to the new TiVo harddrive.
Connect the second connector of that FLAT-CABLE to your CDRom drive.
Connect a power connector to the TiVo harddrive, and
don't forget the power for the CDRom-drive.
Verify that the jumpers of the TiVo
harddrive are set
to MASTER, and the
ones on the CDRom drive to SLAVE.
Please write down first how the jumper
where set, so you can set them back later - if needed.
Tip: if you do not have documentation
on the jumpers (either a manual or printed on the harddrive itself) then
lookup the drive on the Internet on the manufacturers homepage. They
usually have an online manual for the drive showing the jumper settings.
So basically you have this setup now:
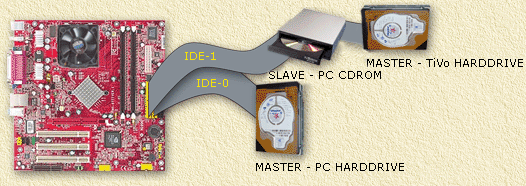
DirecTiVo - Basic Backup setup
Note: this is just a sketch
on how the connections should run - the position of IDE-0 and IDE-1 connectors
may differ, depending on the type/brand of mainboard your PC has. Please
consult the manual of the mainboard to identify the right connectors,
or incase you don't have a manual, look closely on the mainboard. Some
mainboard's have text printed next to the connectors.
STEP 8 - Installing the 4.x Image on the harddrive
In order to write the image to the harddrive, we must first boot our
PC using the BootCD. This will boot the Linux operating system.
At boot it will show you the ISOLINUX message and will
give you some options. Just press ENTER here.
Loading vmlinuz ..... will appear and the bootsequence is running now.
This particular Linux version will try to autodetect whatever hardware
it needs for the hack.
Note: I like to recommend
using a PS/2 keyboard. This Linux distro seems to have issue with either
my USB-bus or USB Keyboard (Logitech).
Once your system has booted, again some options are
presented. Hit ENTER again.
Now
you will see
a cursor blinking in a DOS-like environment (a shell prompt "PTVupgarde
/#" will be visible).
Now remove the BootCD, and insert the ToolsCD.
Before we can use the ToolsCD we
need to mount it (the yellow test is what you enter, finish each line
with pressing ENTER):
PTVupgrade /# mount /dev/hdd /cdrom
mount: block device /dev/hdd is write-protected, mounting read-only
PTVupgrade /#
|
Next step is to write the image to the harddisk:
PTVupgrade /# mfsrestore -s 127 -xzpi /cdrom/image/tivo.mfs /dev/hdc
Starting restore
Uncompressed backup size: 818 megabytes
Restoring 818 of 818 megabytes (100.00%) (79.62% compression)
Cleaning up restore.  Please wait a moment.
Restore done!
Adding pair /dev/hdc14-/dev/hdc15
New estimated standalone size: 131 hours (52 more)
PTVupgrade /# |
The numbers in this example may very (depending on
image size and harddisk size).
Note: Some people might run into trouble here when
using a 40Gb disk. This has to do with the slightly differeny geomtery
of your disk. David suggest on his website to decrease the size of the
swap to 50M (-s 50). But that's for more experienced users.
Once completed execute the following commands:
PTVupgrade /# cd /
PTVupgrade /# umount -f -a -r
PTVupgrade /# halt
The system is going down NOW !! |
The system will not shutdown - a
reboot is mandatory!
We now copied the 4.x image to your new harddrive.
But we're not done yet!
STEP 9 - A new Kernel
The PTVupgrade CD comes with some handy tools for mounting,
kernel copying, and such. We'll now first do some mounting and replace
the kernel.
So we have to boot the PC again using the BootCD.
At boot it will show you the ISOLINUX message and will
give you some options. Just press ENTER here.
Loading vmlinuz ..... will appear and the
bootsequence is running now.
This particular Linux version will try to autodetect whatever hardware it needs
for the hack.
Once your system has booted, again some options are
presented. Hit ENTER again.
Now you will see a cursor blinking in a DOS-like environment (a shell
prompt "PTVupgarde
/#" will be visible).
Now to work with the bootCD we
need to mount it, and we need to prepare the mount of the harddisk by
making a directory for it:
PTVupgrade /# mount /dev/hdd /cdrom
mount: block device /dev/hdd is write-protected, mounting read-only
PTVupgrade /# mkdir /tivo
|
Next step is mount the TiVo harddisk, one of the following
two commands will work, the other one will fail.
If it replies "mount:
you must specify the filesystem type" then this means this one failed.
Try the other one.
Option 1:
PTVupgrade /# mount /dev/hdc7 /tivo
PTVupgrade /# |
Option 2:
PTVupgrade /# mount /dev/hdc4 /tivo
PTVupgrade /# |
Once mounted we need to extract and copy the kernel
to the new disk:
PTVupgrade /# cp /cdrom/s2_kernels/3.1.1c/vmlinux.px.gz /tivo/var/vmlinux.px.gz
PTVupgrade /# cd /tivo/var
PTVupgrade /# gunzip -d -v vmlinux.px.gz
vmlinux.px.gz:     38.3% -- replaced with vmlinux.px
|
Tip: Linux has a cool Shell feature where the TAB-key
can be used to "autocomplete" commands, filenames, pathnames, etc.
So instead of typing the very long copy command, you could type: cp
/d[TAB]/s2_[TAB]/3.1.1c/vm[TAB].
Where [TAB] represents you pressing the TAB key. This line will then
automatically expand to the full names. It will save you a lot of typing
...
Now we put the killhdinitrd kernel in both kernel partitions.
One is enough, but this way we do not need to which one is used with
the bootpage:
PTVupgrade /# dd if=/tivo/var/vmlinux.px of=/dev/hdc3

1+1 records in
1+1 records out
PTVupgrade /# dd if=/tivo/var/vmlinux.px of=/dev/hdc6

1+1 records in
1+1 records out |
STEP 10 - Additional
Hacks
We will no continue to add some more hacks
Now it's time to go to the ToolsCD.
We do need to unmount the BootCD first, swap CD's, and mount the ToolsCD.
Now to work with the bootCD we
need to mount it, and we need to prepare the mount of the harddisk by
making a directory for it:
PTVupgrade /# umount /cdrom
|
Remove the BootCD, and
insert the ToolsCD. Then type:
PTVupgrade /# mount /dev/hdd /cdrom
mount: block device /dev/hdd is write-protected, mounting read-only
|
So on with the ToolsCD. First let's copy the required
files to a hack directory:
PTVupgrade /# mkdir /tivo/hacks
PTVupgrade /# cp /cdrom/superpatch-4all-NutKase-0.7.1.tcl /tivo/hacks/
PTVupgrade /# cp /cdrom/set_mrv_name_ADH.tcl /tivo/hacks/
PTVupgrade /# cp /cdrom/guide_patch_v401b.tcl /tivo/hacks/ |
Next we will install the "init
framework":
PTVupgrade /# cd /tivo
PTVupgrade /# tar -zxvf /cdrom/init_framework.tgz
./
./init
./init/001_bash.init
./init/010_lba48.init
./init/011_uma6fix.init
./init/kmonte.o
./init/monte
./init/uma6fix.o
./init/uma6fix_license.txt
./test.conf
|
!!!
THIS STEP IS FOR RID MODELS ONLY !!!
Now we need an
extra step for so called RID models.
RID models can be identified by looking at the
back of the receiver. There is a label identifying the brand and model
(mine has it's sticker where the power goes into the TiVo).
RID models have a RID number there. Something
like "RID:
000012345678".
My Hughes SD-DVR40 is a RID model.
We need to replace the original DSSAPP with our new one.
First we move (mv)
the original file (rename it), then we copy (cp) the new file to this
location, and finally we make the new file executable (chmod):
PTVupgrade /# mv /tivo/tvbin/dssapp /tivo/tvbin/dssapp.orig
PTVupgrade /# cp /cdrom/dssapp/dssapp /tivo/tvbin/
PTVupgrade /# chmod +x /tivo/tvbin/dssapp |
Now we need to copy the kernel to a place where the "init
framework" expects it to be:
PTVupgrade /# cp /cdrom/lba48_2.4.18.px /tivo/init/vmlinux.px |
We will no continue with the installation of the TiVo
BusyBox and TiVoFTP deamon, etc.
PTVupgrade /# mkdir /tivo/busybox
PTVupgrade /# cd /tivo/busybox
PTVupgrade /# tar -xvf /cdrom/tivotools.tar |
This will generate a long list of files that are extracted to /tivo/busybox.
The next step should be done carefully! It writes the
bootpage so the TiVo knows where to boot from, and sets a few things
like not to do software updates, etc. So pay attention here!
PTVupgrade /# cd /cdrom/
PTVupgrade /# ./bootpage/bootpage -p /dev/hdc
root=/dev/hda7
|
This "bootpage" command
will respond with either "root=/dev/hda7"
or "root=/dev/hda4", make
a note of this.
As of now I will asume /dev/hda7.
Replace this with /dev/hda4 if you got a respons that said "root=/dev/hda4".
The now following command is ONE SINGLE line! I had
to wrap it so it would be in a reasonable size for this webpage!
After the "-p" there is a SPACE before the double quotes!
Naturally, if you're using /dev/hda4, then enter /dev/hda4,
and not /dev/hda7!
PTVupgrade /# ./bootpage/bootpage -P
"root=/dev/hda7 dsscon=true console=2,115200 upgradesoftware=false" -C /dev/hdc
Updated bootpage on /dev/hdc
Updated bootpage on /dev/hdc
|
Check the outcome of this action as such, make sure
the reply of the program matches the one you see below (naturally, if
you're using /dev/hda4, then it should say /dev/hda4, and not /dev/hda7):
PTVupgrade /# ./bootpage/bootpage -p /dev/hdc
root=/dev/hda7 dsscon=true console=2,115200 upgradesoftware=false |
We will now edit the rc.sysinit.author. We will use
the editor "pico" for that purpose.
PTVupgrade /# cd /tivo/etc/rc.d
PTVupgrade /# pico rc.sysinit.author |
The Pico editor will start, now copy the following
text:
UW PICO(tm) 3.8 File: rc.sysinit.author Modified |
#!/bin/bash
export TIVO_ROOT=
export MFS_DEVICE=/dev/hda10
export PATH=./:.:/utils:/bin:/sbin:/tvbin:/tivobin:/busybox
tnlited
23 /bin/bash -login & tivoftpd
fakecall.tcl
route add -host 204.176.49.2
gw 127.0.0.1
route add -net 204.176.49.0 gw 127.0.0.1 netmask 255.255.255.0
|
Be VERY accurate in what you are doing! Verify this
text at least 3 times (I know I did).
Once you're sure you did it right: press CTRL+X. This will exit the editor.
The editor will ask you if you want to save the modifications, press
the "Y" key.
Then it will ask if your want to use the rc.sysinit.author filename.
Press the ENTER key.
Pico will now report how many lines it has written and will return to
the Shell prompt.
You can verify (if you want to) the content of the
rc.sysinit.author file by typing: more
rc.sysinit.author. This will display the file content.
The next step wih this file is to make it executable:
PTVupgrade /# chmod 755 rc.sysinit.author |
One last thing we have to do is to disable the netfilter,
so your TiVo is not limited in it's ability to connect to other IP-addresses.
We will do this by renaming the netfilter file:
PTVupgrade /# mv /tivo/etc/netfilter-enable /tivo/etc/netfilter-notenabled
|
Basically we're done now, so it's time to prepare your
PC for a shutdown:
PTVupgrade /# cd /
PTVupgrade /# umount -f -a -r
PTVupgrade /# halt
The system is going down NOW !!
The system is halted. Press Reset or turn off power
System halted. |
You can now rutn off the power of your PC.
STEP 11 - Putting the new disk into the TiVo
Now we're ready for our first run.
Remove the TiVo disk from your PC, and install it into
the TiVo (look at the pictures where I show you how to get the disk out).
I have not used a dual disk setup - so I have no clue what to do with
that. But with a single disk setup, you can leave the jumpers of the
disk to MASTER.
Tip: this might also be good time to clean the fan
of your TiVo. Just like with PC's these fans suck in a lot of dust.
After putting the disk into the TiVo, make sure that:
- The IDE cable is connected to the harddrive
- The POWER cable is connected to the harddrive
- The flatcable from the mainboard to the TiVo front is still connected
and secure
- DO NOT CONNECT the phoneline!
- Plugin your USB to Ethernet
adapter if you want
to use one!
If you're sure about this, then connect the dish
cables, the audio/video
cables, and your USB ethernet adapter (hooked
up to the network). Make sure your TV is ON and
on the right channel! Again, even for DirecTiVo's: DO
NOT CONNECT THE PHONELINE!
I recommend doing a double check here. If you're sure everything is
fine, and you have you remote handy, then connect the power
connector.
The TiVo will start showing the following screens:
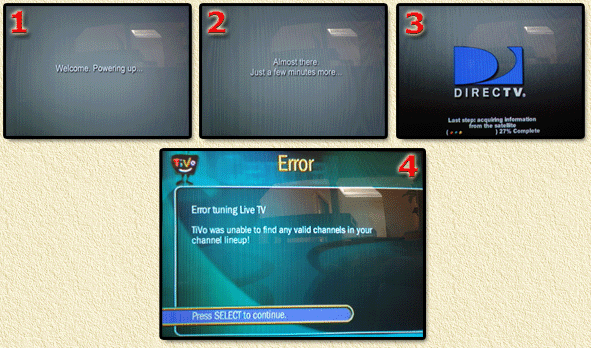
DirecTiVo with TiVo OS 4 running!
Between screens 1 and 2, you will see a black screen
for a bit (about 10 to 20 seconds).
Screen 4 appears when you haven't hooked up your regular antenna (why
would I need that again?).
If you get screen 4, or a screen saying "Error
51"
(if not: skip this part and continue with the "Guided
Setup") then the
Guided Setup will not start. You will need to go to the "TiVo
Messages & Setup" - "Restart
or Reset System" - "Clear and
Delete Everything"
to clear problems. The pictures below illustrate this procedure:

DirecTiVo - Clear and Delete ALL settings
Now they scared me for a minute there with their nice
1 hour message, but in the end it took about 35 minutes for my TiVo to
Clear and Delete everything. Oh, the parental code is "0000".
Once done it reboots the TiVo, showing again the welcome
screen and such, but this time without an error message going straight
to the "Guided Setup". The Guided Setup
is a basic question and answer game, so just read the questions and answer
them accordingly. Some screenshots:
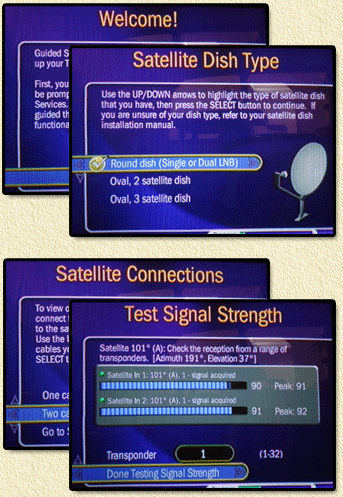
DirecTiVo - Guided Setup
Note: during this process
it will ask you to ACTIVATE your account. DO NOT
DO THIS. Your account/card
has already been activated before, so just press
the TIVO button.
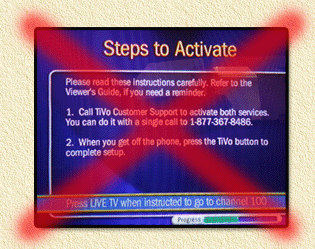
DirecTiVo - DO NOT reactivate your card!
Once complete you can look at the system information
page:
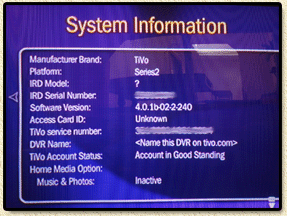
DirecTiVo - Woooohooo, OS4 running
In the setup info you will notice that the TiVo (DVR)
has no name, and that the HMO options are not enabled.
Other items we need to fix: make a fake call daily, and maximu speed
for USB 2.0 adapters :-)
Note: it will take up to 2 days before your TiVo has
all the Guide info up to date.
Also check, incase you have one connected, if your
USB ethernet adapter is active. Most of these adapters show connectivity
by one or more led's lighting up. To make sure this happens:
- Connect the USB adapter to the TiVo
- Connect the USB adapter to the network, router,
hub or whatever
- Make sure the ethernet cable you're using is a GOOD
and WORKING cable
Once the system has started, go to the menu "System
Information" - "Settings" - "Phone
and Network Setup" - "Edit Phone
or Network settings". In the now showing menu you can choose:
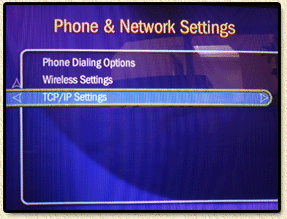
DirecTiVo - Setting your network settings
First set the "TCP/IP settings".
To keep things easy you can either set a fixed IP address (at least you'll
know which one that will be) or a DHCP IP address (at least you know
the settings are right). I used a fixed IP address, so I don't have to
snoop around to find where my TiVo is.
Wireless users: you might want to checkout the wireless
options here. I do not have a wireless adapter so I wouldn't know what
to do with it.
STEP 12 - Even more patches ...
In this step we will deal with some of the items I
mentioned before, like the name of the DVR and such.
First of all: we need a network connection to the TiVo!
We need to setup a telnet connection to our TiVo, personally
I prefer using PuTTY (see our downloadspage), but the regular Telnet
command in Windows will work just fine too.
So start your engines and setup a telnet session (in
a DOS box in Windows: telnet <ip-address>):
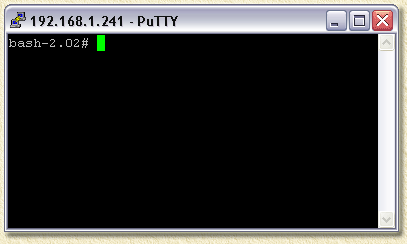
DirecTiVo - Telnet session to your TiVo box
The telnet session will show you the shell prompt of
your TiVo: "bash-2.02# ". You can
see this as a kind of DOS on your TiVo (allthough a Linux Shell is far
more powerfull than a crappy DOS shell).
Note: for a telnet session TCP/IP port 23 is used.
HMO, TIVO NAME, and GUIDE PATCH
To be able to change anything, we need to make sure
the drive is set to read/write - the TiVo by default mounts it as a read-only
drive.
Please note that if you had to use /dev/hda4 instead of /dev/hda7, then
replace the 7 with a 4!
bash-2.02# mount -o remount,rw /dev/hda7 |
Now it's time for some changes (NutKase superpatch,
and name setting). Replace YOURTIVONAME with the name you wish to use
to identify your TiVo.
Note: The name of your TiVo
(allthough not recommended) can have spaces. You will need to put double
quotes around the name!
bash-2.02# cd /hacks/
bash-2.02# chmod 755 superpatch-4all-NutKase-0.7.1.tcl
bash-2.02# ./superpatch-4all-NutKase-0.7.1.tcl

Superpatch-4All-NutKase-0.7.1
(C) 8/21/2004 by NutKase - COMMERCIAL USE PROHIBITED
Credit goes to CapablePerson66, rc3105, SledgHammer and others.
and ESPECIALLY alldeadhomiez for his time and knowledge.
All errors are mine.
Your TiVo Software version is 4.0.1b-02-2-240
Please write down your TiVo Software version.
Patching your tivoapp...
Success!
________
1. Your 4.0.1b-02-2-240 tivoapp was updated with the proper superpatch-4all.
2. Your original tivoapp was backed up and is called /tvbin/tivoapp.original.
3. You need to run the set_mrv_name_ADH.tcl, I've included, to
'name' your tivo.
bash-2.02# chmod 755 set_mrv_name_ADH.tcl
bash-2.02# ./set_mrv_name_ADH.tcl YOURTIVONAME
Setting nametable for "YOURTIVONAME"...
bash-2.02# chmod 755 guide_patch_v401b.tcl
bash-2.02# cp /tvbin/tivoapp /tvbin/tivoapp.guide_patch
bash-2.02# ./guide_patch_v401b.tcl /tvbin/tivoapp.guide_patch

guide_patch_v401b.tcl
(C) 11/22/2004 by AhoyMatey - COMMERCIAL USE PROHIBITED
Thanks to MuscleNerd who wrote the original 4.0 guide patch
Thanks to alldeadhomiez for all his advice and help File was patched bash-2.02# mv /tvbin/tivoapp.guide_patch /tvbin/tivoapp |
It is good practice to remount the disk as a read-only
drive (if this fails, you can reboot anyway).
Please note that if you had to use /dev/hda4 instead of /dev/hda7, then replace
the 7 with a 4!
bash-2.02# mount -o remount,ro /dev/hda7 |
You will now need to reboot your
TiVo.
Note: it can
take 1 to 2 days before your guide data is all complete again!
FAKE CALLS and LOG WIPING
Based on AlphaWolfs suggestion in this thread
in the DealDatabase, we can use crond to
make fake calls daily and have the log file wiped every day. Cron is
commonly used in Linux/Unix for running tasks automatically at certain
times.
Agian: To be able to change anything, we need to make
sure the drive is set to read/write - the TiVo by default mounts it as
a read-only drive.
Please note that if you had to use /dev/hda4 instead of /dev/hda7, then replace
the 7 with a 4!
bash-2.02# mount -o remount,rw /dev/hda7 |
Next execute these instructions:
bash-2.02# echo "root:x:0:0:root:/:/bin/sh" >> /etc/passwd
bash-2.02# echo "root:x:0:" >> /etc/group
bash-2.02# mkdir -p /var/spool/cron/crontabs
bash-2.02# touch /var/spool/cron/crontabs/root
bash-2.02# echo "0 0 * * * fakecall.tcl" >> /var/spool/cron/crontabs/root
bash-2.02# echo "0 0 * * * wipelogs" >> /var/spool/cron/crontabs/root
bash-2.02# echo "/busybox/crond" >> //etc/rc.d/rc.sysinit.author
bash-2.02# crond
|
This will prepare the required files for crond to run (autostart, and
such).
If you're not apply any other
hacks, then mount the disk as read only again:
Please note that if you had to use /dev/hda4
instead of /dev/hda7, then replace the 7 with a 4!
bash-2.02# mount -o remount,ro /dev/hda7 |
USB 2.0 at maximum speed
FOR USB 2.0 USERS ONLY!
The standard TiVo software does
not seem to utilize the full capacity of the USB 2.0 standard. So for
those of you who do use a USB 2.0 device (for example the LinkSys USB200M
- like I do - more models can be found at the bottom of the Sleeper
Hack page), this will be a speed booster (about 3 times faster!)!
The required drivers can be download from your TiVo
directly, and this method will be used.
If you haven't done so: make the TiVo disk read/write.
Please note that if you had to use /dev/hda4 instead of /dev/hda7, then
replace the 7 with a 4!
bash-2.02# mount -o remount,rw /dev/hda7 |
Note: these instructions
are based on David's
intructions.
bash-2.02# cd /hacks
bash-2.02# wget http://www.weethet.nl/downloads/usb20.tar.gz
Connecting to www.weethet.nl[83.98.147.3]:80
usb20.tar.gz   100% |************************************| 99571  00:00 ETA
bash-2.02# tar -zvxf usb20.tar.gz
usb20netmodules-2.4.18
usb20netmodules-2.4.18/usbnet.o
usb20netmodules-2.4.18/ehci-dummy.o
usb20netmodules-2.4.18/usbcore.o
usb20netmodules-2.4.18/usb-ohci.o
bash-2.02# cd /lib/modules/
bash-2.02# mkdir backup
bash-2.02# mv ax8817x.o backup/
bash-2.02# mv usbcore.o backup/
bash-2.02# mv usb-ohci.o backup/
bash-2.02# mv /hacks/usb20netmodules-2.4.18/usbcore.o /lib/modules/
bash-2.02# mv /hacks/usb20netmodules-2.4.18/usb-ohci.o /lib/modules/
bash-2.02# mv /hacks/usb20netmodules-2.4.18/usbnet.o /lib/modules/
bash-2.02# ln -s /lib/modules/usbnet.o /lib/modules/ax8817x.o
bash-2.02# rm -rf /hacks/usb20* |
Now we need to edit the test.conf file. The original
content of this file, which resides in root (type: more /test.conf to
see the content), is:
#!/bin/bash
echo "starting test.conf"
export PATH=./:.:/utils:/bin:/sbin:/tvbin:/tivobin:/busybox
export upgradesoftware=false
for foo in /init/*.init ; do
echo "starting $foo"
$foo
done
This file is executed during the boot of your TiVo, before system initialization
scripts kick in. This file allows you to add scripts/mods. We need to
add some lines here:
/sbin/insmod /lib/modules/usbcore.o log2_irq_thresh=4
/sbin/insmod /lib/modules/usbnet.o
/sbin/insmod /lib/modules/usb-ohci.o
There are a few ways to do this, probably the easiest
is either using "vi" or the "echo" command.
Since not everybody is equally skilled with VI, I suggest using the echo
command. We have seen the use of this before, so use the command as displayed
below:
bash-2.02# echo "/sbin/insmod /lib/modules/usbcore.o log2_irq_thresh=4" >> /test.conf
bash-2.02# echo "/sbin/insmod /lib/modules/usbnet.o" >> /test.conf
bash-2.02# echo "/sbin/insmod /lib/modules/usb-ohci.o" >> /test.conf |
This should be it.
Mount the disk as read only again,
and reboot your TiVo.
Please note that if you had to use /dev/hda4 instead of /dev/hda7, then replace
the 7 with a 4!
bash-2.02# mount -o remount,ro /dev/hda7 |
Links and more to read
One of the goals of these hacks was to be able to extract (download) recordings from your TiVo to your PC.
Thanks to NutKase for his SuperPatch (and the good folks that contributed to that), the recordings are no longer encrypted.
This means we can now use a tool to download recordings to our PC so we can process them further and burn them on a DVD, VCD, or SVCD.
I wrote a rather long article on that, you can find it here.
I have used TyTools10r4 for that. There are other tools out there that do a similar job, however I found TyTools to be the easiest in use.
So go ahead and read How to extract Recordings from your TiVo using TyTools !
Further reading and other TiVo related links:
TiVo Supplies:
PTVupgrade - Supplies image, tools, disks, etc and has great TiVo forum and the best TiVo images.
TiVo - The TiVo company ...
DirecTV - Supplies DirecTV TiVo's that work with the DirecTV service.
9thTee - Supplies, more aimed towards the older TiVo's, more specialized in cables, jacks, etc.
Weaknees - Supplies and TiVo's.
Video Extraction:
EtiVo - Alternative to TyTools, which supports transcoding to other formats (like DivX) as well.
gtivo - a GTK/Gnome (Linux) application for TiVo
TyTool - homepage of TyTool?
Old TyTool/TyStudio Sourceforge project
ty-mp4-rrs - Transcode ty-files to MP4 for RSS feeds.
TiVoTool - The TyTool alternative for Mac OSX and Linux (see also wiki).
TiVo-MPlayer - plays Ty-streams, now part of mplayer (for Windows, Max OS X, Amiga, and Linux).
TyShow - DirectShow help so you can play Ty-files in Media Player.
Media Player Classic - cool and flexble replacement for Windows Media Player.
Hacks, Patches:
Sleeper Hack - Hack your OS 3.x DirecTiVo
OS 4.x Hack - Hack your TiVo to OS 4.x enabling HMO and MRV (this article)
OS 6.2 Hack - Hack your TiVo to OS 6.2 enabling HMO and MRV
DealDatabase - THE forum for (advanced) TiVo fans!
6.2 Slice Upgrade Guide - by David Dellanave
Forums:
PTVupgrade forum - from the makers of InstantCake and PTVnet - highly recommended.
DealDatabase - THE forum for (advanced) TiVo fans!
TiVo Techies
Home Media Option (HMO):
JavaHMO - Media server for use with the new TiVo HMO features (view pictures etc on your TiVo).
Galleon - Free open source media service for the TiVo.
TiVoWeb
TiVoWeb Modules
|
