Welcome to WeetHet!


Managed Web Hosting by Liquid Web

Your IP address:
44.201.94.236
     
 
Print this page
- use Landscape
Search the
WeetHet Pages
WeetHet is being updated! - Current articles will slowly move to www.tweaking4all.com
For excellent webhosting that is reliable and affordable, we highly recommend: LiquidWeb

On this page ...

On this page I'll present the navigation solution PopupMenuApplet by David Binard.

An excellent alternative, although not free, is apPopupMenu by ApyCom.

There are others out there, but unfortunally WAY to expensive for a private website. As soon as I get the popup menu of them sponsored, I will consider writing about it ...

HTML

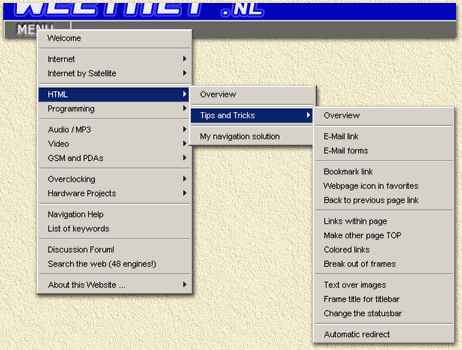
How to use PopupMenuApplet

On my old webpage and on the current version of WeetHet, one could/will find this in the upper left corner;

A sample of the menu I used on my old website ...

What do we need for the menu ?

1. PopupMenuApplet.class
2. PopupGen.exe

The file PopupMenuApplet.class is needed for getting a menu anyway. Copy the (unzipped) file to the same directory where the HTML-file will be located. The JAVA class is written by David Binard, visit his webpage for more info and/or an the latest version.

PopupGen.exe will be used to generate the menu code.

Let us start by choosing an image for accessing the menu.
Below you will see the button I used on this webpage you're looking at (if you can't find it, some one ripped this text illegally ... please visit my website):

My menu button ...

The dimensions of this image are: width=114 and height=24.

As an alternative we could make a simple square button...

Let's assume we named this image "button_menu.gif".

Now we can add the first pieces of code the HTML-page we wnat to create. First locate where you would like to have the button. At that location we will add the code.

Note: width and height are the width and height of the button-image we will be using.

Your basic applet code;

<APPLET
CODE = "PopupMenuApplet.class"
CODEBASE= "."
NAME= "PopupMenuApplet2"
WIDTH= "120"
HEIGHT= "34"
MAYSCRIPT
>

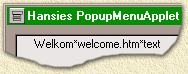
Here we tell the browser that we want a JAVA klasse (class) "PopupMenuApplet.class" to be used at this location. The codebase (".") indicates that the class-file will be located in the same directory as where the HTML-file is located.

The applet must be given a name, "PopupMenuApplet2" in this example.

Finally we must indicate the size of the applet by entering the width and height values of the button-image.

Next step will be to tell the JAVA applet where to find what image and how the menu should look like. First we add the image information:

<PARAM NAME="IMG" VALUE="button_menu.gif">

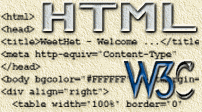
Here we tell the JAVA applet, that it's "IMG" parametr (PARAM) should have the value (VALUE) "button_menu.gif".

Note: These parameters are JAVA Applet specific !!

Now the hard part: the menustructure.

To make sure the applet is universal, a specific data-structure was created. Let's call these the "data-parameters".

Don't get scared now (I created a little tool for this, so don't worry):

<PARAM NAME="DATA" VALUE="
{Welkom*welcome.htm*text}
{HR}
{Internet* {Introductie*internet.htm*text}
{HR}
{HTML*html.htm*text}
{HR}
{Navigatie Help*navigationhelp.htm*text}
{HR}
{Over deze webpagina ...* {Updates*updates.htm*text}
{Statistieken*statistics.htm*text}
{Software en de Auteur*about.htm*text}
}
">

You understand ? No ? No problem, I have trouble reading this too...

This data represents a rather simple menu (sorry for the Dutch text, but hey, it's just an example):

Welkom  

 
Internet >> Introductie
Navigatie Help

HTML
Over deze webpagina >> Updates
  Statistieken
  Software en de Auteur

*the submenus have a differnt color, so it won't be to hard to keep them apart. The final menu will NOT have these colors!

A program to create these structures can be downloaded here.

What else do we need ?

We tell the browser where the applet ends by using the </APPLET> tag.

Here you'll see the entire code for a simple page using the previous examples (the blue marked text is the menu-code):

<HTML>
<HEAD>
<TITLE>PopupMenu test page</TITLE>
</HEAD>
<BODY>

<APPLET
CODE = "PopupMenuApplet.class"
CODEBASE= "."
NAME= "PopupMenuApplet2"
WIDTH= "120"
HEIGHT= "34"
MAYSCRIPT
>

<PARAM NAME="IMG" VALUE="button_menu.gif">

<PARAM NAME="DATA" VALUE="
{Welkom*welcome.htm*text}
{HR}
{Internet* {Introductie*internet.htm*text}
{HR}
{HTML*html.htm*text}
{HR}
{Navigatie Help*navigationhelp.htm*text}
{HR}
{Over deze webpagina ...* {Updates*updates.htm*text}
{Statistieken*statistics.htm*text}
{Software en de Auteur*about.htm*text}
}
">

</APPLET>
</BODY>
</HTML>

How to use the PopupGen application ?

Note: this application will NEVER win any beauty contest. I wrote this little piece of software because I didn't want to spend to much time on building and maintaining the menu structure for my webpage.

If you did not came here via the "Navigation Solution": please read the rest of the article, starting here. Below you will find a little tool to convert such a project to a HTML table.

Let's start by downloading the program-file and extracting the zip-file
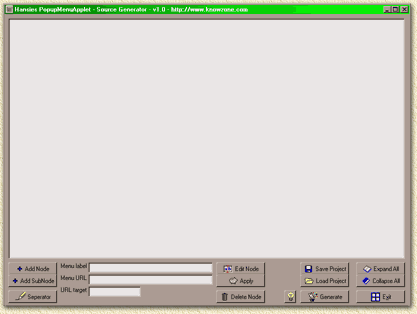
 (for example using Winzip).
The zip-file contains just one file: PopupGen.exe.

Double click the icon to start the application:

Main window ...

Note: For those of you working with a monitor displaying 800x600 or less: you will not be able to see the full window, since the size of this window is 818x607, go and buy a new monitor !

Some "words" before we start:

Name
Purpose/Meaning
Add Node
adds a menu-item on the same level as the selected menu-item
Add Subnode
adds a submenu-item to the selected menu-item
Seperator
adds a horizontal line to the menu, for seperating subjects
Menu label
this will be the text displayed in the menu
Menu URL
is the link that should appear when selecting this menu-item
URL target
is (for example) used with frames, you can leave this empty if you don't need it
Edit Node
copies the information of the selected menu-item so you can alter them
Apply
after using "Edit Node" and altering the text, you can use this button to apply the changes
Delete Node
remove the selected menu-item
Save Project
save the menu-structure for later use, this will be usefull for maintenance
Load Project
open a previously saved menu structure
Generate
generate teh needed JAVA PARAM code
Expand All
all submenu-items will be made visible
Collapse All
all submenu-items will be hidden
Exit
guess what,... quit the application

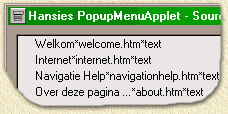
Note: DO NOT USE QUOTES in a menu title !

The application starts with an empty menu. If you would have saved a previous project, then you could load it right now using "Load Project".

Since we haven't done this yet, we will start building our example menu now. We will be using the sample menu seen before (don't mind the dutch text, it's just an example anyway).

Let us start with the menu-items in the main-menu.

1. Enter at the "Menu label" field: "Welkom" (without the quotes!)
2. At the "Menu URL" fied: "welcome.htm"
3. Since I'm using frames here and the target frame is called "text", we enter the value "text" at thej "URL target"-field.
4. Click "Add Node".

Note: Step 3 can be skipped if you're not using frames!

We will see:

Our first menu item

It will be easy to identify the values you just entered, seperated by asterisks ("*").

Repeat these steps for the other items, using these values:

Menu Label

Menu URL

URL Target

Internet

internet.htm

text

Navigatie Help

navigationhelp.htm

text

Over deze webpagina ...

about.htm

text

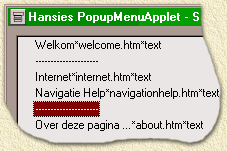
Resulting in to this window:

Now with some items added

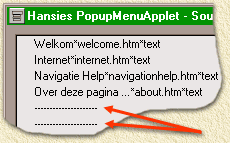
We still miss the seperator lines. We need 2 of them: click the "Seperator" button twice.
Two lines will appear now,... unfortunally at the wrong location:

Seperators added on the wrong place ...

Using the mouse we can move the lines to a different location, by dropping them on the menu-item that should be after the sepeartor line. Click the item you want to move using the left mouse button and keep that button pressed. Now move the mouse to the desired menu-item and release the mouse button.

Now also move the second seperator.

Seperators after moving them

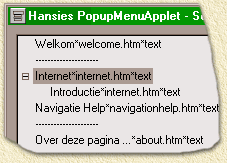
Now we have completed the main-menu, let's start creating the submenu.
Select the menu-item that needs submenu-items.

1. at the field "Menu label" enter "Introductie"
2. at the "Menu URL" field, enter "internet.htm"
3. Once again, enter "text" at the "URL target" since I'm using frames. You can leave this field empty if you're not using frames.
4. Click "Add SubNode".

Note: Step 3 can be skipped if you're not using frames!

Our first submenu item!

For the next submenu-item you can now use two different approaches.
1. You select the new submenu-item and start adding items on that same level using "Add Node"
2. You keep the mainmenu-item selected and add submenu-items using "Add SubNode".

It's up to you what you prefer.

Note: adding a seperator line can only be done on the same level as the selected item.

Once you're done creating the entire menu, you can use "Save Project", so you can edit the menu later.

Use a meaningfull name when saving the project, for example: menu_project.txt.

A project file is saved in plain ASCII text. You will be able to edit this using a wordprocessor or Notepad.

For each depth level a TAB is placed in frotn of a menu-item. The mainmenu (rootlevel) is considered level zero, therefor no tabs are placed in frotn of these items. A submenu of the mainmenu is considered level one, therefor one TAB is placed in front of this item. A submenu of a submenu is considered level two, so 2 TAB's in frotn of these items.

Let's create the JAVA PARAM code now by clicking the "Generate" button.

Once more, use a sensible name here, for example: menu_code.txt.

Note: This code is also stored in plain ASCII text.

Adding the parameter code to your HTML-code is pretty easy and straight forward.
Open the generated code using notepad.

Select all lines and cop them to the clipboard (either by using CTRL+C or the menu "Edit"-"Copy").
Open now (using notepad or your HTML-editor) the HTML-file and locate the position of the applet-data.

In this example I did paste the generated code (marked blue) here:

<HTML>
<HEAD>
<TITLE>PopupMenu test page</TITLE>
</HEAD>
<BODY>

<APPLET
CODE = "PopupMenuApplet.class"
CODEBASE= "."
NAME= "PopupMenuApplet2"
WIDTH= "120"
HEIGHT= "34"
MAYSCRIPT
>

<PARAM NAME="IMG" VALUE="button_menu.gif">

<PARAM NAME="DATA" VALUE="
{Welkom*welcome.htm*text}
{HR}
{Internet* {Introductie*internet.htm*text}
{HR}
{HTML*html.htm*text}
{HR}
{Navigatie Help*navigationhelp.htm*text}
{HR}
{Over deze webpagina ...* {Updates*updates.htm*text}
{Statistieken*statistics.htm*text}
{Software en de Auteur*about.htm*text}
}
">

</APPLET>
</BODY>
</HTML>

Save the HTML-file, and you're done....

Generating a table based on the menu

Additionally I wrote a small application to convert a project file to an HTML file, which you can download here (sources). This is done to keep the website accessable for those that do not have the popup-menu.

This program works pretty straight forward.

First you need to have a project file generated with POPUPGEN.EXE (as shown above).

Next you need to have an HTML file with a tag to indicate where to inject the table. The tag should be: <!--MENU-->

Generate a FLAT menu ...

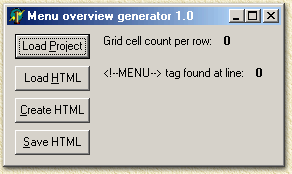
Step 1, click the "Load Project" button and select your project file.

Step 2, click the "Load HTML" button and select the HTML file with the <!--MENU--> tag.

Step 3, click the "Create HTML" button so the project file will be placed as a table in the HTML file.

Step 4, click the "Save HTML" button to save the HTML file (you can choose name and location of the file).


Klik hier om te wisselen naar nederlandstalige pagina's You are currently on the English pages.
Help & AboutWelcome ... !!GuestbookWeetHet HelpGlossary ...Searching the InternetSearching WeetHetAvailable downloadsNews & UpdatesStatisticsDisclaimer!AdvertisingJoin us !!!AwardsAbout WeetHet ...Hansie goes USAWhere is Hansie?First monthsMy new homeGoing outPuck goes USAMy new carSnapshots PuckRandom snapshotsFinally: Spring!Nice warm summerFirst Family visit!CD's and DVD'sMusicAudio-DVD to MP3Music CD to MP3Music CD to WAVCopy Music CDYour own Music CDMusic from the InternetChanging MP3 VolumeNero Burning RomBurn BIN/CUE filesConvert BIN to ISOComputer CDRomBurn ISO filesPhoto VCDPhoto SVCDNero vs Nero ExpressNRG to ISOBurn SVCDSVCD with menuBurn VCDVCD with menuDVD VideoWhat are RegionCodes?What is MacroVision?Video formatsDIKO: 3 AVIs - 1 DVDHow does a CD work?How to burn a CDCreating a DVDConvert BIN to ISONRG to ISOCreating a disk catalogComputer InfoHow does a CD work?Netiquette: E-MailWhat is DivX?What is MP3?What is RAID?What is USB?What are PAR files?Wireless LAN introPC to TV cablesStart XP fasterBoot from USB driveFireWire connect 2 PC'sPhoto SizingGraphics / PhotosPhotoshopPhoto SizingFast car3D buttonsDraw lightningPhotos on CDPictureToTVVideoCD with NeroSVCD with NeroMagix Pictures on CDDVD PictureShowPhoto SizingPhoto SizingGSM / PDAsCompaq iPAQReplace batterySerial craddle to USBGarmin eTrex cableGarmin eTrex plugRound Garmin plugPalmPilotConnect Ericsson GSMGarmin eTrex GPSMobile phonesEricsson RingtonesMusicBoxRingtonesMasterA edit SIMSMSC numbersConnector pinoutsHardware & HacksOverclocking CPU'sGenericAMD CPU codesAMD Slot-AAMD Socket-AProgr. SmartcardsMillenniumAlcatel HackLCD display to PCNetwork cablesBoot from USB drivePC to TV cablesPromise Ultra -> RAIDSoundblaster MIDIResistor colorcodeFireWire NetworkInternetNetwork genericEnabling DHCPWin95/98/ME ClientWin2000/XP ClientMac OS 7/8 ClientMac OS X ClientWell known IP-portsDNS addressesNetwork cablesWireless LAN IntroFireWire NetworkDialup connectionTCP/IP optimized for Win9xPublic IP Address?ADSL / MxStreamADSL in generalHow ADSL worksDNS addressesMXStreamInstallingPSTN EthernetISDN EthernetRouter for MXStreamSMC 7404 WBRA/BeTech ModemRoutereTech RouterSitecom 4S routerVigor 2200E routerSolving problemsAlcatel HackHack the modemPassword CalculatorPurpose of the LEDsSolving problemsFirmware upgradeDNS addressesWell known IP-portsMapping PortsAutoPortMappingConnection sharingPossibilitiesWinRoute (software)Network Win95/98/MENetwork Win2000/XPNetwork Mac OS 7/8Network Mac OS XWell known IP-portsWireless LAN IntroNetwork cablesRoutersSMC 7404 WBRA/BeTech ModemRoutereTech RouterSitecom 4S routerVigor 2200E routerInternet by SatelliteHow does it work?Brief intro ...Overview variantsStandardBySky methodTwo-Way InternetInstalling cardsWhich satellite-card?PC requirementsHarmonic CyberstreamPentam. Pent@VisionHauppauge DVBs NexusTechnotrend PCLineEOL problemsNew driversMounting a dish (Astra)Dish size?EON ChecklistTransponders EOLRamdisk for FazztYour own webpageNavigation solutionsInsight and solutionsApyCom apPopupMenuD.Binard PopupMenuPopupMenu generatorPopupMenu flatTips and TricksE-Mail linkE-Mail FORMBookmark this pageIcon for my webpage'Page back' link?Jumping within a pageEscape from framesUse frametitleControlling framesAuto redirectFixing 100% problemChange link colorText in the statusbarFixed backgroundText over imagesBrowser safe colorsUsing the .htaccess fileSpecial charactersWhere to downloadIRC using mIRCInstalling mIRCDownload Movies etcFAQMovies from InternetMovie QualityWhat are PAR files?LeechGuyLeechGuy editoreMuleWinMXE-MailNetiquetteQuote of the dayMiscellaniousHack Arescom NetDSLWireless LAN IntroFireWire NetworkWell known IP-portsWhat is my IP Address?Search (WeetHet)Searching (Internet)WeetHet DownloadsA few great websitesDNS addressesMicroControllersBasic Stamp IIStarting with the BS2Assembling the kitFullsize scematicsConnection to your PCBS2 to 44780 LCD44780 LCD SnapshotsBS2 to M50530 LCDM50530 SnapshotsHomebrew BS2Smartcards/SIMProgrammer Softw.CardMasterInfinityUSBMasterBurnerMilleniumCard TypesEdit GSM SIMResistor colorcodeMusic / AudioMusic from InternetIntroductionLeechGuyLeechGuy editorWinMXeMuleUsing mIRCBurn BIN/CUE filesConvert BIN to ISOAudio-DVD to MP3How does a CD work?Copy music CDYour own music CDWhat is MP3?Music CD to MP3MP3 CD for Yamakawa?Changing MP3 VolumeMusic CD to WAVSB MIDI interfaceAC3 to WAV/MP3ProgrammingBorland DelphiHansies Delphi ToolsAYeah!CatalogQuote of the dayPopupMenu generatorOverview ASCII chars.Satellite (TV & GPS)Satellite TelevionSatellite TV on the PCTV reception on your PCPC requirementsNew driversPentam. Pent@VisionHauppauge DVBs NexusTechnoTrend PCLinePVA file to MPEG2DirecTV TiVoRemote ControlDirecTiVo to OS6.21: Intro & Images2: TiVo disk in PC3: Install OS 6.24: OS6.2 first start5: SuperPatch & More6: Recordings to PCTyTools - Movies to PCOld: DirecTiVo to OS4Old: Sleeper HackSmartcardsProgrammer Softw.CardMasterInfinityUSBMasterBurnerMilleniumCard TypesWhat is DiSEqC?Mounting a dish (Astra)Dish sizeSRT8000 firmwareGPS NavigationGarmin eTrexDiagnostic modeSerial connectionConnect to iPAQ 36/38xxConnect to PalmPilotThe eTrex connectorThe round connectorHow GPS worksGeoCaching explained ...Internet by SatelliteHow does it work?Brief intro ...Overview variantsStandardBySky methodTwo-Way InternetInstalling cardsWhich satellite-card?PC requirementsHarmonic CyberstreamPentam. Pent@VisionHauppauge DVBs NexusTechnotrend PCLineEOL problemsNew driversMounting a dish (Astra)Dish size?EON ChecklistTransponders EOLRamdisk for FazztVideoVideo guide - start hereIntroductionGSpot: AVI InfoDIKO: 3 AVIs - 1 DVDDownload QualityVideo in generalWhat is DivX?Video formatsRecording TypesWhich AVI codecs?Intro K(S)VCD/KDVDDVD+RW IssuesAbout bitratesVideoServer pluginWhat are RegionCodes?What is MacroVision?RippingAudio-DVD to MP3Photo SizingAVI to MPEGGSpot: AVI InfoDIKO: 3 AVIs - 1 DVDAVI to DVD/(S)VCDWithout SubsD.I.K.O.MainConcept (S)VCDNero Vision Express 2TMPGEnc (S)VCDTMPGEnc K(S)VCDTMPGEnc with AC3With SubTitlesD.I.K.O.MainConcept (S)VCDNero Vision Express 2TMPGEnc (S)VCDTMPGEnc K(S)VCDTMPGEnc with AC3Burning CD NeroBurn VCDVCD with menuBurn SVCDSVCD with menuBurn BIN/CUE filesDVD PlayersCompatibilityAdd DVD playerDVD+RW IssuesIntro K(S)VCD/KDVDVideo ToolsBitrate CalulatorDVD RippingGSpot: AVI InfoFlaskMPEG and CCEVideoServer pluginDVD to DivXIntroductionCalculating bitratesRippingDVDx and SmartRipperDVDx settingsFlaskMPEG method 1FlaskMPEG method 2FlaskMPEG method 3DVD to (S)VCDIntroductionCalculating bitratesRippingDVDx and SmartRipperDVDx settingsFlaskMPEG 0.6 and CCEDVDx and Video ServerDivX to (S)VCDDVD to DVDDVD2OneDVDShrinkDVD+RW IssuesTMPGEnc & CoDIKO: 3 AVIs - 1 DVDMovie Cut & PasteGSpot: AVI InfoMergingMPEG1 and MPEG2Using TMPGEncWomble MPEG2VCRAVI with VirtualDubCuttingNewWith TMPGEncWomble MPEG2VCREasy Video SplitterAVI en DIVXAVI with VirtualDubEasy Video SplitterMovies from InternetIntroductionLeechGuyLeechGuy editoreMuleWinMXUsing mIRCWhat are PAR files?Burn BIN/CUE filesConvert BIN to ISOPictures on CDPictureToTVVideoCD with NeroSVCD with NeroMagix Pictures on CDDVD PictureShowRipping SubtitlesVobsub: fast and easy!SubRip (OCR)Sync subtitlesDisplaying subtitlesDisplaying with VobSubSync subtitlesCreate a MicroDVDPC connected to TVPC to TV cablesATI softwarenVidia softwareTiVo - Harddisk VCRTiVo Series 1What is a TiVo?Opening a TiVoSerial accessDebug Mode accessLinux Bash shellSet the clockDisable dialupDirecTV TiVoRemote ControlDirecTiVo to OS6.21: Intro & Images2: TiVo disk in PC3: Install OS 6.24: OS6.2 first start5: SuperPatch & More6: Recordings to PCTyTools - Movies to PCOld: DirecTiVo to OS4Old: Sleeper HackYamakawa 713/715IntroductionFAQThe Remote ControlSecret codesSet regioncodeSet regionfreeDisable MacroVisionFactory-settingsWhich DVDRom driveFirmware versionChange firmwareDownload firmwareChange backgroundCreate MP3 CDM.U.F.Y. MP3 CD'sHelpForumSearch (WeetHet)Search (Internet)News & UpdatesGlossary ...DownloadsLinksStatisticsAdvertisingJoin us !!!Guestbook

Liquid Web Fully Managed Web Hosting