On
this page ...
D.I.K.O. by
VMesquita is
a freeware application which basically converts one or more AVI's
into SVCD/DVD compatible MPEG files. These MPEG files can be used
to compile a DVD or a SVCD.
The kicker: D.I.K.O. supports
the KSVCD and KDVD
formats! This allows you for example to squeeze 3 or 4 full
size movies on one 4.7 Gb DVD! Or maybe 11 episodes of your favorite
soap/TV-series?
In this short guide I'll show you how to create your own MPEG
files (separate Video and Audio file) for DVD's or SVCD's from
AVI's, which you can playback on your PC and on most standalone
DVD-players.
The files
generated by D.I.K.O. can
be used to author a DVD/SVCD. D.I.K.O. can
even create the whole DVD/SVCD.
Note:
Not all standalone DVD-player support DVD±R(W) media,
check our compatibility
page for more details!
Note: D.I.K.O. stands
for DivX/DVD In, KDVD/KSVCD Out.
So it does not only support AVI's, but can also compress DVD's!
Also keep in mind that VMesquita did quite some efforts to create
this tool, if you really like D.I.K.O. then
please consider
getting the Gold version (which offers additional DVD ripping
support, non standard frame rates, subtitle synchronization,
crash recovery, etc.). It's just $19.95.
Note: Read the disclaimer first!
Note: Thanks to Vinicius (VMesquita) and Riez for the input! |
|
Overview
- What we need
Definitely needed:
- D.I.K.O.
Optional:
- CCE
- D.I.K.O. Menu Maker
- New FreeEnc
- Individual codecs
- FFDShow
- Configuring D.I.K.O.
- Configure Paths, Audio, Video, Encoder settings, DVD Authoring, etc.
- Preparing Menu Images
- Only required if you have D.I.K.O. author the DVD. We need these
images before conversion starts.
- Converting movies
- Adding a movies (one or 2 part movies), adding more movies, start
conversion.
- Trouble shooting
- Missing DLL: MSVCP60.DLL
-
Canceling conversions
- Jerky movie playback
- Menus are not there or do not seem to work
- v0.78/1.48Gold: Missing MSVCR70.DLL or "LoadPlugin: unable to load
RemoveGrain.dll"
What we need
Actually we do not need much, as D.I.K.O. comes pretty
complete.
Definitely needed:
(I recommend starting with this before trying the optional items)
- D.I.K.O.
Download it from the D.I.K.O.
homepage or from our downloads page.
Install it by executing the file you downloaded.
D.I.K.O. comes with XviD, make sure that option is checked during installation.
XviD can also
be downloaded from the XviD
Movies
website or from our downloads page.
Note:
If you decide to get the Gold version, the this version will be emailed
to you with instructions how to install it.
Basically it's extracting the archive you received and copy them over
the existing setup of the free version.
Optional:
- Cinema Craft Encoder (CCE)
D.I.K.O. standard
works with a free MPEG encoder (FreeEnc).
This encoder performs very well. However CCE seems
to perform a little better as for quality.
Using CCE requires ECLCCE,
a little tool which makes interfacing between D.I.K.O. and CCE possible.
You can download it from our downloads page.
You will need CCE
SP 2.66 or 2.67,
and ECLCCE.
Note that CCE is a COMMERCIAL application,
and it doesn't come cheap!
So buy CCE and install
it according the instructions.
HOW TO INSTALL:
Once you installed CCE and downloaded the ECLCCE file, go to
the directory where CCE is
installed. Extract the files from the ECLCCE archive
into this directory.
Commonly this is the directory "C:\Program
Files\Custom Technology\CCE SP" (where the
encoder executable can be found - the trail version is called CCTSPT.EXE -
I don't own the full version so the name might be different).
So
make sure both executables (CCTSPT.EXE and EclCCE.EXE)
are in the same directory.
- To have D.I.K.O.
Author the DVD: D.I.K.O. Menu Maker
M. van Rijnen created a little tool that can assist you in
creating the required files for D.I.K.O. to
author the DVD.
This tool can be downloaded from VanRijnen.nl,
or from our downloads page.
Read the DVD Authoring section below for more details.
HOW TO INSTALL:
Simply execute the downloaded setup file.
- Update FreeEnc
D.I.K.O. comes
with FreeEnc - a freeware MPEG1/2 encoder.
It can be that the FreeEnc version that comes with D.I.K.O. is
older than the newly available one.
A newer version of FreeEnc - if available - can also
be downloaded from the D.I.K.O.
homepage.
HOW TO INSTALL:
Extract the files into the FreeEnc folder in the DIKO folder (commonly:
"C:\Program Files\DIKO\FreeEnc").
Once you have done that: delete the file called "Default.ini",
copy the file "Incredible_KDVD.ini" and
rename it to "Default.ini".
This way the new FreeEnc will always use the KDVD format.
- FFDShow
I'd like to recommend FFDShow on
any PC that is being used for video playback or editing.
It's not really required for D.I.K.O. to
work properly, recommended anyway ...
- Individual Codecs
For each codec type (depends on the codec used for your AVI), you will need a
coded.
Optionally you could install DivX 3.11 (see our downloads
page), DivX
5.x (see DivX.com),
etc.
FFDShow already takes care of most of these, but some people
prefer to overload their PC with codecs.
Also; if you use for example DV AVI's (from a camcorder) then
you will need to have a DV-codec installed.
Configuring D.I.K.O.
The first time we start D.I.K.O., we will need to very
the configuration.
Note: screen shots are based
on the 1.47
Gold version
(yes I really purchased this awesome tool!). Screens for the free version
are similar.
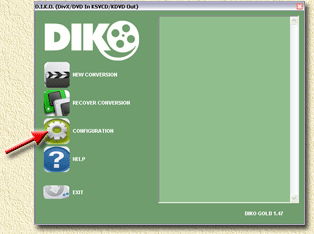
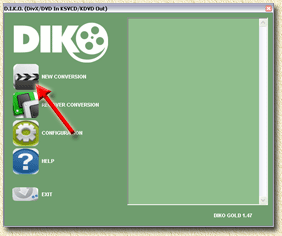
D.I.K.O.: Start screen of DIKO
Now click the "CONFIGURATION"
button. The following screen will appear:
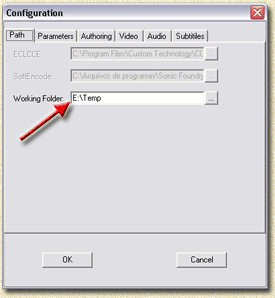
D.I.K.O. Configuration - Working folder
In the first screen (tab called "Path") we set our
working directory.
Make sure this points to a directory where you have
a couple of Gbytes free. I always make sure I have about 8 Gb free in
that folder.
Now go to the next tab (called "Parameters"). Copy
the settings as shown in the image below:
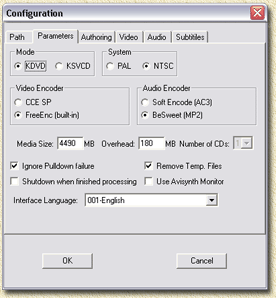
D.I.K.O. Configuration - Generic Parameters
Details:
- MODE
Select if you want to make a DVD (KDVD) or a Super
VCD (KSVCD).
- SYSTEM
Select your TV System here. PAL is commonly used in Europe, NTSC in
the USA.
More details can be found on the Video
Formats page (look at the
bottom).
Note from Riez: mixing PAL and NTSC movies might cause issues!
- VIDEO ENCODER
Select FreeEnc to begin with (I'm pretty pleased
with it).
If you want to use CCE, then after selecting this, go back to the "Path"
tab and set the "ECLCCE" path to you CCE directory.
- AUDIO ENCODER
I use BeSweet since Soft Encode seems
to be a commercial application (it is discontinued however).
- MEDIA SIZE
I have set mine to 4490 Mb with 180 Mb overhead. Slightly more than
the default. Either will work just fine.
However, when using DVD-R (since this media type does not support overbunring)
you're stuck with the maximum (default) value of 4482
Mb.
- OTHER SETTINGS
I have checked "Ignore Pulldown failure" and "remove
Temp files".
Optionally, if you do the encoding during the night, you can check
"Shutdown when finished processing".
The option "Use AviSynth Monitor" can be practical - if you're an expert
- to monitor problems (never had a use for it).
Also note that there have been reports that AviSynth Monitor may actually
cause problems!
Naturally you can set the interface language to your language, however
in this guide we stick with English.
Now we go to the next tab: "Authoring".
We have 2 options here:
1) We author our DVD ourselves using DVDLab, TMPGEnc
DVD Author or another DVD authoring tool.
In this window uncheck everything,
including the "Author
Disc" option.
Authoring your DVD's yourself gives you more freedom in designing
my own layout, chapters, and functionality you would like.
But it will also take more time ...
2) We have D.I.K.O. Auhtor our DVD
If you want to use this option (definitly less work),
then make sure "Author Disc" is checked.
This option will create a directory called "author" holding two folders:
"AUDIO_TS" and "VIDEO_TS"
with the complete DVD in it.
The other settings are the default languages you wish to use for Audio
(Sound Language) and subtitles (Subs
language).
The chapter option is default set to 5 minutes. Which
means that D.I.K.O. will
generate a chapter every 5 minutes.
You can change this value to 5, 10, 15, 20 minutes,
or "Don't add chapters".
Personally I would recommend keeping it a 5 minutes.
You can check "Create DVD Image" (if
you use Nero then this is not required), which will create an ISO
file which most burning software can burn. I usually have Nero handle this
problem, so I leave it unchecked.
You can also check the option "Burn using DVD
Decrypter". This will burn
the DVD right away once D.I.K.O. finished
creating the image. Again: I prefer to have Nero do the burning.
So I leave it unchecked. Leaving this unchecked also offers you the
option to do a quality check before burning your conversion to a
DVD.
The next tab "Video" is
used for setting encoder specific settings, here we assume that we use FreeEnc:
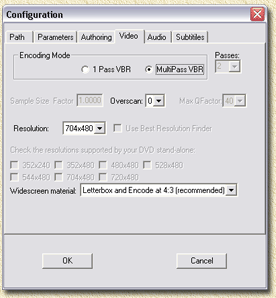
D.I.K.O. Configuration - Video Settings
For best quality:compression ratio I always select
"Multipass VBR".
For top speed conversion select "1 Pass VBR".
The option overscan should be set to zero.
"Resolution" depends on your TV system: PAL uses 704x576, NTSC uses 704x480.
For some movies it might make sense to use a lower resolution. However
so far I have not had any movie where the default value didn't work
properly. See also the the Video Formats page.
The next tab is "Audio". The
default settings are just fine.
Default 2.0 audio (stereo) is set to 160 kbps. If you selected "Soft
Encode" on "Parameters" tab, then 5.1 audio is set to 384 kbps.
The last tab is "SubTitles" and
allows you to define the kind of subtitles you want: DVD (selectable
during playback) or Fixed (always there). I highly
recommend setting this to DVD, even if you do not use subtitles (it will
not affect your movies at all).
So now we configured D.I.K.O. click
the "OK" button - we're ready to roll!
Preparing the Menu
If we let D.I.K.O. author
our DVD, then we must prepare the DVD menu images first.
So if you disabled
DVD Authoring, then you can skip this step.
First a little explanation on how D.I.K.O. does its
DVD authoring.
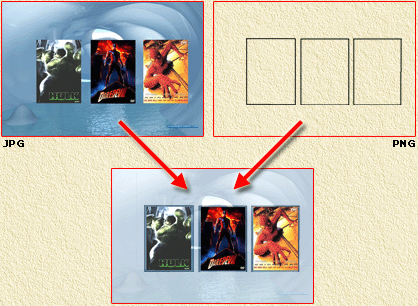
First it requires a JPG image.
This is basically the
background, but including all clickable components (ie. the menu items)
in the same picture.
Next we need a PNG image.
To determine where the "buttons"
(or menu items) are, we need to create a PNG image which masks the buttons.
With masking I mean, a box indicating where exactly the buttons are.
Only the border of the box should be in the image. The rest ogf the image
is transparent.
To give you
an idea how this will work:
D.I.K.O. - Masking for the DVD Authoring menu
Here we see the JPG image
holding 3 buttons (images based on examples provided with D.I.K.O.),
and the PNG file which is completely transparent,
with 3 rectangles in it. If we lay these images over each other,
we see that these rectangles indicate the borders of the images
- ie. the buttons or menu items. The area inside such a rectangle is
considered a button / menu item.
The black rectangles will light up later
when selecting an item during DVD playback.
Now we can make these two files in two
ways.
The
simple way: using DIKO MenuMaker.
Download the D.I.K.O. Menu
Maker from
our downloadspage, or from VanRijnen.nl to get the most recent version,
and install it.
Now start the application.
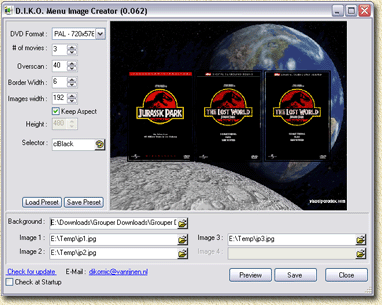
D.I.K.O. Menu Maker by M. VanRijnen helps you create the JPG and PNG
file for the menu
The process is pretty straight forward:
1) Select the TV system you're using (PAL
or NTSC) in the "DVD Format" field.
2) Select the number of movies.
3) Set overscan (I recommend leaving the standard to
40). Overscan is the space in the picture that might not appear on your
TV.
4) Select
the Border Width - this is the width of the selection border when an item is
active (during DVD playback).
5) Make sure aspect ratio is checked
6)
Optionally you can play with Images
Width.
Finally: load your Background image (can
be a BMP, JPG, or PNG), and the images which will identify the movies
(use the same order later when adding the AVI files for conversion!).
The button images can for example be cover
images, which for example can be found on CDCover.CC,
MoviePosters.com or
DVDTown.com.
You can modify them, if needed, with Photoshop or another drawing program.
You can see the result right away by clicking
the "Preview" button. If you're happy with what you're seeing: click "Save".
The application will ask you where to save the JPG file, it will automatically
save the required PNG file with the JPG file using the same file (just
another extension). Remember where you saved this!
The
hard way: Drawing it yourself.
You can use Photoshop,
The
GiMP, PaintShop pro, or any other drawing program that supporst
JPG and PNG to create these files
yourself. Applications that support layers are recommended (just easier
to work with).
The big advantage is that you can make
the images a lot more fancy.
Remember:
- you need to create a new image
of one of these sizes: PAL: 720x576, NTSC:
720x480.
- The black rectangle is the highlight around the buttons
-
Save an image as a JPG (without the rectangles, but with background
and button images).
- Save an image as a PNG (without background - this is transparent,
without button images, but with the rectangles).
Tip: take a
good look at what DIKO MenuMaker generates, or the example files that
come with D.I.K.O., it will give you a good indication how to do it.
Converting Movies
So now we're back at the start window. Click the "New
Conversion" button:
D.I.K.O. - Start a new AVI to DVD/SVCD Conversion
A new window opens allowing you to select the AVI files
you wish to convert:
D.I.K.O. - Selecting AVI's for your new DVD/SVCD
In this window we select our AVI files,
D2V files
(DVD2AVI project files), or a regular DVD (might not work very well with
the free version).
In this guide we will not dig into the advanced D2V project files or DVDs,
and
stick with AVI files only!
Note: The DVD option is not available in the free version!
I found that on average you can store between 4 and
7 hours of movie on a DVD with still a good quality.
So that is about 2 to 4 movies, or about 11 episodes of your favorite
show (right click an AVI, and select properties. This will show you the
playback time of each individual AVI).
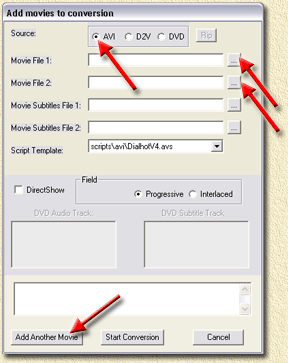
Adding
a movie
Note: If you use the DVD Auhtoring feature;
make sure you add the movies in the same order as you have set the buttons
in the JPG image!
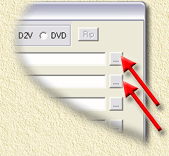
Click the "..." button
next o the field "Movie
File 1:".
Movies that consist out of 2 parts can be added
A file dialog will open allowing to select your AVI
file.
If your movie is
split in two parts (not uncommon, for example CD1 and CD2), the use the "Movie
File 2:" to select the second part.
Note that this should be the second part of THE
SAME MOVIE!
Note: Optionally you can
drag the AVI file into the "Movie File 1:" or "Movie
File 2:" field.
Adding
the next movie
If you want to add another movie, then click "Add
Another Movie" and repeat the steps as described for adding
a movie/avi.
Only use this button if this is NOT your last movie!!!
Start
Conversion
Once you have added all your AVI's you can click the
button "Start Conversion".
If you have "DVD Authoring" enabled,
then D.I.K.O. will
ask you for the menu image files (forgot what this is? Read the
preparing menu images section):
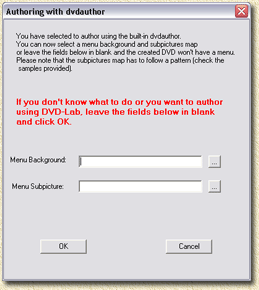
DIKO - Where are the menu image files?
The "Menu Background" file is
the JPG file. The "Menu
Subpicture" is the PNG file. Click "OK" and conversion will
start.
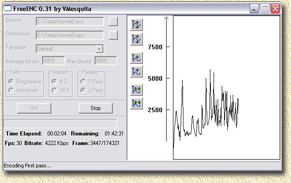
Conversion can take some time. My Athlon 64 (3400)
works about 6 hours before it's done (Multipass VBR).
If you enabled DVD Authoring, Create
DVD Image, and
Burn using DVD Decrypter, then at the end of the process
you will have a DVD burned and ready to play (don't forget tp put an
empty DVD in your DVD burner).
If you enabled DVD Authoring, and Create
DVD Image, but not Burn using DVD Decrypter,
then you will now have an ISO file ready to be burned with for example
Nero (it could also be a BIN/CUE, I'm not sure anymore).
If you only enabled DVD Authoring,
the you now will have a couple of files like VOB's,
BUP's, and IFO's in the "author/VIDEO_TS" folder.
You can burn these with Nero (use
DVD-Video and move the files from the "author/VIDEO_TS"
into the VIDEO_TS folder of Nero).
If you disabled DVD Authoring, you
will need to use a DVD Authoring tool to create a DVD. You will find
a MPV (Video) and MP2 (Audio) for each movie you converted.
Use DVDLab, or the TMPGEnc DVD
Author page for authoring a DVD.
Trouble
Shooting
MISSING
DLL: MSVCP60.DLL
D.I.K.O. installs
and runs just fine on most computers. However; sometimes it complains
that it is missing a specific DLL: MSVCP60.DLL. You
can download it from our downloads page in
case your computer needs it.
HOW TO INSTALL:
Extract the DLL and copy it into the "C:\Windows\System32" or "C:\Winnt\System32" folder.
CANCELLING
CONVERSIONS
Due to the way D.I.K.O. is setup, aborting a conversion
can take a little bit more effort than just clicking "Cancel".
- If you haven't clicked "Start
Conversion", you can
simply click the "Cancel" button.
- FreeEnc: If conversion
has started, you can click "STOP".
Next look in the taskbar of windows (the horizontal bar at the
bottom of your screen), you might notice that FreeEnc is still
running.

Click this once, so FreeEnc opens:
Click the "X" to close it.
- CCE: For CCE you will encounter a similar problem.
Maximize CCE and close the application.
JERKY
MOVIE PLAYBACK
There can be several reason why a resulting DVD playsback
rather jerky:
1) The quality of your DVD's is poor. I had this experience
with Memorex printable DVD's.
2) The source AVI is jerky by itself. (Garbage in =
Garbage out)
3) Some people claim that framerate conversion can
cause this as well (for example 25 fps to 23 fps). I have not had this
experience.
4) You squized too much on a DVD, the bitrates can
become to low for a smooth playback. Try to stick to 3 movies or 11 episodes
per DVD.
5) Your DVD player does not support KDVD or KSVCD (see
compatibilty page and KDVD/KSVCD
intro)
MENU's
DO NOT APPEAR OR DO NOT SEEM TO WORK
Menus do not seem
to work as they should in DIKO 0.77 and 1.47 Gold so you will have to
apply a little workaround.
Do the following:
- Open the file "diko.ini" (can
be found in the folder where you installed D.I.K.O.)
- Find the section "[DVDAuthor]"
- In this section you will find:
main_menu_jpeg=
main_menu_subpictures=
Change this to something like:
main_menu_jpeg=X:\XYZ\menu.jpg
main_menu_subpictures=X:\XYZ\menu.png
Where "C:\XYZ\" is
the folder where you will always save the menu image files (menu.jpg
and menu.png).
Now DIKO will always get those pictures, so it would be handy if you say to
the menu maker to save your pictures to this folder.
MISSING
MSVCR70.DLL or "LOADPLUGIN: UNABLE TO LOAD REMOVEGRAIN.DLL
I have seen this problem with v0.78 (free)
and 1.48 (Gold) and is both caused by the midding DLL.
Download MSVCD70.DLL from our downloads
page and after extraction
copy the DLL to "C:\Windows\System32" of "C:\Winnt\System32".
|
