|

| Print this page - use Landscape |
Search the WeetHet Pages |
|||||||||||||||||||||||||||||||||||||||||||||||||||||
| WeetHet is being updated! - Current articles will slowly move to www.tweaking4all.com For excellent webhosting that is reliable and affordable, we highly recommend: LiquidWeb |
||||||||||||||||||||||||||||||||||||||||||||||||||||||
|
On this page...
Overview Before we start we need to decide what type of cable we wish to make:
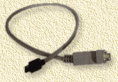
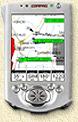
Getting Connected with a nullmodem cable This trick assumes a Compaq/HP iPAQ 3600 (or 3800) series PDA and a Garmin eTrex GPS receiver (any model will do). What do we need?
Basic layout of the connection Cables, Cables, Cables ... So how are the wires connected then?
Connect the 3 wires with the connectors as indicated in the table above. (Thanks to Jan Willem van der Hoek for the 38xx information) After doing the soldering, you might want to try one or two of the freeware applications for your PocketPC (Stealth GPS for example). Make sure protocol (Garmin vs NMEA) and baudrate (usually 4800 for NMEA) are set properly. The connection of your Compaq iPAQ is sometimes called COM1 in the PocketPC application ... Below you will find detailed images on the pins to use. Keep in mind that this cable is for GPS only!
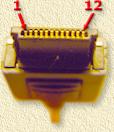
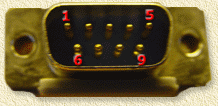
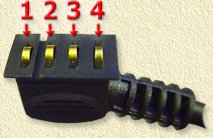
And this cable is a NULMODEM cable! Connectors and numbers ... As always, connectors have numbered pins,... the only things is: WHAT numbers? Most DB9 connectors have number printed on them, but the iPAQ connector is too small for that. So I tried to make it better understandable which is which. The iPAQ 3600 series connector Front view, viewing the part that goes into the iPAQ:
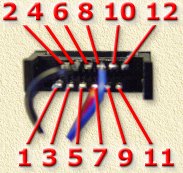
This is what such a connector looks like on the backside, ie. inside the connector:
The RS232 DB9 connector This is a well known and well document connector, most of them even have numbering on the connector itself.
Direct connected to the Garmin eTrex If you'd rather have a direct connected cable, you should need the data on the Garmin eTrex connector:
The serial connector of the iPAQ (3600 and 3800 series!) will have to be connected as such:
(Thanks to Jan Willem van der Hoek for the 38xx information) Tip: If you're busy with an eTrex connector anyways then you might want to consider adding external power for the eTrex aswell. Use a 3V powersupply and connect it to pin 1 (+) and 4 (-) of eTrex connector. |
||||||||||||||||||||||||||||||||||||||||||||||||||||||