|

| Print this page - use Landscape |
Search the WeetHet Pages |
|||||||||||||||||||||||||||
| WeetHet is being updated! - Current articles will slowly move to www.tweaking4all.com For excellent webhosting that is reliable and affordable, we highly recommend: LiquidWeb |
||||||||||||||||||||||||||||
|
On this page ...
OVERVIEW
First of all you must get the setup file from the WinMX website (the original website does not exist anymore - thanks JD for the tip! - try these: WinMX World or WinMX World Archive). If download is slow or not available, the please consider using a different location, or download version 3.31 of the last version 3.53 right here from WeetHet. After downloading (please try to remember where you downloaded the file too!) you will need to unpack (use either WinZip or WinRar) the "winmx260.zip" (depending on the version you just downloaded, the filename might be different). Now you will have a file called "winmx260.exe", double click it to start the setup; The "Welcome"-window now appears, click the "Next" button to proceed installing. Next, the "License Agreement" appears, click "Yes" to continue. Now "Choose Destination Location",
you may change the installation location if you like, click "Next". Now it's time to start WinMX for the first time. Click "START" - "Programs" - "WinMX" - "WinMX". First the "WinMX License Agreement" appears (again), click "ACCEPT AGREEMENT" to continue. The WinMX setup wizard will now guide you through the settings setup, click "Next" to start.
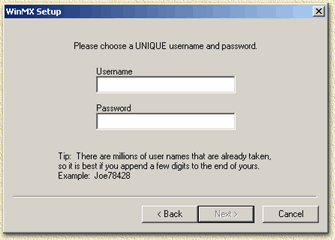
In this window you will have to enter a username and a password, this can be any username and password you would like to use for using WinMX. It is advisable to use an alias like "Joe1234" or "JohnDoe123" rather than your normal name. The password can be about anything else too,... Note: you might want to write down the username and password, you might need it in the future. Click "Next" to continue.
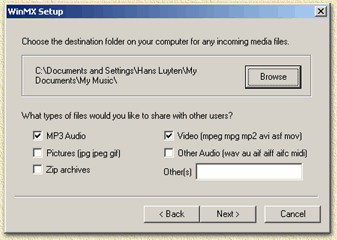
The now appearing dialog will ask you where to download files to, and what filetypes you would like to share with other user. This is the basic part of tools like WinMX and Napster. You can open a folder that can be accessed by other users, so make sure that folder does not contain private data! Also make sure you do not select the root of a drive ... First select the download folder by clicking the "Browse"
button.
Check what you would like others to see and finish by clicking "Next".
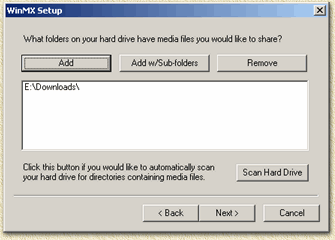
In this window you can "Add" or "Remove" folders you want to share - these folders are accessable by other users (read-only I hope). Select the folders and click "Next".
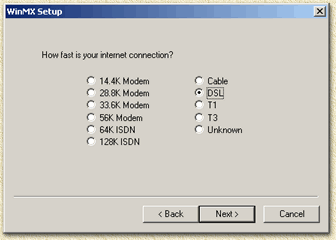
Now select the speed of your connection and click "Next" to continue. Tip: ADSL (MXStream) users should select "128K ISDN" instead of "DSL" - MXStream is not THAT fast. Now we get close to the more difficult part, how are you connected ? If you're computer is directly connected to a modem or cable modem, then select the first option "There is a dial-up ...". If your computer is connected to a LAN network, corporate network, sharing the Internet connection, connected to a hub or switch, then select the second option "This computer is connected ...". Note: When in doubt select option 2 "This computer .... (LAN)". Click "Next" to continue. If you selected option 1 ("There is a dial-up ...") then this window will appear, if you did select the second option then you should skip this and go to the next picture;
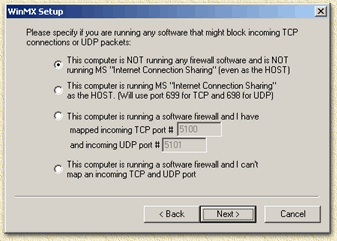
Here you can set if you are using a firewall (options 2, 3 and 4) like ZoneAlarm or Microsoft Internet Sharing, if you're not running either, you may check option 1 ("This computer is NOT ..."). Tip: If you're not sure or just want to be on the safe side, select option 4 "This computer is running ...". Make your selection and click "Next", now continue reading here (interface appearance). If you selected the option 2 ("This computer is connected to the internet through a local area network (LAN)") in the previous internet connection option, read on.
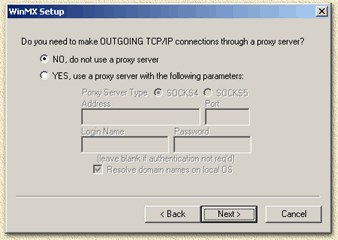
If you are connected to the Internet using a proxy,
then this is the place to enter the proxy settings.
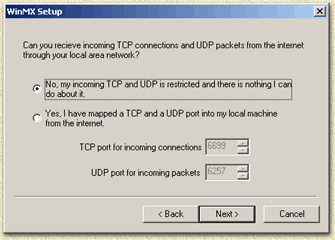
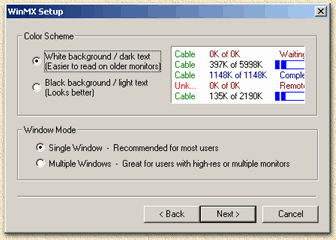
In this window you can set firewall settings as well. If you know what TCP/IP or UDP/IP ports are open, you can set them now. If in doubt check the first option "No, my incoming ...". Click "Next", continue reading. In the now appearing window we can change the interface appearance. Basically there are 2 color modes, white background (shown in the dialog window below) or black (below that dialog window).
I prefer the white background, but some people prefer the black background. You can also set if you would like to work with a single or multiple windows. I suggest that you start by using the single window since multiple windows can become confusing. Click "Next" to continue. You have now completed the WinMX settings-wizard, click "Finish" to continue. A dialog window appears, stating that your serverlist is empty. Click "OK" (make sure you are connected to the Internet) to retrieve a serverlist.
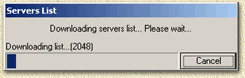
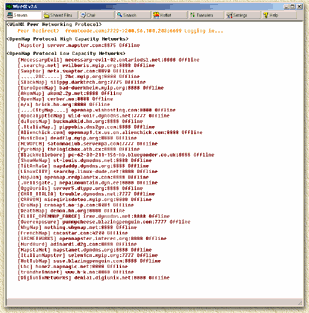
WinMX starts downloading a list of the available servers. Once WinMX completes the download the main window will be filled with a long list ... just don't pay any attention to it (yet).
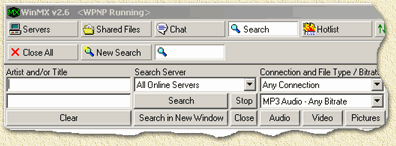
OK, so setup and settings are done now,... let's start looking for our favorite music, just to have an example how things work out here. Click the "Search" button, this window now appears allowing you to set the search parameters;
For example, let's say we would like to find "Calling Elvis" by the "Dire Straits" then this is what we can enter:
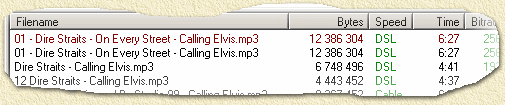
The results appear in the lower pane of this window;
Somethings to keep in mind before we make our selection are:
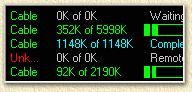
Details on the Server Status - or how to find the right connection So how do i detremine if I found the right connection? Well, the column Server/Status shows you the availability of the server/file you selected. Let's take a closer look; So now we found some results, and we want the file. Downloading is pretty straight forward, double click
the file you want to download. Here you see the download status... monitor the "Status" column to see if the download starts OK.
Once you get a succesfull connection downloading starts (this can take several second to start!);
Note: downloading can be pretty slow,... be patient ... To go back to the search window click "SEARCH" button and when you want to view the downloading files, click "TRANSFER" button . Have fun ! |
||||||||||||||||||||||||||||