Welcome to WeetHet!


Managed Web Hosting by Liquid Web

Your IP address:
18.97.9.168
     
 
Print this page
- use Landscape
Search the
WeetHet Pages
WeetHet is being updated! - Current articles will slowly move to www.tweaking4all.com
For excellent webhosting that is reliable and affordable, we highly recommend: LiquidWeb

On this page...

Mirdesign – AutoPortMapping tool for the Alcatel SpeedTouch Home (hacked), Pro and 510

Maarten Pater (Mirdesign) created a useful tool, helping Alcatel SpeedTouch Home (hacked) or Pro users to map ports without too much effort.

Manually mapping ports can be a pretty tedious job, specially when once has to map entire ranges of IP ports. See also the page: How to map ports on the Alcatel. Not only the large amount of manual "labor", but also the fact that you have to lookup the command's each time takes a lot of time

Note: Read the disclaimer and visit the Mirdesign website for additional help!

MIR Design - AutoPortMapping tool for the Alcatel SpeedTouch

Introduction

AutoPortMapping is capable of;

  • Build – port mapping
  • Remove – removing mapped ports
  • Individual selection of TCP/IP or UDP/IP.
  • List - overview of the current mappings in the NAT table.
  • Defserver – set the default server PC.
  • Flush – Delete all mapped port and load defaults optionally.
  • From, To – map a single port or a range of ports with one single action.
  • IP Modem – access the modem based on it's IP address.
  • Password/User – set username and password of the modem.
  • Import of external lists – Map or remove entire sequences of mappings based on external files.
  • Automatic web update of the application.

Download and installation

Before we start we will need to download AutoPortMapping of the Mirdesign website. Choose the HOT version if you have never worked with AutoPortMapping, or the SOFT version to update an existing setup.

Personally I suggest using the HOT version!

Tip: I recommend closing all Internet related applications, like browsers and messengers, before installing AutoPortMapping!

After downloading the ZIP file, you will need either WinZip or WinRar to extract the files from the archive. After extraction double click the “SETUP.EXE” file to start installation.

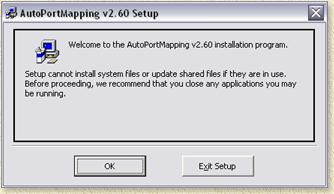
AutoPortMapping - Installation start

It's not unlikely that some files in either C:\WINDOWS or C:\WINNT are outdated. Setup will ask you if you want to update these. Click “OK”to update. A restart might be needed, setup will then ask you to reboot, choose “OK” to do a reboot.

These screens will appear during installation;

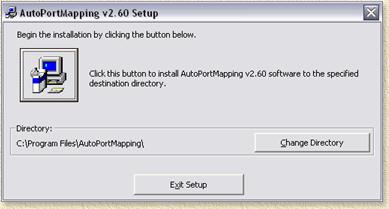
AutoPortMapping - Where do you want to install AutoPortMapping?

This dialog asks you WHERE to install AutoPortMapping. Personally I would simply use the default path, if you must change the path, then use the "Change Directory" button to do so.

Now click the blue computer icon to continue setup.

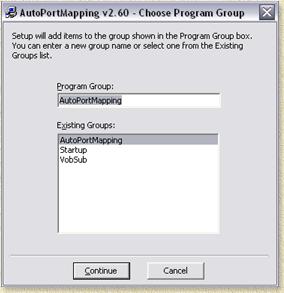
AutoPortMapping - Which program group?

In the next dialog you will be asked in what program group (in the Windows START menu) you wish to have AutoPortMapping. Once again, you can change this if you want to, by typing a new name or selecting one from the list.

Click "Continue" to proceed.

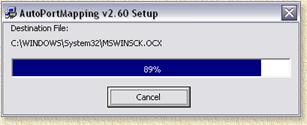
AutoPortMapping - Installation completed ...

The final steps - copying files - are now being completed.

Note: newer Windows versions might have newer files. The setup will ask you if it should overwrite these newer files. Naturally we do not want that.

Note: Setup can start complaining that some winsock DLL's are being used by applications (like for example ICQ/MSN etc). That's OK, simply click "Ignore".

AutoPortMapping start

When starting AutoPortMapping for the first time, we must first do some settings for us to become connected to the Alcatel.

At the first start, you are asked to register, since Maarten is not asking too much - please consider doing so. If you do not register, the application will not remember your settings and you will need to enter them again, each time you start AutoPortMapping.

The next steps;

1. Click the “Options” in the menu bar.

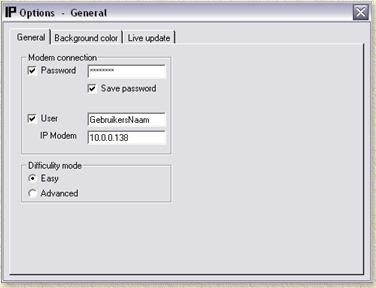
A window now appears where you must enter username, password and IP-address of the modem.

AutoPortMapping - Setting the conection information for the Alcatel

If you ever did set a password (either manually or by using AutoPortMapping) for your modem, then enter it at the "Password" field. If so, then please check the "Password" option. Optionally the password can be saved. If your sure nobody will access your PC to screw around with your modem, then it's pretty save to do so. In that case check "Save Password".

Also optionally, you can enter a username at the "User" field. If you want to use then, then put a checkmark in front of that too. Note that not all firmware versions work properly with username - meaning that most firmware versions simply ignore it.

We also need to enter the IP-address of the modem ("IP Modem"), default this is 10.0.0.138. If you never manually changed this address, it's safe to assume your modem has this IP-address too.

Finally we can set the interface to “Easy” or “Advanced” mode. For now choose "Advanced" mode.

Close this window now by clicking the little "cross" in the upper right corner of this window.

2. Click “Connect” in the menu bar.

AutoPortMapping will now try to connect to the Alcatel SpeedTouch.

If that worked out OK, AutoPortMapping will try to retrieve settings from the Alcatel SpeedTouch. The main window will show you what happens, as shown below:

------------------------------------------------------------------------
*
* ______
* ___/_____/\
* / /\\ Auto Port Mapping
* _____/__ / \\
* _/ /\_____/___ \ Version 2.62
* // / \ /\ \
* _______//_______/ \ / _\/______ By Maarten, Mir
* / / \ \ / / / /\
* __/ / \ \ / / / / _\__
* / / / \_______\/ / / / / /\
* /_/______/___________________/ /________/ /___/ \
* \ \ \ ___________ \ \ \ \ \ /
* \_\ \ / /\ \ \ \ \___\/
* \ \/ / \ \ \ \ /
* \_____/ / \ \ \________\/
* /__________/ \ \ /
* \ _____ \ /_____\/
* \ / /\ \ /
* /____/ \ \ / ICQ: 44558950
* \ \ /___\/ wir@xs4all.nl
* \____\/ www.mirdesign.nl
------------------------------------------------------------------------
Status: Initializing liveupdate... [DONE]
Status: Current update version: 1.10
Status: Looking for a new version... [DONE]
Status: No new version has been found
Status: Connecting... [DONE]
Status: Checking Firewall status... [DONE]
Status: Firewall is on


Tip: In case of errors: check username, password and IP-address in the options window! If you didn't register, keep in mind that the application will not remember your settings!

Mapping or Removing Ports

The main purpose of AutoPortMapping is to make mapping ports easier, so let's do some mapping :-)

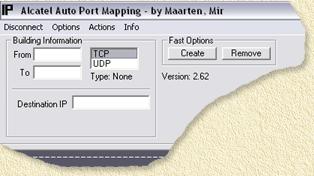
AutoPortMapping - Port mapping in EASY mode
AutoPortMapping in "EASY" mode

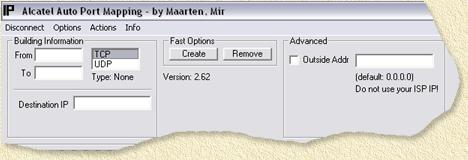
AutoPortMapping - Port mapping in ADVANCED mode
AutoPortMapping in "ADVANCED" mode

AutoPortMapping can be used in two ways to create/remove port mappings.

Before we can map ports, we naturally need to know WHICH ports we want to map. There are three possible sources for finding the needed port numbers: The manual of the application, The website of the application or finally the IP-Port list. If you found port numbers that are not in the IP-Port-List, then please e-mail them to me so I can add them.

Note: only add ports between 0 and 32767.

So now we know if we want to map one port or a group of ports (add or remove).

BUILDING INFORMATION:

If you want to create/remove a single port; enter the port number in the “From” field. Leave the “To”field empty. An example: port 7777 for Unreal Tournament.

If you want to add or remove a range of port numbers; Enter the first port number of this range into the “From” field. Enter the last port number of this range in the “To”field. For example: ports 6891 to 6900 for MSN Messenger.

Now choose if this should be TCP/IP or UDP/IP.

Finally enter the "Destination IP", the IP-address of the PC in your local network where the application is running.

Note: for a port mapping only ONE PC can be assigned to that particular port number!

Execution:

Click the CREATE button for creating a mapping (add) or
click REMOVE to remove existing mappings.

ADVANCED MODE

In "Advanced" mode you can additionally enter an IP-address of a particular PC on the Internet that can access this port. This is done by entering the IP address of that PC in the "Outside Addr" field. By default this is set to 0.0.0.0, meaning that ALL PC's on the Internet can access this port. Warning: never enter your own public IP address here!

Additional Actions

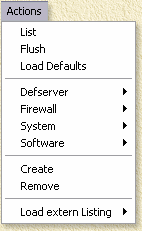
In the menu, you will also see an option called "Actions";

AutoPortMapping - Extra options ...

These extra options ("Actions") help you assist in more detailed configuring the Alcatel SpeedTouch.

Caution: Make sure that you really know what you are doing when using these "Actions"!

  • Action - LIST : Display NAT table content

    This option displays the content of your current NAT table (which ports are being used). Do not get scared by the large amount of entries. Usually applications like instant messengers (MSN, Yahoo!, etc) and Peer-to-peer tools (KaZaa, eMule, WinMX, etc) and browsers open a shit load of ports.

  • Action - Flush: Empty the NAT table

    Using Flush will empty the entire NAT table! Make sure you really know what you are doing here! Just to make sure, AutoPortMapping will ask you a second time to make sure you are sure what you are doing! After flushing the table AutoPortMapping will ask you if it should load the defaults back into the table.


  • Action - Load Defaults: Load factory settings

    This option load the factory settings of the modem. Be aware though that it might be so that these settings are not the proper settings for your (A)DSL connection!

  • Action - Set Defserver: Set default server PC

    SET: here you can define the IP-address of the default server. All incoming traffic that has not been mapped to a particular port number will be redirected to that PC. This can save you al lot of port mapping.
    Note: Before using this, enter the IP-address of that PC into the field "Destination IP".

    EMPTY: Removes the default server (sets it to zero).

    VIEW: Displays the default server IP address.


    Note: Mapped ports ALWAYS overrule defserver!

  • Action - Firewall: Internet firewall ON or OFF

    The internal firewall of the modem can be switched ON (strongly recommend leaving it ON!) or OFF.

  • Action - System - Password: Set the password of your modem

    SET PASSWORD: set a new password.

    In the upcoming window you will enter the password twice.

    AutoPortMapping - Nieuw Wachtwoord invoeren

    Note: Do not forget you password!

    CLEAR PASSWORD: Remove password.

  • Action - System - Reboot modem: Basically reset the modem

    The modem will be switched OFF and ON again, useful when the modem seems to be confused.

  • Action - Software - Display Version: Display firmware versions

    Show the firmware version of the active firmware (used right now) and the passive (backup) firmware.

  • Action - Software - Switch Version: Toggle between the active and the passive firmware

    Tip: Make sure your modem is NOT connected with the Internet, as this might damage your modem.


  • Action - Create: is identical to the CREATE button on the main window


  • Action - Remove: is identical to the REMOVE button on the main window


  • Action - Load extern listing: Load listing of ports to be mapped or deleted

    Using "script" files like that, you can add (AMC file) or remove (AMR file) mappings.

    Syntax of these files (you can comment lines by adding a "#" in front of that line):

    you must enter these fields
    Optional fields

    [From Port] <IP Computer> (IP Extern) {To Port} /TCP-UDP\

    - [From Port] - The first port number of a range or an individual port number.
    - <IP Computer> - The IP-address of the computer where you want to direct traffic to.
    - (IP Extern) - Optional, the IP-address of the only external PC that can use this port. Default: 0.0.0.0
    - {To Port} - Optional, when using a range of ports, then this should be the last port number of that range.
    - /TCP-UDP\ - Optional, choose either TCP or UPD. Default: TCP.

    Two file extensions are being used for distinction between CREATE and REMOVE lists:

    AMR: Remove List
    AMC: Create List

    In both files you can also define the Defserver, syntax:

    ^IP^

    Where "IP" should be the IP-address of the default server.


Klik hier om te wisselen naar nederlandstalige pagina's You are currently on the English pages.