|

| Print this page - use Landscape |
Search the WeetHet Pages |
|||||||||||||
| WeetHet is being updated! - Current articles will slowly move to www.tweaking4all.com For excellent webhosting that is reliable and affordable, we highly recommend: LiquidWeb |
||||||||||||||
|
On this page ...
Introduction: What format should I choose? Tip before we start: take a good look at the Video Formats page, for details! First of all, we need to know if our standalone DVD-player can handle CD-R or CD-RW media. Newer models, specially those that support MP3 playback, usually are capable of dealing with both media types. Older players usually don't. You will have to simply test this. If CD-R media doesn't work, then please try to use CD-RW media, since the reflection behavior of CD-RW is very similar to DVD. I tried this once with my old Toshiba DVD player and it usually works. If neither media type is supported (CD-R and CD-RW),
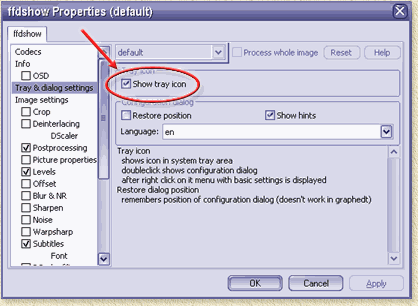
you're out of luck. Consider buying a new DVD player. What format should I use? VideoCD or Super VideoCD? Well this depends again on the capabilities of your DVD player. Does it support Super VideoCD? Then Super VideoCD (SVCD) is the choice to make because of the higher image and sound quality. If the DVD player does not support SVCD, then go for VideoCD (VCD). Unless that's not supported either, then you're back to the "buy a new DVD player" solution. See also the Video Formats page for more details on the two formats. So now we know the MEDIA TYPE and the VIDEO FORMAT we want to use. The required software Software for movie playback First try if you can playback the movie on your PC using the Window Media player. If not, then we will need to install (if not already) the Video Codec. For DivX go to the DivX homepage . This is needed for playback. MPEG Encoder uses the codec suitable for the movie, just as it does with basically any AVI file format. Software for transcoding Here we are at the core of our conversion process (called "transcoding"). Download MPEG Encoder from the MainConcept website. First use the trial version to see if it works the way you expect it. I know I'm convinced that this is a tool worth it's money, but make sure you do too. Install it and run the application. In order to get subtitles we do need a recent version of FFDShow. Download it from the Download page or from the FFDShow SourceForge page (go for the FFDShow-Alpha!). Step 1: Before installing this, remove ALL subtitle related filters like GDivX and VobSub (not required I guess, but you won't need them anymore any way - and better save than sorry). Step 2: Uninstall previous FFDShow installs. Most likely you cannot remove C:\Program Files\FFDShow\FFDShow.ax. Simply rename the file to something else, for example FFDShow.old. Step 3: Install the newly downloaded FFDShow. Step 4: Copy C:\Program Files\FFDShow\FFDShow.ax also to the windows\system32 directory, usually either C:\Windows\System32 or C:\WinNT\System32 overwriting older FFDShow versions. Step 5: Open the FFDShow configuration screen. You can do this by selecting Windows "Start" menu -> "Programs" -> "FFDShow" -> "Configuration". Very these settings; At "Tray & Dialog settings" check "Show Tray Icon" - this will make access to the settings easier during playback.
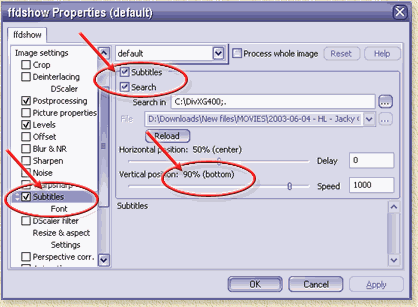
At "subtitles", check "Subtitles" and make sure the vertical position is set to 90%;
To make sure things go well with MainConcept MPEG Encoder, within MPEG Encoder go to the menu "Options" - "Import Modules...". Make sure the order of modules matches this one, optionally you can select a module and use the arrows on the right to move them up or down, click OK when done:
Let's do some TransCoding After starting the MPEG Encoder, you will see this screen (can differ per version, I used version 1.3):
Click the "Open ..." button (A) next to the Video Source field and select the DivX movie you want to convert. Note: In case
MPEG Encoder didn't enter a filename at the "Audio Source"
field, you might want to click button (B) for selecting
the audio file. If there is no seperate audio file, then just select the
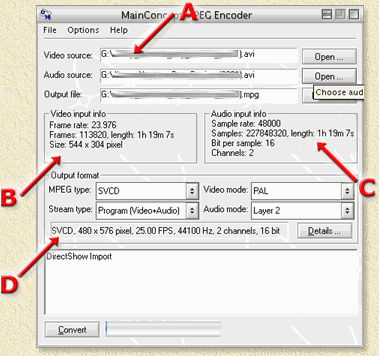
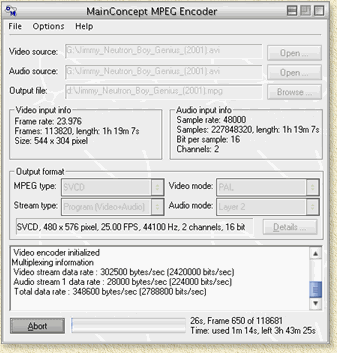
same file as you did with "Video Source". Usually it takes a few second for MPEG Encoder to recognize the file format and "start" the engines (video codec and audio codec). Something like this might appear:
In this example we see some info that might be very usefull. A: Files used Here we see the Video Source and the Audio Source filenames. Usually with DivX (and other AVI formats), the audio track is included in the movie file. So for the Audio Source we use the same filename. Also very nice to know what the Output Filename is, which is the 3rd of the these 3 fields. B: Video input info In this example we see that the input movie runs at 23.976 frames per second, at a resolution of 544 x 304 pixels. The entire movie is about 1 hour and 19 minutes long. C: Audio input info Here we see details on the audio track: it's stereo (2 channels) at a bitrate of 48 kHz (pretty good quality). D: Output format Here we need to do some settings. These settings can be done:
Naturally, all these settings can be pretty confusing. MPEG TYPE; VIDEO MODE; STREAM TYPE; AUDIO MODE; The "Details" button brings you to a more advanced screen;
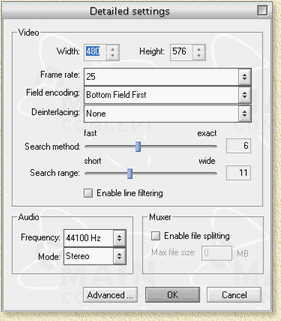
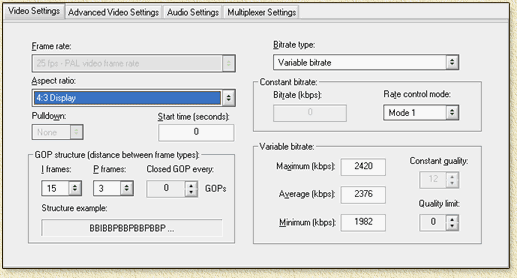
Here we can do some detailed settings on the framerate, quality (Search method and range) and audio. However, when clicking the "Advanced ..." button, we come to a more interesting screen. The "Video Settings"-tab shows use some really cool settings on the bitrates and aspect ratio (4:3 = normal TV, 16:9 = widescreen TV). Here we can enter values we can calculate with for example the WeetHet-bitrate-calculator, to make sure the move we are converting fits on a specific number of CD's. Enter the calculated bitrate into the "Average" field. Make sure the "Minimum" bitrate is lower than the "Average". I usually enter 500 kbps in the "Minimum" field.
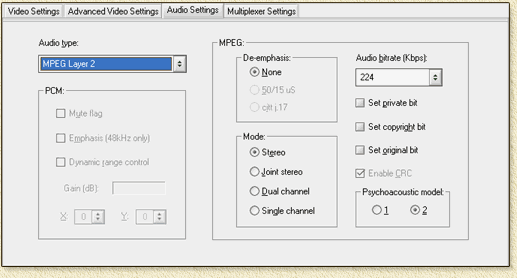
The "Audio Settings" tab allows us to tweak audio a bit. I usually use 224 Kbps for bitrate and usually don't change any of the other settings.
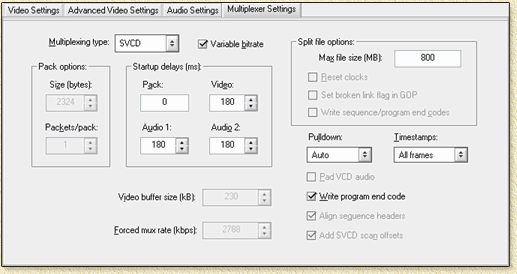
The final tab "Multiplexer Settings" is one of my favorites. It allows you to specify at what point the file should be split. So you won't need a cut and paste tool afterwards to make sure it fit's on a CD. MPEG Encoder will do that for you. Usually a 80 minutes CDR or CDRW can hold almost 800 Mb of data for VideoCD or Super VideoCD. To be on the safe side, choose something like 795 Mb as 800 Mb might result in a slightly too big a file for an 80 minutes CDR.
Pressing the "OK" button twice, will bring us back to the begin screen. Simply click "Convert" to start the process.
In the lower right corner you will see the progress (the gauge next to the "Abort" button). Next to the gauge you will also see some details on how long it will take to convert. In this example a AMD Duron 700 Mhz took only 3 hours and 45 minutes to convert the movie to SVCD! That's FAST! Not even to mention the great quality! On my Pentium 4, 2.8 Ghz it take app. 1 hour and 40 minutes, my AMD Athlon XP (2800) does the same job in less than an hour! Note: if the original file is bad of quality, then please do not expect the converted result to be any better! Note: during transcoding an AVI, you will see the FFDShow icon in the systray (Windows clock in the lower right corner). |
||||||||||||||