|

| Print this page - use Landscape |
Search the WeetHet Pages |
|||
| WeetHet is being updated! - Current articles will slowly move to www.tweaking4all.com For excellent webhosting that is reliable and affordable, we highly recommend: LiquidWeb |
||||
|
On this page ...
Overview In this article we will discuss the commonly used ratios, we'll also show you how to cut them in the proper size.
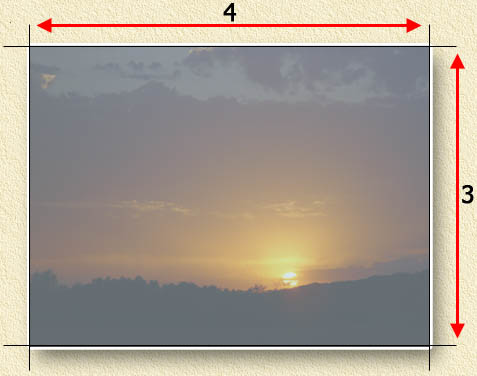
4:3 - Digital Camera's, (S)VGA and TV One of the most commonly used aspect ratio is the 4:3 format as seen with regular/older TV's. This format is very often used with digital camera's as well (most digital camera's do have a special setting so it can also create 3:2 pictures: 10 x 15 cm or 4 x 6 inch). 4:3 is also the aspect ratio of VGA formats (computer monitors). The picture shown below is made with my own digital camera (Sony F828). Back to the calculation example: both 3264 and 2448 can be divided by 816, resulting is a 4:3 aspect ratio. For large numbers, I use this trick to determine the aspect ratio: Divide the tallest side by the smallest side (3264 / 2448). This will give us a fraction: 1,33333. This implies an aspect ratio of 1,3333:1. Since we use integers to indicate aspect ratios, we need to multiple both numbers by 3. After all 1,33333 times 3 equals 4 (an integer). The other number in this aspect ratio is "1", multiply that by 3 and it will get you: 3. The aspect ratio of 4:3 shows.
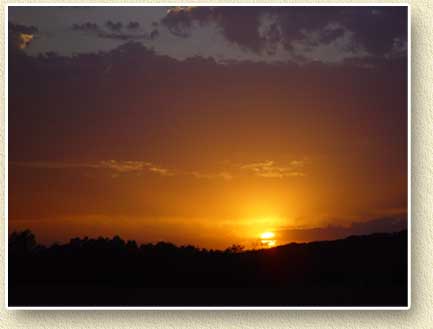
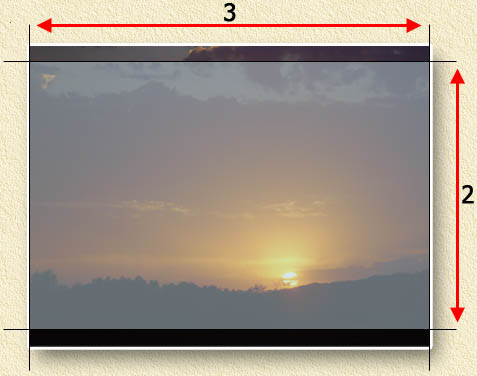
3:2 - The classic photograph format The classic photograph format has a 3:2 aspect ratio. This is the common aspect ratio for photo prints: 15x10 cm or 6x4 inch. The problem with digital camera's is obvious; when getting a print, you will miss a little piece of the picture ... Like mentioned before: most digital camera's have a 3:2 option, so pictures will actually be made in that aspect ratio.
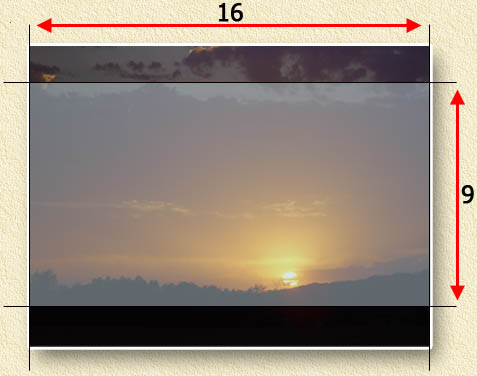
16:9 - WideScreen / HDTV format This is the aspect ratio we see with WideScreen (very common in Europe, less common in the US) and HDTV's. More and more laptops support this kind of aspect ratio. The purpose is obvious: watch widescreen movies on your laptop. Note that most laptops slightly divert from the 100% widescreen format. For example: my Compaq x1000 has a 1680x1024 resolution ... real 16:9 would have been 1680 x 945. Again; there is a good reason for this; it will allow extra space for the Windows taskbar and/or the DVD software control buttons.
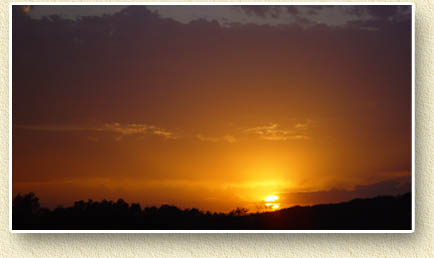
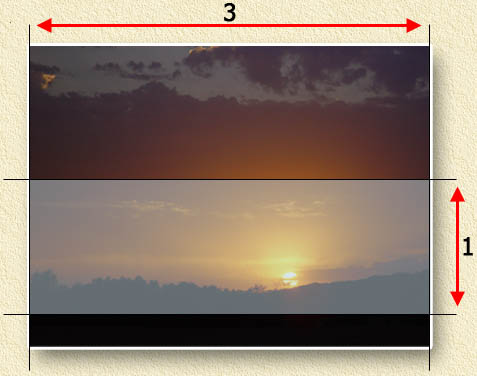
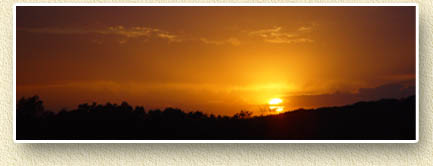
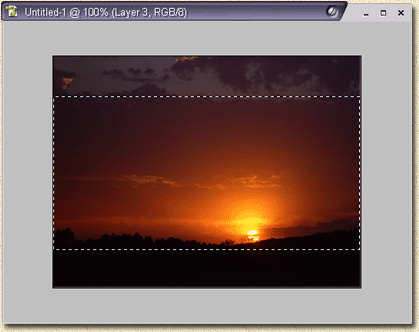
APS camera's also know the so called Panorama aspect ratio 3:1. Many people think a panorama shot will take up more space on their ASP film, but that is not the case. We did the same thing with our example below. Well, OK, I moved the "selected" area a bit down because that would result in a nicer panorama picture.
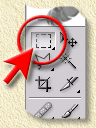
As you can see in the example; the character of the image becomes a whole lot different than the original picture. There is a shit-load of applications out there that can do this. I don't own them all, so I'll focus on just 2. Adobe Photoshop (the best graphical application around - but very expensive) and GiMP (a free Photoshop-look-a-like application). Where to get it: You can buy it (better see where you can get a loan for that) or (if you're lucky) it comes as a Lite version or a Special Edition version with your scanner or digital camera. Note: Special versions (SE, Lite, etc) might have limitations concerning the trick we show below! Step 1: Load the picture into Photoshop (Oh right, the examples are based on version 8/CS, older version will most likely have these options as well). Step 2: Select a random square/rectangle using the "rectangular marquee tool" - which you can activate by pressing the key "M".
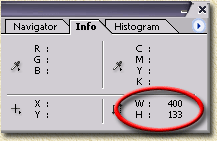
Step 3: From the menu "Select", choose "Transform Selection". Step 4: Drag the selection into the aspect ratio you want to have. The "Info" window (Press F8 top reveal it if hidden) will help you with that.
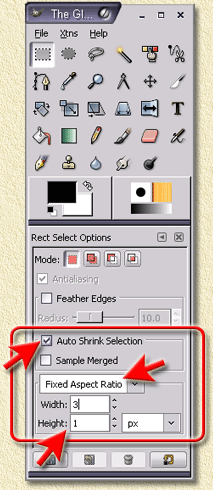
W (width) and H (height) indicate the selection size in pixels: 400 x 133 in this example. This is actually a 3:1 ratio. Step 5: Copy, create new file, and paste: Press the keys CTRL+C (=Copy), then CTRL+N (= menu "File" - "New"), press ENTER and press the keys CTRL+V (=Paste). Step 6: Save the file as JPEG/JPG (usual file format for pictures). Select "File" - "Save As". Set "Format" to "JPEG", type a name and click "OK". Photoshop now show a window where you can set the quality. GiMP has a bit more to offer here, but it will do. Move the "Quality" slider ("small file" on the left and "large file" on the right) which changes the image quality. Optionally you can check "Preview" so you get an idea what it's doing to your picture. Make a choice and click "OK". Where to et it: GiMP is free and can be downloaded for Linux, Apple Macintosh OS X and Windows from the GiMP website. Here I used GiMP 2.0.3. Note: Before you can install GiMP on a Windows PC, one MUST install GTK first. All files can be found on this website. GiMP works slightly different than other graphical application, so you might need a bit of practice to get used to is. To me it's a bit of a weird collection of individual windows.... but that's just me. Step 1: Load the picture into GiMP. Tip: In the window called "The GIMP" you select "File" - "Open" and select the file you want to work with. Unfortunately (and a bit strange to me) the dialog is nothing like what you've been used to from Windows. On the left you will find directories, and drive letters, in the middle you see the file names of the selected directory, and on the right you will see a preview in case you selected a file. Step 2: Set the desired aspect ratio. A very nice feature of GiMP - you can fix a selection to a certain aspect ratio:
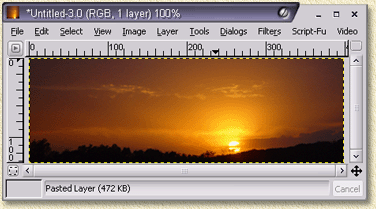
Go to the tools window, the window with the name "The GIMP". Check the option "Auto Shrink Selection", and set "Fixed Aspect Ratio". Next enter the desired aspect ratio: width and height. In our example we wanted a 3:1 picture (panorama), so enter these values. Step 3 : Select a rectangle using the "Select rectangular regions" tool - you can activate this tool by pressing the "R" key after you have activate the window of the picture. The best position to start a selection is by looking which part of the picture is the most important one. Start on the border of the image. For example: In our picture, we would like to see a bit of the ground. So we start in the lower left corner dragging to the upper right corner (do NOT go beyond the border of the image, as this will screw up the aspect ratio!). Step 4 : Copy, create new file, paste: Again we see that GiMP has some fun ideas implemented: From the menu "Edit" choose "Past as new". GiMP will automatically copy the selection, create a new file and paste the selection right in there.
Step 6: Save the file as a JPEG/JPG (common picture file format). Use the menu of the picture and select "File" - "Save As". On the right, from the "Determine File type" menu, choose "JPEG", type a name and click "OK". GiMP will now wine that it has issues because the layers are not supported by the JPEG format. Just ignore it and click the "Export" button .
Again another window appears allowing you to set the quality of the picture. Optionally you can check the "Preview" option which opens a window showing you right away what impact your quality selection has on the image. Tip: GiMP allows you add comments to the file in the lower input field. Practical if you want to write something down like where and when the picture was taken. Click "OK" and your picture will be saved.
|
||||