|

| Print this page - use Landscape |
Search the WeetHet Pages |
|||||||||||||||||||||||||||||||||||||||||||||||||||||||||||||||||||||||||||
| WeetHet is being updated! - Current articles will slowly move to www.tweaking4all.com For excellent webhosting that is reliable and affordable, we highly recommend: LiquidWeb |
||||||||||||||||||||||||||||||||||||||||||||||||||||||||||||||||||||||||||||
|
On this page ...
Page overview
Installation of PictureToTV is a pretty straight forward process. Double click the file p2tv140.exe file (for version 1.40). Follow these steps:
Click "Yes".
Click "Next".
Check "I accept the agreement" and click "Next".
Optionally you can first change
the installation path to the path you wish to use. However I would
recommend keeping the
default path.
Optionally you can first change the menu to a new
name or select an existing menu, not recommended though.
Here the setup wants to know if you do need additional
shortcuts (on your desktop and/or in the quick launch bar located next
to the Windows Start button). The next screen informs you what setup will do.
Once completed this window appears:
Optionally you can check "Launch
PictureToTV", this will
start PictureToTV once you click "finish". Installing the Super VideoCD plugin Before continuing: make sure you installed PictureToTV first! Note: The
Super VideoCD (SVCD) plugin is OPTIONAL. Now locate the Super VideoCD plugin installation file. Mine was called p2tvsvcd.exe, double click it.
The installation process is again
pretty straight forward. A screen will now appear, welcoming you
to the setup. Again, a window will ask you to agree
with the license agreement. The next window will ask you where to
install the plugin. Setup therefore needs to know the ROOT directory
of
PictureToTV,
by default this is C:\Program
Files\PictureToTV\, unless of course you selected another
directory to install PictureToTV in
during the PictureToTV setup. Setup now wants to know in which windows
start-menu you want a shortcut to "Uninstall SVCD plugin". Finally a window indicates that it's ready
to install the plugin. Quickly after that a window confirms that
the installation has been completed. Running PictureToTV the first time At the first time you start PictureToTV you will get this screen:
Option A: For those that want to try the
trail version first, click "Register Later" (this
question will show each time you start PictureToTV until
you register it). Option B: For those that have a registration key: click "Register Now". A window appears asking you to enter your email address and your registration key:
After entering e-mail address and registration key, click "OK". A new popup window will inform you that your 're registered now. Either way, the PictureToTV screen will
now open, showing you the "Tip of the day".
After closing the "Tip of the day" you will basically see this window:
PictureToTV controls and areas Before we start creating our first picture
(Super) VideoCD, you might want to familiarize yourself a bit with the
interface. There are basically 4 areas (I defined them myself so nomenclature might not match PictureToTV's);
Here we can navigate through our albums.
By default "Album 1" (A) has been create to let
you start working straight away! In this area you will also find some controls for working with albums (B). Below you see a short explanation of the buttons shown;
In this area, you will see the actual
content of an album, meaning: the pictures of your album. Later on we
will see more about this area as we start adding pictures.
The generic controls area is for navigating through the application.
This is the area where we get our content from for populating the Albums. Tip: Also keep an eye on the progressbar indicated by arrow D. It shows you how full your VideoCD will be!
Now that we are familiar with the interface,
it's time to create our first Photo (Super) VideoCD. Tip: For more information on the differences between VideoCD and Super VideoCD: please read the Video Formats page. As of this point I assume you just started PictureToTV as seen in "Starting PictureToTV for the first time". By default one album already exists, called "Album 1". Keep in mind that you can create multiple albums. So it's not a bad idea to start the entire process by sorting/organizing your images. Already thinking in terms of "albums". Note: For each Picture VideoCD (use the "File" menu) you create you can save the project file for easy retrieval later on. The first thing to do, I guess, is to populate the first album with some pictures. Note: You cannot create an album within an album! Simply use the file area to locate you images. Drag items (files) from the File Area to the Album Content Area as shown with the red arrow in the screen shot below, by left clicking the image (keep the left mouse button pressed). Move the mouse over the Album Content Area and release the left mouse button. You can also select multiple items either by pressing the SHIFT key, selecting from image to image (range). Or by using the CTRL key, selecting individual images. Repeat this step until you think your album is filled with images as you see fit. Tip: You can also use the Windows Explorer to drag images/pictures from. simply drop them on the Album Content Area.
Note: PictureToTV supports BMP, JPG, PNG, TIF, PCX, PGM, PICT, TGA, WMF, and even EPS formatted pictures. Most digital camera's use JPG (JPEG) images, where as most scanners tend to use TIF (TIFF) images. You can also change the order of the items within the Album Content Area by dragging one or more items to a different position (ie. drop the files in front of the image where you want them to appear). After populating the first album, you
might want to rename the "Album 1" (later
on this can be optionally made visible when creating the menu). Click
the name in the Album
Area and press the rename button ( The next step is to create a new album.
Click the new album button ( If you want to, you can already give this
new album a new name, using the rename button ( The order in which albums appear can be
changed by clicking the album you want to move and then using the up
( Now repeat step 1 for the newly created album(s). Keep repeating steps 1 and 2 until you have included all your pictures or until the CD is full (see the progress bar at the bottom of the screen). Tip: You can also drag images from one album to another. Simply open the source album and select the files you want to move to another album. The drag the selection over the album name in the Album Area and release the mouse button. Step 3: Advanced features - Adding Transition effects to an Album Adding transition effects (the effect
used when going from one image to another) is pretty straight forward
and can be done on two levels. To apply an effect on the entire album, click the "Effects" button in the Generic Controls Area. You will now see the File Area change, showing details on effects.
PictureToTV offers some excellent transition effects. In version 1.40 I found these (great) effects in the drop down list box: Random, Blinds, Circle, Contrast, Dissolve, Expansion Morph, Fade, Old Film, Rotate In, Shutter, Swirl, Twist, Zoom In, and finally Zoom Out. I have to say that in particular the "Old Film" effect is really cool! From the drop down list box you can select
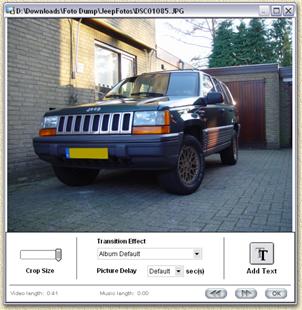
the effect you would like. On the right you will see a preview. When you're done selecting and setting the transition effect, simply click the "Import" button in the Generic Controls Area. Step 4: Advanced features - Adding Transition effects to an Image You can also add a transition effect to a single image. Personally I'm not in favor of mixing effects, but hey: it's great to have it anyhow :-) In the Album Content Area you can double click an image from which you wish to alter the transition effect. Double clicking the image will show something like this in a new window:
Here we see some great settings we can apply to a single image. To start with what we came here for: the Transition Effect. This specifies the transition between this image and the next image in the album. You can also adjust the playback time of an image (Picture Delay). Another great thing is that you can specify Crop Size, so you can determine which part of the image is being displayed in the VideoCD.
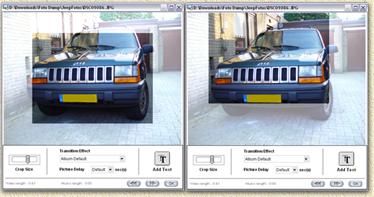
The Crop Size slider changes the visible area of a picture. As you can see in the first screen shot above, the invisible area is much lighter than the visible area (the square). When clicking the visible are with the left mouse button (and keeping the mouse button pressed) you can shift the visible area to a more suitable place. When clicking the "Add Text
button" (
The text controls are explained in the table below:
Step 5: Advanced features - Add music/sound So after adding images, albums, effects and maybe even text, we now come to the option to add music. This is optional! So you don't need to add sound. It does however cheer up the entire slide show! In order to add music, first click the "Music" button in the Generic Controls Area. Now the File Area again changes. An empty list appears. Use the Add button
( The music you add here will be applied to the current album. Music can be played with the play button
( After doing all this work, it would be nice to have a nice navigation menu. Let's create one. Click the "Disc Menu" button from the Generic Controls Area. This time not only the File Area but also the Album Content Area changes. Compared to version 1.30 the menu options are strongly improved and offers great flexibility.
The File Area changed. Here we can select a predefined menu template. You can select our own background image if you want to (click "Browse" to use a different image, or click "Default" to use the default menu background for the template). We can also add some music to the menu (either select "none" or click the "Browse" button next to the "Menu Music" field to select a file). In the Album Content Area, we now see a preview of the menu. Using the arrow buttons (left and right) you can select the menu page you want to edit (each menu page can be edited individually - changes will reflect in all menu pages!). Clicking the "Edit" button, you can customize the menu view to your needs.
In this window you can move the menu thumbnails and the menu arrows. You can also edit the album numbers and album text layout (font etc.). As we have seen in Adding Effect to individual picture, we can here also use the "Add Text" button to add text to the menu page. Before you continue with the next step, it's a very good idea to preview the VideoCD. Note: if your PC is too slow, it might not be able to keep up and show some minor glitches - don't worry, it won't show in the final VideoCD. Click the purple "Preview" button in the Generic Controls Area to activate preview.
The controls on the right represent the remote control of a DVD player. Click the number of the menu and press the play button. OK, so our compilation has been completed, now it's time to burn the (Super) VideoCD. Click the "Burn CD" button in the Generic Controls Area. Again File Area and Album Content Area change:
In the section "Video Option" you
can select the video system format (see Video
Formats for details): PAL or NTSC. The "Burn Settings" allows you to select
the CD-writer and the writing speed. In the lower part of the screen you can either select to just "Generate new video" file, "Generate new video and burn into CD" will do the same and after finishing the video fie will also brun it to CD. The option "Burn existing video into CD" burns a video file you have created previously. Commonly one selects "Generate new Video and burn into CD" - this will generate the required files and burn it on CD. In the "Save to, then burn from video file:" field, you can enter the path and filename where your VideoCD image should be stored. This is useful when you want to burn multiple copies of a VideoCD. Click "Set" to browse for a new location - make sure there is at least 800 Mb of disk space available on the disk you selected! Once you have set and done this all, you still might want to verify if you checked "Store original pictures" and see if the size indicator is not exceeding the limits of what might fit on a CD. After that click "Start". A dialog will show the progress on generating the video. This might take some time, depending on the speed of your PC, the selected filters etc. After that the burning process is started. When the VideoCD is done you will see this popup:
So that's basically it. I recommend playing a bit with the effects and such. Working with PictureToTV sure was fun to me! |
||||||||||||||||||||||||||||||||||||||||||||||||||||||||||||||||||||||||||||


 ),
the text options appear.
),
the text options appear.