|

| Print this page - use Landscape |
Search the WeetHet Pages |
||||
| WeetHet is being updated! - Current articles will slowly move to www.tweaking4all.com For excellent webhosting that is reliable and affordable, we highly recommend: LiquidWeb |
|||||
|
On this page ...
Overview ...
Where to get DVD2SVCD and How to install it First we will need a copy of DVD2SVCD, you can download it at the DVD2SVCD Website. Tip: If you're new to DVD2SVCD, then choose the BUNDLE version. After downloading the archive, unzip it, using WinRAR or WinZip, in a folder. Double click the setup file (EXE-file, this icon: A Window will appear;
Click "Yes". The next upcoming window is a welcom message, click "Next" to continue. Now a file dialog will apear asking you where to install
DVD2SVCD.
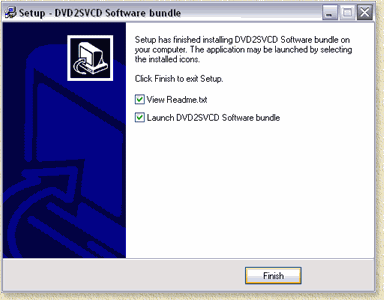
Click "Next" to continue. The now appearing dialog asks what program group it should use/create for you Windows start-menu. Simply click "Next" to continue. The next dialog would like you to check if you want a shortcut on your desktop (recommended) and/or your QuickLaunch bar (not recommended). The Quicklaunch bar is the small collection of icons directly next to your Windows START button - if active. Check your selection and click "Next". Finally a dialog appears showing you a summary of your selections. Click "Install" to start the installation. The final window informs you that the installation has been completed and you can check if you want to see the README file (latest changes, problems etc), and if you want to start DVD2SVCD. Uncheck both unless you wish otherwise, and click "Finish".
When you start DVD2SVCD for the first time (either by double cliking the desktop shortcut, the shortcut in the Windows START men or because you check "Launch DVD2SVCD Software bundle" during setup), you will get a notification:
It suggest to use the default settings when running the first time rip. It also informs you that ASPI drivers are needed (you can find them on the WeetHet download page) and that either Cinema Craft Encoder or TMPGEnc is needed. The full text for refence:
To keep this page as complete as needed, I will walk through all possible settings to see what they mean and if they need modified. Click "OK" to continue.
Due to the huge amount of possibilties, DVD2SVCD might appear a bit chaotic. Don't get scared now :-) I'll try to guide you though the screens. Note: Since DVD2SVCD is freeware, you do not need to pay anything for it's use. However, if you like DVD2SVCD a small donation is recommended to keep development going! Before we start, you must realize that DVD2SVCD combines multiple programs together using the DVD2SVCD frontend:
The program comes as a complete package containing and
isnatlling all the free software packages needed. Setting the ENCODER First we will need to set the proper encoder. Install either Cinema Craft Encoder or TMPGEnc. Now click the "Encoder" tab, which will display either of these two screenshots (depends if "TMPGEnc" or "Cinema Craft Encoder" is selected);
First step, select the encoder you wish to use. I'll start with Cinema Craft Encoder.
Click the browse button, right on the field called
"Cinema Craft Encoder 2.5" ( The next field, "Save in Folder", allows you to set the directory where the ripped file should be stored. Make sure this harddisk has plenty of space left for storing a movie! I usually use a D: drive just for that purpose.
|
|||||

 ).
).