|

| Print this page - use Landscape |
Search the WeetHet Pages |
|||||||||||||||||||||||||||||||||
| WeetHet is being updated! - Current articles will slowly move to www.tweaking4all.com For excellent webhosting that is reliable and affordable, we highly recommend: LiquidWeb |
||||||||||||||||||||||||||||||||||
|
On this page ...
Putting the new disk into the TiVo Now we're ready for our first run. Remove the TiVo disk from your PC, and install it into
the TiVo (look at the pictures where I show you how to get the disk out). Tip: this might also be a good time to clean the fan of your TiVo. Just like with PC's these fans suck in a lot of dust. After putting the disk into the TiVo, make sure that:
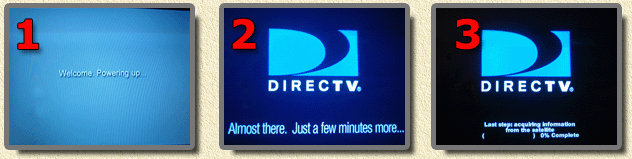
If you're sure about this, then connect the dish cables, the audio/video cables, and your USB ethernet adapter (hooked up to the network). Make sure your TV is ON and on the right channel! Again, even for DirecTiVo's: DO NOT CONNECT THE PHONELINE! I recommend doing a double check here. The TiVo will start showing the following screens:
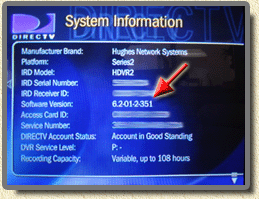
After screen 3 my TiVo rebooted, but then restarted just fine. Once the system started, you can go to the system information page and see the version your system is running (6.2).
Note: it can take up to 2 days before your TiVo has all the Guide info up to date again. Also check, incase you have one connected, if your
USB ethernet adapter is active.
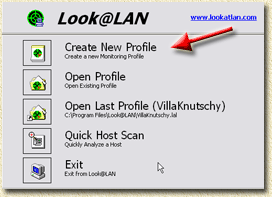
With a tool like Look@LAN (see the links page for the link where to download this tool for free) you can now scan your network and see what the IP address of the TiVo is. Download Look2LAN (either from the official website or from our downloads page) and install it. Once Look@LAN started, we will need to create a profile:
Click the "Create New Profile" button.
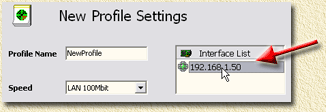
The upcoming window shows a list of available network adapters on your computer (Interface List). Any way; select the IP address and click "Next". Look@LAN will start scanning your network right away. Give it a bit of time to find all network connected devices.
Now click the "Hide" button:
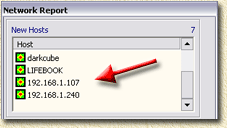
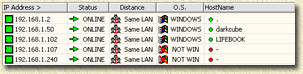
We now see a list of IP-addresses Look@LAN found on your network. Any device with a "name" in "HostName" is NOT your TiVo either. In this example this leaves us with: 192.168.1.2, 192.168.1.107, and 192.168.1.240. There are more tricks in the book to eliminate IP-Addresses, for example: I know my router is 192.168.1.2 (Default gateway in your network settings). But since we have only these left, we can simply start trying them. Enter the IP-Address you wish to try (assuming you have only one hacked TiVo in your network) in the Address-bar of your favorite browser;
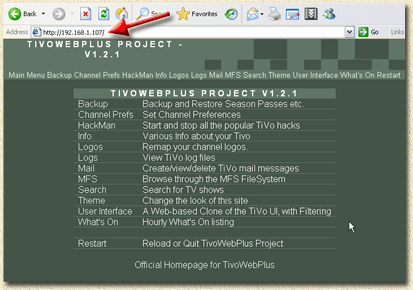
When a webpage appears called "TIVOWEBPLUS PROJECT" then you have found your TiVo (PTVnet installed TiVoWebPlus remember!?). Keep trying until you find your TiVo. For those who want to hack multiple TiVo's: do one at a time, so in the next run you already know what the IP-Address of the other TiVo is.
|
||||||||||||||||||||||||||||||||||