|

| Print this page - use Landscape |
Search the WeetHet Pages |
|||
| WeetHet is being updated! - Current articles will slowly move to www.tweaking4all.com For excellent webhosting that is reliable and affordable, we highly recommend: LiquidWeb |
||||
|
On this page...
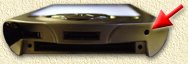
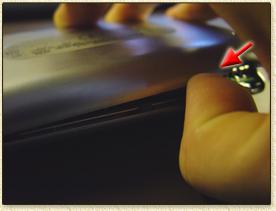
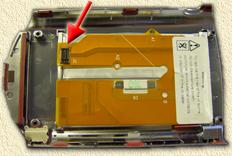
Is it the battery? This is actually a pretty good question! My iPAQ didn't work in the craddle either. Using only the powersupply didn't do any good either. So why doesn't the iPAQ just start? It has power doesn't it? So this can't be the battery ... right? Well, could be true, but did you try to hard reset the iPAQ? This is done pretty easy.
Use the stylus and gently push the resetbutton (indicated with the red arrow in the image above). You might need to push the power on button - but usually the iPAQ now starts ... in that case: your iPAQ is not dead, but it's battery is ... (might need to try it more than once). Remove the powersupply from the iPAQ and you'll see that it switches off within a few seconds - typical signs of a dead battery. Recharging might work, but usually doesn't ... I suggest you try it first before spending time and money in something that isn't broken. I tried to recharge my iPAQ for 24 hours ... and the result remained the same. Removing the powersupply = dead within a few seconds. If the text above doesn't apply to your situation the your problem might still be the battery, but I can guarantee that. Solution? The solution is pretty simple: replace the battery.
So where can I get a new battery?
The enhanced battery is pretty cool, but somehow I really don't feel the need to spend $140 on a battery - it's a better battery (2100 mAh) than the original from Compaq (950 mAh) and seems to last 2 to 3 times longer. Several shops sell this battery, for example the German Wolfsoft, the German Fawis, iPAQupgrade.com, and last of all PocketPCTechs. There are more companies out there selling this stuff ... If you plan to go for the enchanced battery, then please consider visiting either of these companies as mounting this battery is maybe not as easy as replacing it with an original part. So I did the eBay thingy, saved me a bundle since I could by my new battery for $45 - an original 950 mAh. Replacing the battery So you decided to read on. OK, we now ordered our battery
and received it most likely by mail.
STEP 1: Prepare the iPAQ Several things need to be cleared before we can start:
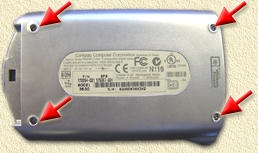
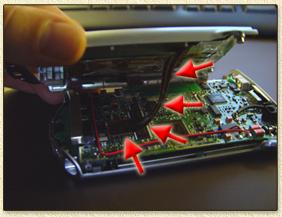
STEP 2: Remove the screws. Now remove the screws indicated with the red arrows in the image below. I requires a special screwdriver (torex?), but I got lucky with one of those el-cheapo screwdriver sets (those miniature sets as seen for a dollar or two). When removing the screws keep in mind:
It takes only four (4) screws to open the iPAQ. Taking the frontside and backside a part is not that easy. STEP 3: Open the iPAQ This is not easy. Keep in mind to remain calm
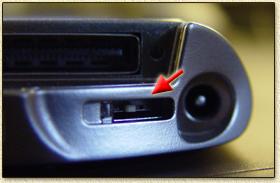
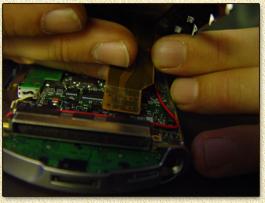
and gentle with the iPAQ - it's all plastic and might break! CAUTION! In my experience the iPAQ is best opened by gently pushing your finger nail between front- and backside, as show in the picture below. Do this for bot sides. The iPAQ will not fully open when doing so.
Onces both sides are loose, gently lift the backside, starting at the top of the iPAQ (at the bottom, two little hooks prevent you from doing so on that side):
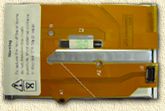
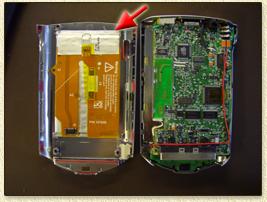
If you take a good look, just between the back and the rest of the iPAQ, you will notice a little "flat" cable between the backside (actually - the battery) and the frontside (ehm, the mainboard of the iPAQ):
Gently remove the "flat" cable from the mainboard. You can now safely put the backside next to the frontside:
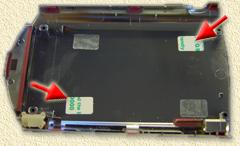
In the backside, you will see the brownish thingy - the battery (indicated with the red arrow in the image above). STEP 4: Removing the old battery Gently "peel" the battery from the backside. It's stuck there beacuse Compaq did put some double sided tape between the backside and the battery. Do not use sharp tools! Bending the old battery is not advisable, but I don't think it will harm as it is dead anyway. Just try to avoid that the battery package opens. After removing the battery you will see this:
As you can see, Compaq conveniantly used only two of the 4 pieces of tape. The onces indicated with the red arrows still have their protective cover on it. Peel these of, so we can use then. If you're not THAT lucky, then just hope that the old onces still stick or replace it with new onces. STEP 5: Placing the new battery Gently put the new battery in place, and check if it sticks... please not the orientation (I did it wrong the first time, so maybe you won't have to):
The red arrow indicates the connector for the battery of the iPAQ to it's mainboard. This should be pointing to the bottom on the iPAQ as shown above. Now it's time to reconnect the battery to the mainboard. This takes a bit of patience ...
Gently put the connector on the connector on the mainboard. Do NOT use FORCE! With some patience it will slide into place. STEP 6: Closing the iPAQ again OK, before you close the iPAQ, maybe you want to check if the button for sound reocrding and the button for ejecting the styles are properly in place. Gently click the backside onto the frontside. Don't forget to check the two little pins at the bottom of the iPAQ as these seem to be unwilling to close without a bit of help. Insert the 4 screws and tighten them - do not use to much force here! STEP 7: Charging OK, this is the final step. Undo the "Power Off" switch, by moving it to the right again (see Step 1!). Next put the iPAQ back on it's craddle so it can start charging. After a few minutes see if the battery holds (I did diner during this charging, so ...) and that's it ... p.s. as you might already know, the battery indicator in the iPAQ takes a few seconds to determine how full it is, so don't be alarmend when it shows "unknown"!
Happy iPAQ-in! |
||||