|

| Print this page - use Landscape |
Search the WeetHet Pages |
||||||||||||||||||||||||||||||||||
| WeetHet is being updated! - Current articles will slowly move to www.tweaking4all.com For excellent webhosting that is reliable and affordable, we highly recommend: LiquidWeb |
|||||||||||||||||||||||||||||||||||
|
On this page ...
Page overview
This guide is good to start working with the combination of Europe Online and the Harmonic Cyberstream DVB card, even in combination with SuperWeb ! The very positive side of this card is that it's cheap and simple to use.
The now following text is based on my own experiences and the experiences of others. I can't guarantee that this is the best, fool proof method of installing. By my knowledge however, this is a very easy and good working method.
Requirements:
NOTE: the Harmonic Cyberstream does not support TV. Note: Setup on these pages are based on Windows 9x and will work in a similar fashion on other Windows versions (if a driver is available). Short briefing for the impatient & Step by Step guide The tabel below you can be used in two ways: 1. For the impatient (like me) 2. For the less experienced Where I refer to either "Harmonic" or "Cyberstream" you should read "Harmonic Cyberstream SAT1".
Shutdown your computer, if you have not done so yet. Remove the power-cord. Remove the screw and finally remove the "hood" of the PC-case. !!! DO NOT SWITCH YOUR COMPUTER ON UNTIL STEP 7 !!!
This is not to hard to find since most manufacturers
use these color codes to identifcy the slots:
Check, just to be sure, that the card is inserted correctly
and not like often happens slightly tilted or not pressed far enough into
the slot (the golden contacts on the bottom of the card, should not be
visible).
The centre pin of the connector used is simply the same wire used inside the antenna-cable and therefor not very strong. Be gentle! Fortunatly the connector is located very good, so connecting
this will not be a problem. Note: whenever you disconnect or
connect the antenna-cable: MAKE SURE THE POWER IS OFF !
Do not power your computer yet !
After connecting all cables (including the powercord) you can switch your computer on so it will boot.
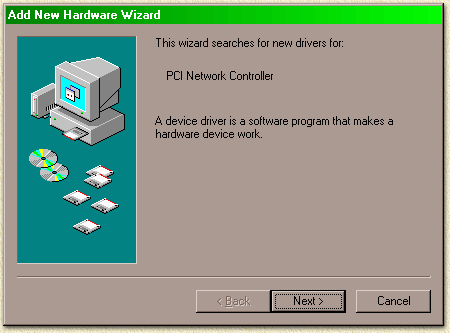
As soon as Windows (Windows 95, 98, 98SE, ME, 2000) starts, it will come up with a notification that it found a PCI device (the DVB-card). The next pictures illustrate this, using Windows 98 SE (Second Edition). Other Windows version will show similar dialogs with the exception of Windows NT. Note: Windows 95 (release 1) does not support more than 2 network cards. So if you have the Harmonic, a dialup adapter AND a regular ethernet adapter, then you MUST display the ethernet adapter in the device manager. My suggestion here: UPGRADE to Windows 98/98SE/ME ! Note: This setup is Windows 9x based, other Windows versions might work in a similar fashion. Note 2: WinSock 2.0 is required to get things up and running and Windows 95 does not include WinSock 2.0. Download the WinSock 2.0 update by Microsoft here.
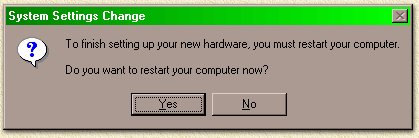
Select "Next". Check "Search for the best driver for you device" and select "Next". If you plan to use the driver on the CD-Rom, check "CD-ROM", if you plan to use a newly downloaded driver, check "Specify Location". So you can select either the CDRom or the downloaded driver as a driver source. Check out the drivers page if you want to get the latest version. Select "Next". Windows will display a message that it found the Harmonic card. Select "Next". Windows will now inform you that it used the drivers and installed the card. This last dialog indicates that Windows finished the installation of the driver. Select "Finish" to complete. Windows will ask you to reboot, please do so or you PC might "freeze" (thrust me: I did this) !
After the reboot, the Harmonic Cyberstream installation procedure will start for additional software tools. Just confirm all questions with a click on the "Next" button. When the "Finish" button appears, it will ask you to reboot once more. You MUST reboot otherwise you will get an error-message. Note: you might get an "unsupported browser" error. Don't worry we'll fix that automatically.
In this step we will start checking all settings to make sure it all works. In the systray (there where Windows put's the little
clock - in the lower right part of the screen) you will see the signal
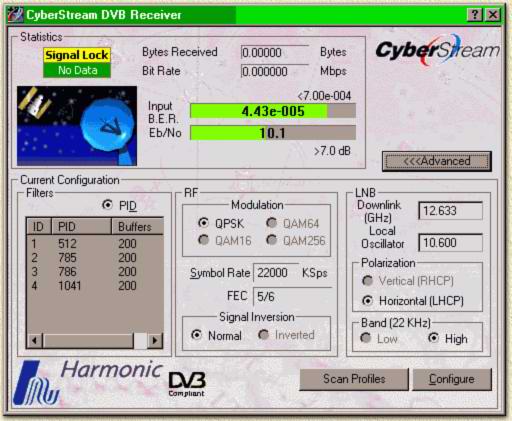
indicator of Harmonic ( RED means BAD SIGNAL, When double clicking the indicator, the signal and settingspanel will appear;
Here you can do your transponder/Astra settings using the values shown on the transponder page. To get the view shown above click the "Advanced" button. To configure a different transponder click the "Configure" button. The value fields can now be altered. The screenshot above this text might be different from what you are seeing on your screen. If this is the case, then please use the right mouse button to click on the Cyberstream application. A popup-menu will appear where you can select (amongst others): "Display downlink" and "View Decimal". Please do so in order to match the screenshot. PID's can be added manually by clicking with the right mouse button on the PID table. The upcoming popup-menu allows you to select the option "Add PID". Make sure you entire the right value here (check if this should be heximal or decimal numbers). Do not alter the "Buffer" value, it's set just right by default. Note that most settings might have to set differently if you want to use a different transponder. First try using the default settings (transponder 113). Once you have found a good setting, for example
for transponder 113, then consider using profiles. A profile stores the settings of a specific transponder offering you more comfort when switching transponders. You can save a profile by clicking the systray indicator (that is the colored M&M in the lower right corner of your monitor indicating the signal status) with the right mouse button. Choose "Save Profile". In upcoming window click "Save". A file save dialog will now appear and will ask you for an appropriate file name, for example "EON113.INI". Repeat these steps for the other transponders (114, 115 en de 103). Using "Load Profile", found in the same menu where you found "Save Profile", you can retrieve transponder settings, saving you a lot of work and patience.
So, now we're almost ready for our first INTERNET Test-drive, but first we need to do the proper settings for the Internet Explorer. Note: similar settings are required for
Netscape, Opera, etc. NetCaptor however uses the Internet Explorer settings.
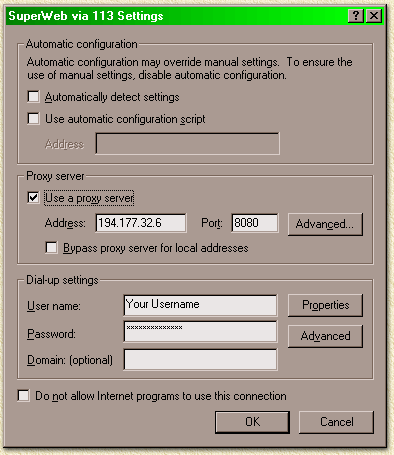
In the pictures above this text you will notice that I have 3 dialup-adapters in use. Take a look at the Dialup-page for more information and tips. I use 3 dialup-adapters so switching between transponders is easier. Select the dialup-adapter you want to use for Internet by Satellite and select "Settings".
Make sure "Use a proxy server" is checked. Enter the proxy server's IP-address at the "Address" field. This should be the proxy that goes with the transponder you would like to use (take a look at the transponder page). For the transponder 113 the (new!) IP-address should be 194.177.32.11 (in picture above the old ip-address is mentioned). Next step is to enter the proper "Port"
number (8080). Here you can also enter the username and password
for the dialup adpater at the fields "User name" and
"Password". Select "OK" and repeat these steps for each individual Dialup-adapter. If you experience problems mind you to change the same settings for "LAN Settings" as well. When finished, close the window by selecting "OK". Starting your first session
That's it ! Now you can surf by Satellite ...
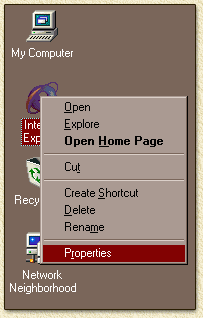
For you to able to use the Fazzt offline download system, you MUST change the default IP-address of the Harmonic card. Let's check some settings for this card by clicking with the right mouse button on the "Network Neighborhood" icon on the Windows desktop and select the option "Properties". Look for the "TCP/IP -> Harmonic DVB Network Adapter" and click it once with the left mouse button. Now select "Properties". The dialog that appears will show you the TCP/IP settings
for the Harmonic card. Note that default it is set to "10.10.10.10".
Change this to these numbers: After changing the IP-address and Subnet Mask, select
"OK" and "OK" again. |
|||||||||||||||||||||||||||||||||||