|

| Print this page - use Landscape |
Search the WeetHet Pages |
|||||||||||||||||||||||||
| WeetHet is being updated! - Current articles will slowly move to www.tweaking4all.com For excellent webhosting that is reliable and affordable, we highly recommend: LiquidWeb |
||||||||||||||||||||||||||
|
On this page ...
Overview
Surface Basically a Compact Disc is nothing more than a plastic (polycarbonate) disc with several layers. The diameter of a CD is about 12 centimeters and is about 1,2 millimeter thin. If we look at a CD from the side, for example using a microscope, we will see something similar to this picture:
You can store an awfull lot of data on a CD. But why are we talking about "data"? Most CD's hold music isn't it, that's not the same, right? Well, information on a CD can only be stored in a digital form, even music must be converted to digital information a.k.a. DATA. Conversion is explained briefly on the Recording Sound and Sound Playback part of this page. But one thing you now know: information must be digital in order to store it on a CD. To be precise: a lot of 1's and 0's. Now you maybe can imagine what the pits (F) and bumps (E) are used for in the previous drawing. Track A different feature of a CD is the so called Track (helix) on the disc. Basically this is the track followed by the laser and it's sensor. This works similar as the good old record-player, the needle moves through a groove (the track) until the end of the groove has been reached.
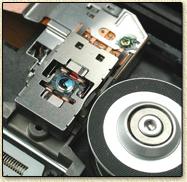
This track or helix, can be up to 5 kilometers in length. In the above picture I simplified this, in reallity the density is much higher. Spin-speed The combination of laser and sensor, the "head" (see picture below), moves from the centre of the CD to the outside of the CD.
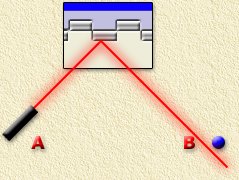
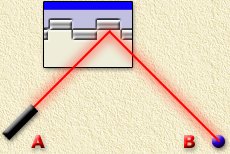
In case the CD would spin at a constant speed, the laser would come into trouble. The amount of passing pits and bumps is much greater at the outside of a CD compared to the centre of the CD. To get things working properly, the so called bitrate (the amount of passing bumps and pits) must be constant. To achief this, the spin-speed of a disc changes as the head moves close to the outer side of a CD. You can compare this with running in circles. Say you have to run a circle with a particular diameter within a give time. Now try this onces more with a circle with a much larger diameter. You will notice that you must run much faster in the larger circle in order to complete the circle in the same amount of time. Basically the distance for the circle with the larger diameter is much longer, you're passing more yards. The same goes for a CD. Reading A CD uses a laser, which is basically a concentrated bundle of light. One of the features of light is that it travels straight forward. Light can also be reflected, for example using a mirror. One of the rules in physics here is that, light that has been reflected, uses the same angle for both incoming and outgoing light. So, if a laser is aimed on a mirror under an angle of 45 degrees, it's reflecting will be 45 degrees as well in the opposite direction:
In the left image above, we see that the laser (A), reflects (Image 1) on the bump. The reflected laser light however does not seem to reach the sensor (B). Your CD-player interprets this as a logical ZERO. In the second image we see a reflection on a pit (Image 2). Here we see that the reflected laser light DOES reach the sensor (B). This is being interpreted by your CD-player as a logical ONE. But what's the use of 1-s and 0-s? Even worse: where the h*ll did we get these zero's and one's? Recording sound: Analog to Digital Sound is analog, which means, there are an unlimited number of values (sounds) between two (any) given values (sounds). try for example to wisthle twice the exact same tone, there is no way you can achive this. So how do we convert analog to digital? Well, there are so called AD chips out there, Analog to Digital converter chips. Basically this chips tries to measure the current value. In the picture below things might become clear. The red line is the analog sound moving in time from left to right. Blue is the measured value by the AD.
You probably are not aware of this, but you probably have one or more AD chips in your home right now. The can be found in mobile phones (CDMA, GSM, etc are digital), in ISDN phones and in your PC (your soundcard has one).
Now we have digital data for our CD ... or our computer. Well, that is,.. ehm, aren't we supposed to have only zeros and ones? That's true! However, a group of ones and zero (bits) can be combined to a byte of word representing a value. For a CD we use groeps of 16 bits to represent a value. 16 positions that can be a 1 or a 0. This means that we have a value range, per 16 bits, from 0 to 65535. Where 0 = 0000 0000 0000 0000 en 65535 = 1111 1111 1111 1111. In order to get a good quality sound, we need to have the AD measure the analog value at a rate of 44100 Hertz (Hz) meaning 44.100 times per second. At playback, the human ear will not be able to notice the digital "stairs' as seen in the image above. Sound Playback: Digital to Analog Now we have the digital data, stored on a CD in bumps and pits. How can we play this back so we can actually hear the original music? For that purpose we have a so called DA chips, Digital to Analog converters. The digital information detected by the CD-player's laser-sensor combination is being directed to the DA which converts it to an anlog signal ready for use by your amplifier in your home stereo-set.
Naturally, the result created by the conversion analog to digital to analog leaves some traces but won't affect the sound as muchas you'd expect it to do, because of
Don't forget however: Once converted you will not be able to retrieve the original sound for a full 100% - but then again you will not be able to notice the difference.
|
||||||||||||||||||||||||||