| Print this page - use Landscape |
Search the WeetHet Pages |
|||||||||||||||||||||||
| WeetHet is being updated! - Current articles will slowly move to www.tweaking4all.com For excellent webhosting that is reliable and affordable, we highly recommend: LiquidWeb |
||||||||||||||||||||||||
|
On this page ...
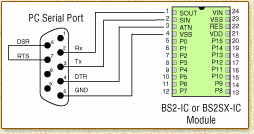
Connecting the Basic Stamp to your PC Step one in the programming process is to get connected with your Basic Stamp. The Basic Stamp 1 series used the parallel-port (or printerport) of your PC. Just for reference, I added the wireing on the bottom of this page. The newer Basic Stamp 2 work just fine with the serialport or com-port of your PC. The scematics can also be found on the original Parallax website. CAUTION: Basic Stamp 2 - The Serialport The OEM Basic Stamp 2 kit has already a serialport connector mounted (D-Sub 9) which can be connected to your PC using a regular serial cable (not a null-modem cable!). The "chip" kits do not have such a connector and are te be connected as such:
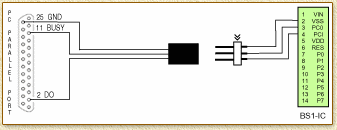
Required programming software The BASIC Stamp is programmed with a DOS (All models) or Windows 95/98/ME/NT4.0/2000 (BASIC Stamp II series) editor. Programs can be created and be downloaded to the BASIC Stamp from within the editor. The software can be found on the CD-Rom or for free download from the Parallax website. The Windows version (StampW v1.3) can be downloaded here as well. Note: code once stored on the Basic Stamp CANNOT be retrieved back from the Basic Stamp! So ALWAYS save the original source code on disk ! When the download is complete the program can be started from ANY location on your harddisk - just unzip it first using WinRar or WinZip. The double click the file called "BASIC Stamp Editor v1.3.msi" and all required software will be installed. Once you entered code and select the 'Run' option, the editor will check your program syntax, download it (if syntax is OK) to the Basic Stamp and execute it. An additional feature of the editor is the "debug" Window. Feedback from your Basic Stamp program (using the "debug" command) will automatically be display in this window. This debug information can also be captured using a regular terminal program, but why bother. The Basic Stamp 2 editor is almost perfect. For reference only: Basic Stamp 1 - The Printerport Keep in mind that this is for the Basic Stamp 1 kits
ONLY and only here for reference purposes!
|
||||||||||||||||||||||||


